Chapter 4: The core
The core
Command line options
It is possible to skip the GUI and start web2py directly from the command line by typing something like:
python web2py.py -a 'your password' -i 127.0.0.1 -p 8000
When web2py starts, it creates a file called "parameters_8000.py" where it stores the hashed password. If you use "<ask>" as the password, web2py prompts you for it.
For additional security, you can start web2py with:
python web2py.py -a '<recycle>' -i 127.0.0.1 -p 8000
In this case web2py reuses the previously stored hashed password. If no password is provided, or if the "parameters_8000.py" file is deleted, the web-based administrative interface is disabled.
On some Unix/Linux systems, if the password is
<pam_user:some_user>
web2py uses the PAM password of the Operating System account of some_user to authenticate the administrator, unless blocked by the PAM configuration.
web2py normally runs with CPython (the C implementation of the Python interpreter created by Guido van Rossum), but it can also run with PyPy and Jython. The latter possibility allows the use of web2py in the context of a Java EE infrastructure. To use Jython, simply replace "python web2py.py ..." with "jython web2py.py ...".
The "web2py.py" script can take many command-line arguments specifying the maximum number of threads, enabling of SSL, etc. For a complete list type:
>>> python web2py.py -h
Usage: python web2py.py

web2py Web Framework startup script. ATTENTION: unless a password
is specified (-a 'passwd'), web2py will attempt to run a GUI.
In this case command line options are ignored.

Options:
  --version             show program's version number and exit
  -h, --help            show this help message and exit
  -i IP, --ip=IP        IP address of the server (e.g., 127.0.0.1 or ::1);
                        Note: This value is ignored when using the
                        'interfaces' option.
  -p PORT, --port=PORT  port of server (8000)
  -a PASSWORD, --password=PASSWORD
                        password to be used for administration (use -a
                        "<recycle>" to reuse the last password))
  -c SSL_CERTIFICATE, --ssl_certificate=SSL_CERTIFICATE
                        file that contains ssl certificate
  -k SSL_PRIVATE_KEY, --ssl_private_key=SSL_PRIVATE_KEY
                        file that contains ssl private key
  --ca-cert=SSL_CA_CERTIFICATE
                        Use this file containing the CA certificate to
                        validate X509 certificates from clients
  -d PID_FILENAME, --pid_filename=PID_FILENAME
                        file to store the pid of the server
  -l LOG_FILENAME, --log_filename=LOG_FILENAME
                        file to log connections
  -n NUMTHREADS, --numthreads=NUMTHREADS
                        number of threads (deprecated)
  --minthreads=MINTHREADS
                        minimum number of server threads
  --maxthreads=MAXTHREADS
                        maximum number of server threads
  -s SERVER_NAME, --server_name=SERVER_NAME
                        server name for the web server
  -q REQUEST_QUEUE_SIZE, --request_queue_size=REQUEST_QUEUE_SIZE
                        max number of queued requests when server unavailable
  -o TIMEOUT, --timeout=TIMEOUT
                        timeout for individual request (10 seconds)
  -z SHUTDOWN_TIMEOUT, --shutdown_timeout=SHUTDOWN_TIMEOUT
                        timeout on shutdown of server (5 seconds)
  --socket-timeout=SOCKET_TIMEOUT
                        timeout for socket (5 second)
  -f FOLDER, --folder=FOLDER
                        location of the applications folder (also known as directory)
  -v, --verbose         increase --test verbosity
  -Q, --quiet           disable all output
  -D DEBUGLEVEL, --debug=DEBUGLEVEL
                        set debug output level (0-100, 0 means all, 100 means
                        none; default is 30)
  -S APPNAME, --shell=APPNAME
                        run web2py in interactive shell or IPython (if
                        installed) with specified appname (if app does not
                        exist it will be created). APPNAME like a/c/f (c,f
                        optional)
  -B, --bpython         run web2py in interactive shell or bpython (if
                        installed) with specified appname (if app does not
                        exist it will be created). Use combined with --shell
  -P, --plain           only use plain python shell; should be used with
                        --shell option
  -M, --import_models   auto import model files; default is False; should be
                        used with --shell option
  -R PYTHON_FILE, --run=PYTHON_FILE
                        run PYTHON_FILE in web2py environment; should be used
                        with --shell option
  -K SCHEDULER, --scheduler=SCHEDULER
                        run scheduled tasks for the specified apps: expects a
                        list of app names as -K app1,app2,app3 or a list of
                        app:groups as -K app1:group1:group2,app2:group1 to
                        override specific group_names. (only strings, no
                        spaces allowed. Requires a scheduler defined in the
                        models
  -X, --with-scheduler  run schedulers alongside webserver
  -T TEST_PATH, --test=TEST_PATH
                        run doctests in web2py environment; TEST_PATH like
                        a/c/f (c,f optional)
  -C, --cron            trigger a cron run manually; usually invoked from a
                        system crontab
  --softcron            triggers the use of softcron
  -Y, --run-cron        start the background cron process
  -J, --cronjob         identify cron-initiated command
  -L CONFIG, --config=CONFIG
                        config file
  -F PROFILER_DIR, --profiler=PROFILER_DIR
                        profiler dir
  -t, --taskbar         use web2py gui and run in taskbar (system tray)
  --nogui               text-only, no GUI
  -A ARGS, --args=ARGS  should be followed by a list of arguments to be passed
                        to script, to be used with -S, -A must be the last
                        option
  --no-banner           Do not print header banner
  --interfaces=INTERFACES
                        listen on multiple addresses: "ip1:port1:key1:cert1:ca
                        _cert1;ip2:port2:key2:cert2:ca_cert2;..."
                        (:key:cert:ca_cert optional; no spaces; IPv6 addresses
                        must be in square [] brackets)
  --run_system_tests    runs web2py tests
Please note:
- The option
-W, used to install a Windows service, has been removed. Please seenssmin Chapter 13.- Profiler output can be analyzed using
runsnakeruntool.
Lower-case options are used to configure the web server. The -L option tells web2py to read configuration options from a file, while -S, -P and -M options start an interactive Python shell. The -T option finds and runs controller doctests in a web2py execution environment. For example, the following example runs doctests from all controllers in the "welcome" application:
python web2py.py -vT welcome
Workflow
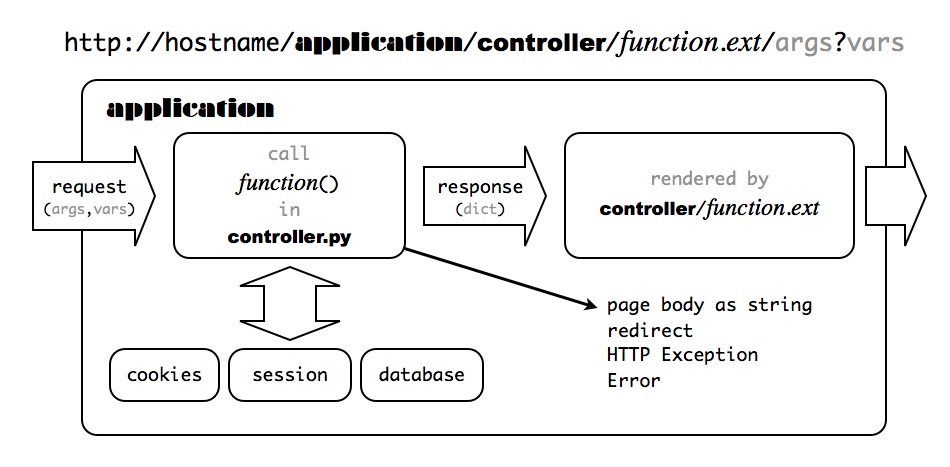
The web2py workflow is the following:
- An HTTP requests arrives to the web server (the built-in Rocket server or a different server connected to web2py via WSGI or another adapter). The web server handles each request in its own thread, in parallel.
- The HTTP request header is parsed and passed to the dispatcher (explained later in this chapter in Dispatching section).
- The dispatcher decides which of the installed application will handle the request and maps the PATH_INFO in the URL into a function call. Each URL corresponds to one function call.
- Requests for files in the static folder are handled directly, and large files are automatically streamed to the client.
- Requests for anything but a static file are mapped into an action (i.e. a function in a controller file, in the requested application).
- Before calling the action, a few things happen: if the request header contains a session cookie for the app, the session object is retrieved; if not, a session id is created (but the session file is not saved until later); an execution environment for the request is created; models are executed in this environment.
- Finally the controller action is executed in the pre-built environment.
- If the action returns a string, this is returned to the client (or if the action returns a web2py HTML helper object, it is serialized and returned to the client).
- If the action returns an iterable, this is used to loop and stream the data to the client.
- If the action returns a dictionary, web2py tries to locate a view to render the dictionary. The view must have the same name as the action (unless specified otherwise) and the same extension as the requested page (defaults to .html); on failure, web2py may pick up a generic view (if available and if enabled). The view sees every variable defined in the models as well as those in the dictionary returned by the action, but does not see global variables defined in the controller.
- The entire user code is executed in a single database transaction unless specified otherwise.
- If the user code succeeds, the transaction is committed.
- If the user code fails, the traceback is stored in a ticket, and a ticket ID is issued to the client. Only the system administrator can search and read the tracebacks in tickets.
There are some caveats to keep in mind:
- Models in the same folder/subfolder are executed in alphabetical order.
- Any variable defined in a model will be visible to other models following alphabetically, to the controllers, and to the views.
Conditional models
- Models in subfolders are executed conditionally based on the controller in use. This avoids processing all table definitions at each request. For example, if the user has requested "/a/c/f" where "a" is the application, "c" is the controller, and "f" is the function (action), then the following models are executed:
applications/a/models/*.py
applications/a/models/c/*.py
applications/a/models/c/f/*.py
response.models_to_run regex list, you can force the behaviour you want. Look at response for additional details.- The requested controller is executed and the requested function is called. This means all top-level code in the controller is also executed at every request for that controller.
- The view is only called if the action returns a dictionary.
- If a view is not found, web2py tries to use a generic view. By default, generic views are disabled, although the 'welcome' app includes a line in /models/db.py to enable them on localhost only. They can be enabled per extension type and per action (using
response.generic_patterns). In general, generic views are a development tool and typically should not be used in production. If you want some actions to use a generic view, list those actions inresponse.generic_patterns(discussed in more detail in the chapter on Services).
The possible behaviors of an action are the following:
Return a string:
def index():
    return 'data'
Return a dictionary for a view:
def index():
    return dict(key='value')
the list of all local variables in the action may be a convenient dictionary to use:
def index():
    return locals()
Redirect the user to another page:
def index():
    redirect(URL('other_action'))
Return an HTTP status code other than "200 OK":
def index():
    raise HTTP(404)
Return a helper
for example a FORM:
def index():
    return FORM(INPUT(_name='test'))
(this is mostly used for Ajax callbacks and components, see Chapter 12).
When an action returns a dictionary, it may contain code generated by helpers, including forms based on database tables or forms from a factory, for example:
def index():
    return dict(form=SQLFORM.factory(Field('name')).process())
(all forms generated by web2py use postbacks, see Chapter 3).
Helpers are also useful for downloading and streaming. For example the "download" action, defined in the scaffolding application, uses the response.download helper for downloading of uploaded files:
def download():
    return response.download(request, db)
look at response for additional details.
The response.stream helper method allows serving of arbitrary content:
def index():
    return response.stream('/tmp/foo.bar', request=request, attachment=True)
look at response for additional details.
Dispatching
web2py maps a URL of the form:
http://127.0.0.1:8000/a/c/f.html
to the function f() in controller "c.py" in application "a". If f is not present, web2py defaults to the index controller function. If c is not present, web2py defaults to the "default.py" controller, and if a is not present, web2py defaults to the init application. If there is no init application, web2py tries to run the welcome application. This is shown schematically in the image below:
By default, any new request also creates a new session. In addition, a session cookie is returned to the client browser to keep track of the session.
The extension .html is optional; .html is assumed as default. The extension determines the extension of the view that renders the output of the controller function f(). It allows the same content to be served in multiple formats (html, xml, json, rss, etc.).
Functions that take arguments or start with a double underscore are not publicly exposed and can only be called by other functions.
There is an exception made for URLs of the form:
http://127.0.0.1:8000/a/static/filename
There is no controller called "static". web2py interprets this as a request for the file called "filename" in the subfolder "static" of the application "a".
web2py also supports the IF_MODIFIED_SINCE protocol, and does not send the file if it is already stored in the browser's cache and if the file has not changed since that version.
When linking to an audio or video file in the static folder, if you want to force the browser to download the file instead of streaming the audio/video via a media player, add ?attachment to the URL. This tells web2py to set the Content-Disposition header of the HTTP response to "attachment". For example:
<a href="/app/static/my_audio_file.mp3?attachment">Download</a>
When the above link is clicked, the browser will prompt the user to download the MP3 file rather than immediately streaming the audio. (As discussed in response, you can also set HTTP response headers directly by assigning a dict of header names and their values to response.headers.)
http://127.0.0.1:8000/a/c/f.html/x/y/z?p=1&q=2
to function f in controller "c.py" in application a, and it stores the URL parameters in the request variable as follows:
request.args = ['x', 'y', 'z']
and:
request.vars = {'p': 1, 'q': 2}
and:
request.application = 'a'
request.controller = 'c'
request.function = 'f'
In the above example, both request.args[i] and request.args(i) can be used to retrieve the i-th element of the request.args, but while the former raises an exception if the list does not have such an index, the latter returns None in this case.
request.url
stores the full URL of the current request (not including GET variables).
request.ajax
defaults False but it is True if web2py determines that the action was called by an Ajax request.
If the request is an Ajax request and it is initiated by a web2py component, the name of the component can be found in:
request.cid
Components are discussed in more detail in Chapter 12.
request.env.request_method is set to "GET"; if it is a POST, request.env.request_method is set to "POST". URL query variables are stored in request.get_vars. request.post_vars contains all parameters passed into the body of a request (usually a POST, PUT or a DELETE one). The request.vars Storage dictionary contains both of them (get_vars and post_vars get merged)web2py stores WSGI and web2py environment variables in request.env, for example:
request.env.path_info = 'a/c/f'
and HTTP headers into environment variables, for example:
request.env.http_host = '127.0.0.1:8000'
Notice that web2py validates all URLs to prevent directory traversal attacks.
URLs are only allowed to contain alphanumeric characters, underscores, and slashes; the args may contain non-consecutive dots. Spaces are replaced by underscores before validation. If the URL syntax is invalid, web2py returns an HTTP 400 error message[http-w] [http-o] .
If the URL corresponds to a request for a static file, web2py simply reads and returns (streams) the requested file.
If the URL does not request a static file, web2py processes the request in the following order:
- Parses cookies.
- Creates an environment in which to execute the function.
- Initializes
request,response,cache. - Opens the existing
sessionor creates a new one. - Executes the models belonging to the requested application.
- Executes the requested controller action function.
- If the function returns a dictionary, executes the associated view.
- On success, commits all open transactions.
- Saves the session.
- Returns an HTTP response.
Notice that the controller and the view are executed in different copies of the same environment; therefore, the view does not see the controller, but it sees the models and it sees the variables returned by the controller action function.
If an exception (other than HTTP) is raised, web2py does the following:
- Stores the traceback in an error file and assigns a ticket number to it.
- Rolls back all open database transactions.
- Returns an error page reporting the ticket number.
If the exception is an HTTP exception, this is assumed to be the intended behavior (for example, an HTTP redirect), and all open database transactions are committed. The behavior after that is specified by the HTTP exception itself. The HTTP exception class is not a standard Python exception; it is defined by web2py.
Libraries
The web2py libraries are exposed to the user applications as global objects. For example (request, response, session, cache), classes (helpers, validators, DAL API), and functions (T and redirect).
These objects are defined in the following core files:
web2py.py
gluon/__init__.py    gluon/highlight.py   gluon/restricted.py  gluon/streamer.py
gluon/admin.py       gluon/html.py        gluon/rewrite.py     gluon/template.py
gluon/cache.py       gluon/http.py        gluon/rocket.py      gluon/storage.py
gluon/cfs.py         gluon/import_all.py  gluon/sanitizer.py   gluon/tools.py
gluon/compileapp.py  gluon/languages.py   gluon/serializers.py gluon/utils.py
gluon/contenttype.py gluon/main.py        gluon/settings.py    gluon/validators.py
gluon/dal.py         gluon/myregex.py     gluon/shell.py       gluon/widget.py
gluon/decoder.py     gluon/newcron.py     gluon/sql.py         gluon/winservice.py
gluon/fileutils.py   gluon/portalocker.py gluon/sqlhtml.py     gluon/xmlrpc.py
gluon/globals.py     gluon/reserved_sql_keywords.py
Notice that many of these modules, specifically
dal(the Database Abstraction Layer),template(the template language),rocket(the web server), andhtml(the helpers) have no dependencies and can be used outside of web2py.
The tar gzipped scaffolding app that ships with web2py is
welcome.w2p
This is created upon installation and overwritten on upgrade.
The first time you start web2py, two new folders are created: deposit and applications. The deposit folder is used as temporary storage for installing and uninstalling applications.
The first time you start web2py and after an upgrade, the "welcome" app is zipped into a "welcome.w2p" file to be used as a scaffolding app.
When web2py is upgraded it comes with a file called "NEWINSTALL". If web2py finds this file, it understands an upgrade was performed, hence it removes the file and creates a new "welcome.w2p".
The current web2py version is stored in the file "VERSION" and it follows standard semantic versioning notation where the build id is the build timestamp.
web2py unit-tests are in
gluon/tests/
There are handlers for connecting with various web servers:
cgihandler.py       # discouraged
gaehandler.py       # for Google App Engine
fcgihandler.py      # for FastCGI
wsgihandler.py      # for WSGI
isapiwsgihandler.py # for IIS
modpythonhandler.py # deprecated
("fcgihandler" calls "gluon/contrib/gateways/fcgi.py" developed by Allan Saddi) and
anyserver.py
which is a script to interface with many different web servers, described in Chapter 13.
There are three example files in the "examples" directory:
options_std.py
routes.parametric.example.py
routes.patterns.example.py
They are all meant to be copied to the root dir (where web2py.py or web2py.exe is) and edited according to your own preferences. The former is an optional configuration file that can be passed to web2py.py with the -L option. The second is an example of a URL mapping file. It is loaded automatically when renamed "routes.py". The third is an alternative syntax for URL mapping, and can also be renamed (or copied to) "routes.py".
The files
app.example.yaml
queue.example.yaml
are example configuration files used for deployment on the Google App Engine. You can read more about them in Chapter 13 and on the Google Documentation pages.
There are also additional libraries, some developed by a third party:
feedparser[feedparser] by Mark Pilgrim for reading RSS and Atom feeds:
gluon/contrib/__init__.py
gluon/contrib/feedparser.py
markdown2[markdown2] by Trent Mick for wiki markup:
gluon/contrib/markdown/__init__.py
gluon/contrib/markdown/markdown2.py
markmin markup:
gluon/contrib/markmin
(see MARKMIN syntax for more)
fpdf created my Mariano Reingart for generating PDF documents:
gluon/contrib/fpdf
This is not documented in this book but it is hosted and documented at https://github.com/reingart/pyfpdf
pysimplesoap is a lightweight SOAP server implementation created by Mariano Reingart:
gluon/contrib/pysimplesoap/
simplejsonrpc is a lightweight JSON-RPC client also created by Mariano Reingart:
gluon/contrib/simplejsonrpc.py
memcache[memcache] Python API by Evan Martin:
gluon/contrib/memcache/__init__.py
gluon/contrib/memcache/memcache.py
redis_cache
gluon/contrib/redis_cache.py
gql, a port of the DAL to the Google App Engine:
gluon/contrib/gql.py
memdb, a port of the DAL on top of memcache:
gluon/contrib/memdb.py
gae_memcache is an API to use memcache on the Google App Engine:
gluon/contrib/gae_memcache.py
pyrtf[pyrtf] for generating Rich Text Format (RTF) documents, developed by Simon Cusack and revised by Grant Edwards:
gluon/contrib/pyrtf/
PyRSS2Gen[pyrss2gen] developed by Dalke Scientific Software, to generate RSS feeds:
gluon/contrib/rss2.py
simplejson[simplejson] by Bob Ippolito, the standard library for parsing and writing JSON objects:
gluon/contrib/simplejson/
Google Wallet [googlewallet] provides "pay now" buttons which link Google as payment processor:
gluon/contrib/google_wallet.py
Stripe.com [stripe] provides a simple API for accepting credit card payments:
gluon/contrib/stripe.py
AuthorizeNet [authorizenet] provides API to accept credit card payments via Authorize.net network
gluon/contrib/AuthorizeNet.py
Dowcommerce [dowcommerce] credit card processing API:
gluon/contrib/DowCommerce.py
PaymentTech credit card processing API:
gluon/contrib/paymentech.py
PAM[PAM] authentication API created by Chris AtLee:
gluon/contrib/pam.py
A Bayesian classifier to populate the database with dummy data for testing purposes:
gluon/contrib/populate.py
A file with API for running on Heroku.com:
gluon/contrib/heroku.py
A file that allows interaction with the taskbar in windows, when web2py is running as a service:
gluon/contrib/taskbar_widget.py
Optional login_methods and login_forms to be used for authentication:
gluon/contrib/login_methods/__init__.py
gluon/contrib/login_methods/basic_auth.py
gluon/contrib/login_methods/browserid_account.py
gluon/contrib/login_methods/cas_auth.py
gluon/contrib/login_methods/dropbox_account.py
gluon/contrib/login_methods/email_auth.py
gluon/contrib/login_methods/extended_login_form.py
gluon/contrib/login_methods/gae_google_account.py
gluon/contrib/login_methods/ldap_auth.py
gluon/contrib/login_methods/linkedin_account.py
gluon/contrib/login_methods/loginza.py
gluon/contrib/login_methods/oauth10a_account.py
gluon/contrib/login_methods/oauth20_account.py
gluon/contrib/login_methods/oneall_account.py
gluon/contrib/login_methods/openid_auth.py
gluon/contrib/login_methods/pam_auth.py
gluon/contrib/login_methods/rpx_account.py
gluon/contrib/login_methods/x509_auth.py
web2py also contains a folder with useful scripts including
scripts/setup-web2py-fedora.sh
scripts/setup-web2py-ubuntu.sh
scripts/setup-web2py-nginx-uwsgi-ubuntu.sh
scripts/setup-web2py-heroku.sh
scripts/update-web2py.sh
scripts/make_min_web2py.py
...
scripts/sessions2trash.py
scripts/sync_languages.py
scripts/tickets2db.py
scripts/tickets2email.py
...
scripts/extract_mysql_models.py
scripts/extract_pgsql_models.py
...
scripts/access.wsgi
scripts/cpdb.py
The setup-web2py-* are particularly useful because they attempt a complete installation and setup of a web2py production environment from scratch. Some of these are discussed in Chapter 14, but all of them contain a documentation string inside that explains their purpose and usage.
Finally web2py includes these files required to build the binary distributions.
Makefile
setup_exe.py
setup_app.py
These are setup scripts for py2exe and py2app, respectively, and they are only required to build the binary distributions of web2py. YOU SHOULD NEVER NEED TO RUN THEM.
web2py applications contain additional files, particularly third-party JavaScript libraries, such as jQuery, calendar, and Codemirror. Their authors are acknowledged in the files themselves.
Applications
Applications developed in web2py are composed of the following parts:
- models describe a representation of the data as database tables and relations between tables.
- controllers describe the application logic and workflow.
- views describe how data should be presented to the user using HTML and JavaScript.
- languages describe how to translate strings in the application into various supported languages.
- static files do not require processing (e.g. images, CSS stylesheets, etc).
- ABOUT and LICENSE documents are self-explanatory.
- errors store error reports generated by the application.
- sessions store information related to each particular user.
- databases store SQLite databases and additional table information.
- cache store cached application items.
- modules are other optional Python modules.
- private files are accessed by the controllers but not directly by the developer.
- uploads files are accessed by the models but not directly by the developer (e.g., files uploaded by users of the application).
- tests is a directory for storing test scripts, fixtures and mocks.
Models, views, controllers, languages, and static files are accessible via the web administration [design] interface. ABOUT, README, and errors are also accessible via the administration interface through the corresponding menu items. Sessions, cache, modules and private files are accessible to the applications but not via the administration interface.
Everything is neatly organized in a clear directory structure that is replicated for every installed web2py application, although the user never needs to access the filesystem directly:
__init__.py  ABOUT        LICENSE    models    views
controllers  modules      private    tests     cron
cache        errors       upload     sessions  static
"__init__.py" is an empty file which is required in order to allow Python (and web2py) to import the modules in the modules directory.
Notice that the admin application simply provides a web interface to web2py applications on the server file system. web2py applications can also be created and developed from the command-line or your preferred text editor/IDE; you don't have to use the browser admin interface. A new application can be created manually by replicating the above directory structure under ,e.g., "applications/newapp/" (or simply untar the welcome.w2p file into your new application directory). Application files can also be created and edited from the command-line without having to use the web admin interface.
API
Models, controllers, and views are executed in an environment where the following objects are already imported for us:
Global Objects:
request, response, session, cache
Internationalization:
T
Navigation:
redirect, HTTP
Helpers:
XML, URL, BEAUTIFY

A, ASSIGNJS, B, BODY, BR, BUTTON, CENTER, CODE, COL, COLGROUP,
DIV, EM, EMBED, FIELDSET, FORM, H1, H2, H3, H4, H5, H6,
HEAD, HR, HTML, I, IFRAME, IMG, INPUT, LABEL, LEGEND,
LI, LINK, OL, UL, META, OBJECT, OPTION, P, PRE,
SCRIPT, OPTGROUP, SELECT, SPAN, STRONG, STYLE,
TABLE, TAG, TD, TEXTAREA, TH, THEAD, TBODY, TFOOT,
TITLE, TR, TT, XHTML, xmlescape, embed64

CAT, MARKMIN, MENU, ON
Forms and tables
SQLFORM (SQLFORM.factory, SQLFORM.grid, SQLFORM.smartgrid)
Validators:
CLEANUP, CRYPT, IS_ALPHANUMERIC, IS_DATE_IN_RANGE, IS_DATE,
IS_DATETIME_IN_RANGE, IS_DATETIME, IS_DECIMAL_IN_RANGE,
IS_EMAIL, IS_EMPTY_OR, IS_EXPR, IS_FLOAT_IN_RANGE, IS_IMAGE,
IS_IN_DB, IS_IN_SET, IS_INT_IN_RANGE, IS_IPV4, IS_LENGTH,
IS_LIST_OF, IS_LOWER, IS_MATCH, IS_EQUAL_TO, IS_NOT_EMPTY,
IS_NOT_IN_DB, IS_NULL_OR, IS_SLUG, IS_STRONG, IS_TIME,
IS_UPLOAD_FILENAME, IS_UPPER, IS_URL
Database:
DAL, Field
For backward compatibility SQLDB=DAL and SQLField=Field. We encourage you to use the new syntax DAL and Field, instead of the old syntax.
Other objects and modules are defined in the libraries, but they are not automatically imported since they are not used as often.
The core API entities in the web2py execution environment are request, response, session, cache, URL, HTTP, redirect and T and are discussed below.
A few objects and functions, including Auth, Crud and Service, are defined in "gluon/tools.py" and they need to be imported as necessary:
from gluon.tools import Auth, Crud, Service
They are imported in db.py in the scaffolding application.
Accessing the API from Python modules
Your models or controller may import Python modules. These are usually Python files you store in the modules directory of your app. They may need to use some of the web2py API. The way to do it is by importing them:
from gluon import ...
In fact, any Python module, even if not imported by a web2py application, can import the web2py API as long as web2py is in the sys.path.
Sharing the global scope with modules using the current object
There is one caveat, though. Web2py defines some global objects (request, response, session, cache, T) that can only exist when an HTTP request is present (or is faked). Therefore, modules can access them only if they are called from an application. For this reasons they are placed into a container called current, which is a thread local object. Here is an example.
Create a module "/myapp/modules/mytest.py" that contains:
from gluon import current
def ip(): return current.request.client
Now from a controller in "myapp" you can do
import mytest
def index():
    return "Your ip is " + mytest.ip()
Notice a few things:
import mytestlooks for the module first in the current app's modules folder, then in the folders listed insys.path. Therefore, app-level modules always take precedence over Python modules. This allows different apps to ship with different versions of their modules, without conflicts.- Different users can call the same action
indexconcurrently, which calls the function in the module, and yet there is no conflict becausecurrent.requestis a different object in different threads. Just be careful not to accesscurrent.requestoutside of functions or classes (i.e., at the top level) in the module. import mytestis a shortcut forfrom applications.appname.modules import mytest. Using the longer syntax, it is possible to import modules from other applications.
For uniformity with normal Python behavior, by default web2py does not reload modules when changes are made. Yet this can be changed. To turn on the auto-reload feature for modules, use the track_changes function as follows (typically in a model file, before any imports):
from gluon.custom_import import track_changes; track_changes(True)
From now on, every time a module is imported, the importer will check if the Python source file (.py) has changed. If it has changed, the module will be reloaded.
Do not call track_changes in the modules themselves.
Track changes only tracks changes for modules that are stored in the application. Modules that import current can access:
current.requestcurrent.responsecurrent.sessioncurrent.cachecurrent.T
and any other variable your application chooses to store in current. For example a model could do
auth = Auth(db)
from gluon import current
current.auth = auth
current.db = db #not needed in this case but useful
and now all modules imported can access current.auth.
current and import create a powerful mechanism to build extensible and reusable modules for your applications.
Warning! Do not use the current object in global scope in a module
Beware! Given from gluon import current, it is correct to use current.request and any of the other thread local objects but one should never assign them to global variables in the module, such as in
request = current.request # WRONG! DANGER!
nor should one use current to assign class attributes:
class MyClass:
    request = current.request # WRONG! DANGER!
This is because the thread local object must be extracted at runtime. Global variables instead are defined only once when the model is imported for the first time.
Instead, assign inside a function.
from gluon import current
...
def a_module_function():
    db = current.db  # assuming you assigned current.db = db in the model db.py
   ...
Another caveat has to do with cache. You cannot use the cache object to decorate functions in modules, that is because it would not behave as expected. In order to cache a function f in a module you must use lazy_cache:
from gluon.cache import lazy_cache

@lazy_cache('key', time_expire=60, cache_model='ram')
def f(a, b, c): ....
Mind that the key is user defined but must be uniquely associated to the function. If omitted web2py will automatically determine a key.
request
The request object is an instance of the ubiquitous web2py class that is called gluon.storage.Storage, which extends the Python dict class. It is basically a dictionary, but the item values can also be accessed as attributes:
request.vars
is the same as:
request['vars']
Unlike a dictionary, if an attribute (or key) does not exist, it does not raise an exception. Instead, it returns None.
It is sometimes useful to create your own Storage objects. You can do so as follows:
from gluon.storage import Storage
my_storage = Storage()  # empty storage object
my_other_storage = Storage(dict(a=1, b=2))  # convert dictionary to Storage
request has the following items/attributes, some of which are also an instance of the Storage class:
request.cookies: aCookie.SimpleCookie()object containing the cookies passed with the HTTP request. It acts like a dictionary of cookies. Each cookie is a Morsel object [morsel].request.env: aStorageobject containing the environment variables passed to the controller, including HTTP header variables from the HTTP request and standard WSGI parameters. The environment variables are all converted to lower case, and dots are converted to underscores for easier memorization.request.application: the name of the requested application.request.controller: the name of the requested controller.request.function: the name of the requested function.request.extension: the extension of the requested action. It defaults to "html". If the controller function returns a dictionary and does not specify a view, this is used to determine the extension of the view file that will render the dictionary (parsed from therequest.env.path_info).request.folder: the application directory. For example if the application is "welcome",request.folderis set to the absolute path "/path/to/welcome". In your programs, you should always use this variable and theos.path.joinfunction to build paths to the files you need to access. Although web2py always uses absolute paths, it is a good rule never to explicitly change the current working folder (whatever that is) since this is not a thread-safe practice.request.now: adatetime.datetimeobject storing the datetime of the current request.request.utcnow: adatetime.datetimeobject storing the UTC datetime of the current request.request.args: A list of the URL path components following the controller function name; equivalent torequest.env.path_info.split('/')[3:]request.vars: agluon.storage.Storageobject containing all request parameters.request.get_vars: agluon.storage.Storageobject containing only parameters passed into the query string (a request to/a/c/f?var1=1&var2=2will end in{var1: "1", var2: "2"})request.post_vars: agluon.storage.Storageobject containing only the parameters passed into the body of the request (usually in POST, PUT, DELETE requests).request.client: The ip address of the client as determined by, if present,request.env.http_x_forwarded_foror byrequest.env.remote_addrotherwise. While this is useful it should not be trusted because thehttp_x_forwarded_forcan be spoofed.request.is_local:Trueif the client is localhost,Falseotherwise. Should work behind a proxy if the proxy supportshttp_x_forwarded_for.request.is_https:Trueif the request is using the HTTPS protocol,Falseotherwise.request.body: a read-only file stream that contains the body of the HTTP request. This is automatically parsed to get therequest.post_varsand then rewinded. It can be read withrequest.body.read().request.ajaxis True if the function is being called via an Ajax request.request.cidis theidof the component that generated the Ajax request (if any). You can read more about components in Chapter 12.request.requires_https()prevents further code execution if the request is not over HTTPS and redirects the visitor to the current page over HTTPS.request.restfulthis is a new and very useful decorator that can be used to change the default behavior of web2py actions by separating GET/POST/PUT/DELETE requests. It will be discussed in some detail in Chapter 10.request.user_agent()parses the user_agent field from the client and returns the information in the form of a dictionary. It is useful to detect mobile devices. It uses "gluon/contrib/user_agent_parser.py" created by Ross Peoples. To see what it does, try to embed the following code in a view:{{=BEAUTIFY(request.user_agent())}}
request.global_settingsrequest.global_settingscontains web2py system wide settings. They are set automatically and you should not change them. For examplerequest.global_settings.gluon_parentcontains the full path to the web2py folder,request.global_settings.is_pypydetermines if web2py is running on PyPy.request.wsgiis a hook that allows you to call third party WSGI applications from inside actions
The latter includes:
request.wsgi.environrequest.wsgi.start_responserequest.wsgi.middleware
their usage is discussed at the end of this chapter in WSGI section.
As an example, the following call on a typical system:
http://127.0.0.1:8000/examples/default/status/x/y/z?p=1&q=2
results in the following request object:
| variable | value |
request.application | examples |
request.controller | default |
request.function | status |
request.extension | html |
request.view | status |
request.folder | applications/examples/ |
request.args | ['x', 'y', 'z'] |
request.vars | <Storage {'p': 1, 'q': 2}> |
request.get_vars | <Storage {'p': 1, 'q': 2}> |
request.post_vars | <Storage {}> |
request.is_local | False |
request.is_https | False |
request.ajax | False |
request.cid | None |
request.wsgi | <hook> |
request.env.content_length | 0 |
request.env.content_type | |
request.env.http_accept | text/xml,text/html; |
request.env.http_accept_encoding | gzip, deflate |
request.env.http_accept_language | en |
request.env.http_cookie | session_id_examples=127.0.0.1.119725 |
request.env.http_host | 127.0.0.1:8000 |
request.env.http_referer | http://web2py.com/ |
request.env.http_user_agent | Mozilla/5.0 |
request.env.path_info | /examples/simple_examples/status |
request.env.query_string | p=1&q=2 |
request.env.remote_addr | 127.0.0.1 |
request.env.request_method | GET |
request.env.script_name | |
request.env.server_name | 127.0.0.1 |
request.env.server_port | 8000 |
request.env.server_protocol | HTTP/1.1 |
request.env.server_software | Rocket 1.2.6 |
request.env.web2py_path | /Users/mdipierro/web2py |
request.env.web2py_version | Version 2.4.1 |
request.env.wsgi_errors | <open file, mode 'w' at > |
request.env.wsgi_input | |
request.env.wsgi_url_scheme | http |
Which environment variables are actually defined depends on the web server. Here we are assuming the built-in Rocket wsgi server. The set of variables is not much different when using the Apache web server.
The request.env.http_* variables are parsed from the request HTTP header.
The request.env.web2py_* variables are not parsed from the web server environment, but are created by web2py in case your applications need to know about the web2py location and version, and whether it is running on the Google App Engine (because specific optimizations may be necessary).
Also notice the request.env.wsgi_* variables. They are specific to the wsgi adapter.
response
response is another instance of the Storage class. It contains the following:
response.body: aStringIOobject into which web2py writes the output page body. NEVER CHANGE THIS VARIABLE.response.cookies: similar torequest.cookies, but while the latter contains the cookies sent from the client to the server, the former contains cookies sent by the server to the client. The session cookie is handled automatically.response.download(request, db): a method used to implement the controller function that allows downloading of uploaded files.response.downloadexpects the lastarginrequest.argsto be the encoded filename (i.e., the filename generated at upload time and stored in the upload field). It extracts the upload field name and table name as well as the original filename from the encoded filename.response.downloadtakes two optional arguments:chunk_sizesets the size in bytes for chunked streaming (defaults to 64K), andattachmentsdetermines whether the downloaded file should be treated as an attachment or not (default toTrue). Note,response.downloadis specifically for downloading files associated withdbupload fields. Useresponse.stream(see below) for other types of file downloads and streaming. Also, note that it is not necessary to useresponse.downloadto access files uploaded to the /static folder -- static files can (and generally should) be accessed directly via URL (e.g., /app/static/files/myfile.pdf).response.files: a list of.css,.js,.coffee, and.lessfiles required by the page. They will automatically be linked in the head of the standard "layout.html" via the included "web2py_ajax.html". To include a new CSS, JS, COFFEE, or LESS file, just append it to this list. It will handle duplicates. The order is important.response.include_files()generates html head tags to include allresponse.files(used in "views/web2py_ajax.html").response.flash: optional parameter that may be included in the views. Normally used to notify the user about something that happened.response.headers: adictfor HTTP response headers. Web2py sets some headers by default, including "Content-Length", "Content-Type", and "X-Powered-By" (set equal to web2py). Web2py also sets the "Cache-Control", "Expires", and "Pragma" headers to prevent client-side caching, except for static file requests, for which client-side caching is enabled. The headers that web2py sets can be overwritten or removed, and new headers can be added (e.g.,response.headers['Cache-Control'] = 'private'). You can remove a header by removing its key from the response.headers dict, e.g.del response.headers['Custom-Header'], however web2py's default headers will be re-added just before returning the response. To avoid this behavior, just set the header value to None, e.g. to remove the default Content-Type header,response.headers['Content-Type'] = Noneresponse.menu: optional parameter that may be included in the views, normally used to pass a navigation menu tree to the view. It can be rendered by the MENU helper.response.meta: a Storage object that contains optional<meta>information likeresponse.meta.author,.description, and/or.keywords. The content of each meta variable is automatically placed in the properMETAtag by the code in "views/web2py_ajax.html", which is included by default in "views/layout.html".response.include_meta()generates a string that includes allresponse.metaheaders serialized (used in "views/web2py_ajax.html").response.postprocessing: this is a list of functions, empty by default. These functions are used to filter the response object at the output of an action, before the output is rendered by the view. It can be used to implement support for other template languages.response.render(view, vars): a method used to call the view explicitly inside the controller.viewis an optional parameter which is the name of the view file,varsis a dictionary of named values passed to the view.response.session_file: file stream containing the session.response.session_file_name: name of the file where the session will be saved.response.session_id: the id of the current session. It is determined automatically. NEVER CHANGE THIS VARIABLE.response.session_id_name: the name of the session cookie for this application. NEVER CHANGE THIS VARIABLE.response.static_version: a version number for the static asset management withresponse.files.response.static_version_urls: setting this toTrueenables static asset management on any link to the static folder.response.status: the HTTP status code integer to be passed to the response. Default is 200 (OK).response.stream(file, chunk_size, request=request, attachment=False, filename=None): when a controller returns it, web2py streams the file content back to the client in blocks of sizechunk_size. Therequestparameter is required to use the chunk start in the HTTP header.fileshould be a file path (for backward compatibility, it can also be an open file object, but this is not recommended). As noted above,response.downloadshould be used to retrieve files stored via an upload field.response.streamcan be used in other cases, such as returning a temporary file or StringIO object created by the controller. Ifattachmentis True, the Content-Disposition header will be set to "attachment", and iffilenameis also provided, it will be added to the Content-Disposition header as well (but only whenattachmentis True). If not already included inresponse.headers, the following response headers will be set automatically: Content-Type, Content-Length, Cache-Control, Pragma, and Last-Modified (the latter three are set to allow browser caching of the file). To override any of these automatic header settings, simply set them inresponse.headersbefore callingresponse.stream.response.subtitle: optional parameter that may be included in the views. It should contain the subtitle of the page.response.title: optional parameter that may be included in the views. It should contain the title of the page and should be rendered inside the html title tag in the header.response.toolbar: a function that allows you to embed a toolbar into page for debugging purposes{{=response.toolbar()}}. The toolbar displays request, response, session variables and database access time for each query.response._vars: this variable is accessible only in a view, not in the action. It contains the values returned by the action to the view.response._caller: this is a function that wraps all action calls. It defaults to the identity function, but it can be modified in order to catch special types of exception to do extra logging;response._caller = lambda f: f()
response.optimize_css: can be set to "concat,minify,inline" to concatenate, minify and inline the CSS files included by web2py.response.optimize_js: can be set to "concat,minify,inline" to concatenate, minify and inline the JavaScript files included by web2py.response.view: the name of the view template that must render the page. This is set by default to:or, if the above file cannot be located, to"%s/%s.%s" % (request.controller, request.function, request.extension)
Change the value of this variable to modify the view file associated with a particular action."generic.%s" % (request.extension)
response.delimitersdefaults to('{{','}}'). It allows you to change the delimiter of code embedded in views.response.xmlrpc(request, methods): when a controller returns it, this function exposes the methods via XML-RPC[xmlrpc] . This function is deprecated since a better mechanism is available and described in Chapter 10.response.write(text): a method to write text into the output page body.response.jscan contain Javascript code. This code will be executed if and only if the response is received by a web2py component as discussed in Chapter 12.response.models_to_runcontains a list of regexes that chooses what models to run.- By default, this is set automatically to load /a/models/*.py, /a/models/c/*.py, and /a/models/c/f/*.py files when
/a/c/fis requested. You can set, e.g.,response.models_to_run = ['myfolder/']to force the execution only of the models inside your application'smodels/myfoldersubfolder. - NB:
response.models_to_runis a list of regex, not a list of filepaths. The regex are relative to the models/ folder, so any model file with a relative file path that matches one of the regexes will be executed. Note also that this can not affect any models which have already been evaluated because they were earlier in the alphabetic sort order. That is, if a conditional model for controller orange was orange/orange_model.py and it set the regex to [.*], that change does not affect any models previously rejected for loading such as the model apple/apple_model.py ; it matches the new regex, but it was evaluated and rejected before orange/orange_model.py changed the regex. - This means that if you want to use models_to_run to share conditional models between controllers, put the models in a sub-directory that will sort last such as zzz, and then use a regex 'zzz'.
- By default, this is set automatically to load /a/models/*.py, /a/models/c/*.py, and /a/models/c/f/*.py files when
Since response is a gluon.storage.Storage object, it can be used to store other attributes that you may want to pass to the view. While there is no technical restriction, our recommendation is to store only variables that are to be rendered by all pages in the overall layout ("layout.html").
Anyway, we strongly suggest to stick to the variables listed here:
response.title
response.subtitle
response.flash
response.menu
response.meta.author
response.meta.description
response.meta.keywords
response.meta.*
because this will make it easier for you to replace the standard "layout.html" file that comes with web2py with another layout file, one that uses the same set of variables.
Old versions of web2py used response.author instead of response.meta.author and similar for the other meta attributes.
session
session is another instance of the Storage class. Whatever is stored into session for example:
session.myvariable = "hello"
can be retrieved at a later time:
a = session.myvariable
as long as the code is executed within the same session by the same user (provided the user has not deleted session cookies and the session has not expired). Because session is a Storage object, trying to access an attribute/key that has not been set does not raise an exception; it returns None instead.
The session object has three important methods. One is forget:
session.forget(response)
It tells web2py not to save the session. This should be used in those controllers whose actions are called often and do not need to track user activity. session.forget() prevents the session file from being written, regardless of whether it has been modified. session.forget(response) additionally unlocks and closes the session file. You rarely need to call this method since sessions are not saved when they are not changed. However, if the page makes multiple simultaneous Ajax requests, it is a good idea for the actions called via Ajax to call session.forget(response) (assuming the session is not needed by the action). Otherwise, each Ajax action will have to wait for the previous one to complete (and unlock the session file) before proceeding, which will slow down the page loading. Notice that sessions are not locked when stored in the database.
Another method is:
session.secure()
which tells web2py to set the session cookie to be a secure cookie. This should be set if the app is going over https. By setting the session cookie to be secure, the server is asking the browser not to send the session cookie back to the server unless over an https connection.
The other method is connect. By default sessions are stored on the filesystem and a session cookie is used to store and retrieve the session.id. Using the connect method it is possible to tell web2y to store sessions in the database or in the cookies thus eliminating need to access the filesystem for session management.
For example to store sessions in the database:
session.connect(request, response, db, masterapp=None)
where db is the name of an open database connection (as returned by the DAL). It tells web2py that you want to store the sessions in the database and not on the filesystem. session.connect must come after db=DAL(...), but before any other logic that requires session, for example, setting up Auth.
web2py creates a table:
db.define_table('web2py_session',
                 Field('locked', 'boolean', default=False),
                 Field('client_ip'),
                 Field('created_datetime', 'datetime', default=now),
                 Field('modified_datetime', 'datetime'),
                 Field('unique_key'),
                 Field('session_data', 'text'))
and stores cPickled sessions in the session_data field.
The option masterapp=None, by default, tells web2py to try to retrieve an existing session for the application with name in request.application, in the running application.
If you want two or more applications to share sessions, set masterapp to the name of the master application.
To store sessions in cookies instead you can do:
session.connect(request, response, cookie_key='yoursecret', compression_level=None)
Here cookie_key is a symmetric encryption key. compression_level is an optional zlib encryption level.
While sessions in cookie are often recommended for scalability reason they are limited in size. Large sessions will result in broken cookies.
You can check the state of your application at any time by printing the request, session and response system variables. One way to do it is to create a dedicated action:
def status():
    return dict(request=request, session=session, response=response)
In the "generic.html" view this is done using {{=response.toolbar()}}.
Don't store user-defined classes in session
Variables stored in the session are preserved between requests by serialisation.
Sessions are retrieved before an execution environment for the request is created, that is before any model and controller is executed, when user classes are not yet defined. Therefore user defined classes cannot be pickled.
Classes defined in modules are also a grey area and they should not put in storage. Most of the time they work but they can break. This is because, for example, if you restart the web server and a user retrieves a session, this may happen before the module is imported. Same problem when the web server starts a new worker process. Same problem in a distributed environment.
Separate sessions
If you are storing sessions on the filesystem and you have lots of them, the file system access may become a bottle-neck. One solution is the following:
session.connect(request, response, separate=True)
By setting separate=True web2py will store sessions not in the "sessions/" folder but in subfolders of the "sessions/" folder. The subfolder will be created automatically. Sessions with the same prefix will be in the same subfolder. Again, note that the above must be called before any logic that might require the session.
cache
cache is a global object that is also available in the web2py execution environment. It has two attributes:
cache.ram: the application cache in main memory.cache.disk: the application cache on disk.
cache is callable, this allows it to be used as a decorator for caching actions and views.
The following example caches the time.ctime() function in RAM:
def cache_in_ram():
    import time
    t = cache.ram('time', lambda: time.ctime(), time_expire=5)
    return dict(time=t, link=A('click me', _href=request.url))
The output of lambda: time.ctime() is cached in RAM for 5 seconds. The string 'time' is used as cache key.
The following example caches the time.ctime() function on disk:
def cache_on_disk():
    import time
    t = cache.disk('time', lambda: time.ctime(), time_expire=5)
    return dict(time=t, link=A('click me', _href=request.url))
The output of lambda: time.ctime() is cached on disk for 5 seconds.
Note, the second argument to cache.ram and cache.disk must be a function or callable object. If you want to cache an existing object rather than the output of a function, you can simply return it via a lambda function:
cache.ram('myobject', lambda: myobject, time_expire=60*60*24)
The next example caches the time.ctime() function to both RAM and disk:
def cache_in_ram_and_disk():
    import time
    t = cache.ram('time', lambda: cache.disk('time', lambda: time.ctime(), time_expire=5), time_expire=5)
    return dict(time=t, link=A('click me', _href=request.url))
The output of lambda: time.ctime() is cached on disk and then in RAM for 5 seconds. web2py looks in RAM first and if not there it looks on disk. If it is not in RAM or on disk, lambda: time.ctime() is executed and the cache is updated. This technique is useful in a multiprocessor environment. The two times do not have to be the same.
The following example is caching in RAM the output of the controller function (but not the view):
@cache(request.env.path_info, time_expire=5, cache_model=cache.ram)
def cache_controller_in_ram():
    import time
    t = time.ctime()
    return dict(time=t, link=A('click me', _href=request.url))
The dictionary returned by cache_controller_in_ram is cached in RAM for 5 seconds. Note that the result of a database select cannot be cached without first being serialized. A better way is to cache the database select directly using the select method's cache argument.
The following example is caching the output of the controller function on disk (but not the view):
@cache(request.env.path_info, time_expire=5, cache_model=cache.disk)
def cache_controller_on_disk():
    import time
    t = time.ctime()
    return dict(time=t, link=A('click to reload', _href=request.url))
The dictionary returned by cache_controller_on_disk is cached on disk for 5 seconds. Remember that web2py cannot cache a dictionary that contains un-pickleable objects.
It is also possible to cache the view. The trick is to render the view in the controller function, so that the controller returns a string. This is done by returning response.render(d) where d is the dictionary we intended to pass to the view. The following example caches the output of the controller function in RAM (including the rendered view):
@cache(request.env.path_info, time_expire=5, cache_model=cache.ram)
def cache_controller_and_view():
    import time
    t = time.ctime()
    d = dict(time=t, link=A('click to reload', _href=request.url))
    return response.render(d)
response.render(d) returns the rendered view as a string, which is now cached for 5 seconds. This is the best and fastest way of caching.
We recommend @cache.action starting from web2py 2.4.7+
Note, time_expire is used to compare the current time with the time the requested object was last saved in the cache. It does not affect future requests. This enables time_expire to be set dynamically when an object is requested rather than being fixed when the object is saved. For example:
message = cache.ram('message', lambda: 'Hello', time_expire=5)
Now, suppose the following call is made 10 seconds after the above call:
message = cache.ram('message', lambda: 'Goodbye', time_expire=20)
Because time_expire is set to 20 seconds in the second call and only 10 seconds has elapsed since the message was first saved, the value "Hello" will be retrieved from the cache, and it will not be updated with "Goodbye". The time_expire value of 5 seconds in the first call has no impact on the second call.
Setting time_expire=0 (or a negative value) forces the cached item to be refreshed (because the elapsed time since the last save will always be > 0), and setting time_expire=None forces retrieval of the cached value, regardless of the time elapsed since it was saved (if time_expire is always None, the cached item will effectively never expire).
You can clear one or more cache variables with
cache.ram.clear(regex='...')
where regex is a regular expression matching all the keys you want removed from the cache. You can also clear a single item with:
cache.ram(key, None)
where key is the key of the cached item.
It is also possible to define other caching mechanisms such as memcache. Memcache is available via gluon.contrib.memcache and is discussed in more detail in Chapter 13.
Be careful when caching to remember that caching is usually at the app-level not at the user level. If you need, for example, to cache user specific content, choose a key that includes the user id.
The admin app for an application lets you view cache keys (and clear the cache). Access it from the database management screen of admin.
cache.action
Web2py by default assumes that the returned content is not going to be cached, as this reduces the shortcomings of an improper caching of the page client-side.
For example, when you show a form to the user, or a list of records, the web page should not be cached, as other users may have inserted new records on the table you are showing.
Instead, if you are showing to the user a wiki page whose content will never change (or it changes once a week), it is useful to store that page, but it is even more useful to tell the client that that page is not going to change.
This is accomplished sending out some specific headers along with the page: when the client's browser receives the content, it is stored in the browser's cache and it will not be requested again to your site. Of course this is a major speedup for public-facing sites.
Web2py 2.4.7+ introduced a new cache.action decorator to allow a smarter handling of this situation. cache.action can be used:
- for setting smart cache headers
- to cache the results accordingly
NB: it will do one or another or both.
The main problem with caching a view with @cache(request.env.path_info, time_expire=300, cache_model=cache.ram) is that request.env.path_info as a key leads to several problems, e.g.
- URL vars are not considered
- You cached the result of /app/default/index?search=foo : for the next 300 seconds /app/default/index?search=bar will return the exact same thing of /app/default/index?search=foo
- User is not considered
- Your user accesses a page often and you choose to cache it. However, you cached the result of /app/default/index using request.env.path_info as the key, so another user will see a page that was not meant for him
- You cached a page for "Bill", but "Bill" accessed the page from the desktop. Now he tries to access it from his phone: if you prepared a template for mobile users that is different from the standard one, "Joe" will not see it
- Language is not considered
- When you cache the page, if you use T() for some elements, the page will be stored with a fixed translation
- Method is not considered
- When you cache a page, you should only cache it if it's a result of a GET operation
- Status code is not considered
- When you cached the page for the first time, something went wrong and you returned a nice 404 page. You don't want to cache errors ^_^
Instead of letting users write a lot of boilerplate code to take care of all those problems, cache.action was created. It will by default use smart cache headers to let the browser cache the result: if you pass a cache model to it, it will also figure out the best key automatically, so different versions of the same page can be stored and retrieved accordingly (e.g. one for English users and one for Spanish ones)
It takes several parameters, with smart defaults:
- time_expire : the usual, defaults to 300 seconds
- cache_model : by default is None. This means that
@cache.actionwill only alter the default headers to let the client's browser cache the content- if you pass, e.g.,
cache.ram, the result will be stored in the cache as well
- if you pass, e.g.,
- prefix : if you want to prefix the auto-generated key (useful for clearing it later with, e.g.
cache.ram.clear(prefix*)) - session : if you want to consider the session, defaults to False
- vars : if you want to consider URL vars, defaults to True
- lang : if you want to consider the language, defaults to True
- user_agent : if you want to consider the user agent, defaults to False
- public : if you want the same page for all the users that will ever access it, defaults to True
- valid_statuses : defaults to None.
@cache.actionwill cache only pages requested with a GET method, whose status codes begin with 1,2 or 3. You can pass a list of status codes (when you want pages to be cached with those statuses, e.g. status_codes=[200] will cache only pages that resulted in a 200 status code) - quick : defaults to None, but you can pass a list of initials to set a particular feature:
- Session, Vars, Lang, User_agent, Public e.g.
@cache.action(time_expire=300, cache_model=cache.ram, quick='SVP')is the same as@cache.action(time_expire=300, cache_model=cache.ram, session=True, vars=True, public=True)
- Session, Vars, Lang, User_agent, Public e.g.
"Consider" means for e.g. vars, that you want to cache different pages if vars are different, so /app/default/index?search=foo will not be the same one for /app/default/index?search=bar Some settings override others, so, e.g., if you set session=True, public=True the latter will be discarded. Use them wisely!
URL
The URL function is one of the most important functions in web2py. It generates internal URL paths for the actions and the static files.
Here is an example:
URL('f')
is mapped into
/[application]/[controller]/f
Notice that the output of the URL function depends on the name of the current application, the calling controller, and other parameters. web2py supports URL mapping and reverse URL mapping. URL mapping allows you to redefine the format of external URLs. If you use the URL function to generate all the internal URLs, then additions or changes to URL mappings will prevent broken links within the web2py application.
You can pass additional parameters to the URL function, i.e., extra terms in the URL path (args) and URL query variables (vars):
URL('f', args=['x', 'y'], vars=dict(z='t'))
is mapped into
/[application]/[controller]/f/x/y?z=t
The args attributes are automatically parsed, decoded, and finally stored in request.args by web2py. Similarly, the vars are parsed, decoded, and then stored in request.vars. args and vars provide the basic mechanism by which web2py exchanges information with the client's browser.
If args contains only one element, there is no need to pass it in a list.
You can also use the URL function to generate URLs to actions in other controllers and other applications:
URL('a', 'c', 'f', args=['x', 'y'], vars=dict(z='t'))
is mapped into
/a/c/f/x/y?z=t
It is also possible to specify application, controller and function using named arguments:
URL(a='a', c='c', f='f')
If the application name a is missing the current app is assumed.
URL('c', 'f')
If the controller name c is missing, the current one is assumed.
URL('f')
Instead of passing the name of a controller function it is also possible to pass the function itself
URL(f)
For the reasons mentioned above, you should always use the URL function to generate URLs of static files for your applications. Static files are stored in the application's static subfolder (that's where they go when uploaded using the administrative interface). web2py provides a virtual 'static' controller whose job is to retrieve files from the static subfolder, determine their content-type, and stream the file to the client. The following example generates the URL for the static file "image.png":
URL('static', 'image.png')
is mapped into
/[application]/static/image.png
If the static file is in a subfolder within the static folder, you can include the subfolder(s) as part of the filename. For example, to generate:
/[application]/static/images/icons/arrow.png
one should use:
URL('static', 'images/icons/arrow.png')
You do not need to encode/escape the args and vars arguments; this is done automatically for you.
By default, the extension corresponding to the current request (which can be found in request.extension) is appended to the function, unless request.extension is html, the default. This can be overridden by explicitly including an extension as part of the function name URL(f='name.ext') or with the extension argument:
URL(..., extension='css')
The current extension can be explicitly suppressed:
URL(..., extension=False)
Absolute urls
By default, URL generates relative URLs. However, you can also generate absolute URLs by specifying the scheme and host arguments (this is useful, for example, when inserting URLs in email messages):
URL(..., scheme='http', host='www.mysite.com')
You can automatically include the scheme and host of the current request by simply setting the arguments to True.
URL(..., scheme=True, host=True)
The URL function also accepts a port argument to specify the server port if necessary.
Digitally signed urls
When generating a URL, you have the option to digitally sign it. This will append a _signature GET variable that can be verified by the server. This can be done in two ways.
You can pass to the URL function the following arguments:
hmac_key: the key for signing the URL (a string)salt: an optional string to salt the data before signinghash_vars: an optional list of names of variables from the URL query string (i.e., GET variables) to be included in the signature. It can also be set toTrue(the default) to include all variables, orFalseto include none of the variables.
Here is an example of usage:
KEY = 'mykey'

def one():
    return dict(link=URL('two', vars=dict(a=123), hmac_key=KEY))

def two():
    if not URL.verify(request, hmac_key=KEY): raise HTTP(403)
    # do something
    return locals()
This makes the action two accessible only via a digitally signed URL. A digitally signed URL looks like this:
/welcome/default/two?a=123&_signature=4981bc70e13866bb60e52a09073560ae822224e9
Note, the digital signature is verified via the URL.verify function. URL.verify also takes the hmac_key, salt, and hash_vars arguments described above, and their values must match the values that were passed to the URL function when the digital signature was created in order to verify the URL.
A second and more sophisticated but more common use of digitally signed URLs is in conjunction with Auth. This is best explained with an example:
@auth.requires_login()
def one():
    return dict(link=URL('two', vars=dict(a=123), user_signature=True)

@auth.requires_signature()
def two():
    # do something
    return locals()
In this case the hmac_key is automatically generated and shared within the session. This allows action two to delegate any access control to action one. If the link is generated and signed, it is valid; else it is not. If the link is stolen by another user, the link will be invalid.
It is good practice to always digitally sign Ajax callbacks. If you use the web2py LOAD function, it has a user_signature argument too that can be used for this purpose:
{{=LOAD('default', 'two', vars=dict(a=123), ajax=True, user_signature=True)}}
HTTP and redirect
web2py defines only one new exception called HTTP. This exception can be raised anywhere in a model, a controller, or a view with the command:
raise HTTP(400, "my message")
It causes the control flow to jump away from the user's code, back to web2py, and return an HTTP response like:
HTTP/1.1 400 BAD REQUEST
Date: Sat, 05 Jul 2008 19:36:22 GMT
Server: Rocket WSGI Server
Content-Type: text/html
Via: 1.1 127.0.0.1:8000
Connection: close
Transfer-Encoding: chunked

my message
The first argument of HTTP is the HTTP status code. The second argument is the string that will be returned as the body of the response. Additional optional named arguments are used to build the response HTTP header. For example:
raise HTTP(400, 'my message', test='hello')
generates:
HTTP/1.1 400 BAD REQUEST
Date: Sat, 05 Jul 2008 19:36:22 GMT
Server: Rocket WSGI Server
Content-Type: text/html
Via: 1.1 127.0.0.1:8000
Connection: close
Transfer-Encoding: chunked
test: hello

my message
If you do not want to commit the open database transaction, rollback before raising the exception.
Any exception other than HTTP causes web2py to roll back any open database transaction, log the error traceback, issue a ticket to the visitor, and return a standard error page.
This means that only HTTP can be used for cross-page control flow. Other exceptions must be caught by the application, otherwise they are ticketed by web2py.
The command:
redirect(location)
is simply a shortcut for:
raise HTTP(303,
           'You are being redirected <a href="%s">here</a>' % location,
           Location='http://www.web2py.com')
The named arguments of the HTTP initializer method are translated into HTTP header directives, in this case, the redirection target location. redirect takes an optional second argument, which is the HTTP status code for the redirection (303 by default). Change this number to 307 for a temporary redirect or to 301 for a permanent redirect.
The most common way to use redirect is to redirect to other pages in the same app and (optionally) pass parameters:
redirect(URL('index', args=(1, 2, 3), vars=dict(a='b')))
In Chapter 12 we discuss web2py components. They make Ajax requests to web2py actions. If the called action performs a redirect, you may want the Ajax request to follow the redirect or you may want the entire page performing the Ajax request redirecting. In this latter case you can set:
redirect(..., client_side=True)
Internationalization, and Pluralization with T
The object T is the language translator. It constitutes a single global instance of the web2py class gluon.language.translator. All string constants (and only string constants) should be marked by T, for example:
a = T("hello world")
Strings that are marked with T are identified by web2py as needing language translation and they will be translated when the code (in the model, controller, or view) is executed. If the string to be translated is not a constant but a variable, it will be added to the translation file at runtime (except on GAE) to be translated later.
The T object can also contain interpolated variables and supports multiple equivalent syntaxes:
a = T("hello %s", ('Tim', ))
a = T("hello %(name)s", dict(name='Tim'))
a = T("hello %s") % ('Tim', )
a = T("hello %(name)s") % dict(name='Tim')
The latter syntax is recommended because it makes translation easier. The first string is translated according to the requested language file and the name variable is replaced independently of the language.
You can concatenate translated strings and normal strings:
T("blah ") + name + T(" blah")
The following code is also allowed and often preferable:
T("blah %(name)s blah", dict(name='Tim'))
or the alternative syntax
T("blah %(name)s blah") % dict(name='Tim')
In both cases the translation occurs before the variable name is substituted in the "%(name)s" slot. The following alternative should NOT BE USED:
T("blah %(name)s blah" % dict(name='Tim'))
because translation would occur after substitution.
Determining the language
The requested language is determined by the "Accept-Language" field in the HTTP header, but this selection can be overwritten programmatically by requesting a specific file, for example:
T.force('it-it')
which reads the "languages/it-it.py" language file. Language files can be created and edited via the administrative interface.
You can also force a per-string language:
T("Hello World", language="it-it")
In the case multiple languages are requested, for example "it-it, fr-ft", web2py tries to locate "it-it.py" and "fr-fr.py" translation files. If none of the requested files is present, it tries to fall back on "it.py" and "fr.py". If these files are not present it defaults to "default.py". If this is not present either, it default to no-translation. The more general rule is that web2py tries "xx-xy-yy.py", "xx-xy.py", "xx.py", "default.py" for each of the "xx-xy-yy" accepted languages trying to find the closest match to the visitor's preferences.
You can turn off translations completely via
T.force(None)
Normally, string translation is evaluated lazily when the view is rendered; hence, the translator force method should not be called inside a view.
It is possible to disable lazy evaluation via
T.lazy = False
In this way, strings are translated inmediately by the T operator based on the currently accepted or forced language.
It is also possible to disable lazy evaluation for individual strings:
T("Hello World", lazy=False)
A common issue is the following. The original application is in English. Suppose that there is a translation file (for example Italian, "it-it.py") and the HTTP client declares that it accepts both English (en) and Italian (it-it) in that order. The following unwanted situation occurs: web2py does not know the default is written in English (en). Therefore, it prefers translating everything into Italian (it-it) because it only found the Italian translation file. If it had not found the "it-it.py" file, it would have used the default language strings (English).
There are two solutions for this problem: create a translation language for English, which would be redundant and unnecessary, or better, tell web2py which languages should use the default language strings (the strings coded into the application). This can be done with:
T.set_current_languages('en', 'en-en')
It stores in T.current_languages a list of languages that do not require translation and forces a reload of the language files.
Notice that "it" and "it-it" are different languages from the point of view of web2py. To support both of them, one would need two translation files, always lower case. The same is true for all other languages.
The currently accepted language is stored in
T.accepted_language
Translating variables
T does not only translate strings but it can also translate values stored in variables:
>>> a = "test"
>>> print T(a)
In this case the word "test" is translated but, if not found and if the filesystem is writable, it will add it to the list of words to be translated in the language file.
Notice that this can result in lots of file IO and you may want to disable it:
T.is_writable = False
prevents T from dynamically updating language files.
Comments and multiple translations
It is possible that the same string appears in different contexts in the application and needs different translations based on context. In order to do this, one can add comments to the original string. The comments will not be rendered but will be used by web2py to determine the most appropriate translation. For example:
T("hello world ## first occurrence")
T("hello world ## second occurrence")
The text following the ##, including the double ##, are comments.
Pluralization engine
Since version 2.0, web2py includes a powerful pluralization system (PS). This means that when text marked for translation depends on a numeric variable, it may be translated differently based on the numeric value. For example in English we may render:
x book(s)
with
a book (x==1)
5 books (x==5)
English has one singular form and one plural form. The plural form is constructed by adding a "-s" or "-es" or using an exceptional form. web2py provides a way to define pluralization rules for each language, as well as exceptions to the default rules. In fact web2py already knows pluralization rules for many languages. It knows, for example, that Slovenian has one singular form and 3 plural forms (for x==2, x==3 or x==4 and x>4). These rules are encoded in "gluon/contrib/plural_rules/*.py" files and new files can be created. Explicit pluralizations for words are created by editing pluralization files using the administrative interface.
By default the PS is not activated. It is triggered by the symbols argument of the T function. For example:
T("You have %s %%{book}", symbols=10)
or, less verbosely:
T("You have %s %%{book}", 10)
Now the PS is activated for the word "book" and for the number 10. The result in English will be: "You have 10 books". Notice that "book" has been pluralized into "books".
The PS consists of 3 parts:
- placeholders
%%{}to mark words in theTinput - rule to give a decision which word form to use ("gluon/contrib/plural_rules/*.py")
- dictionary with word plural forms ("applications/app/languages/plural-*.py")
The value of symbols can be a single variable, a list/tuple of variables, or a dictionary.
A placeholder %%{} may consists of 3 parts:
%%{[<modifier>]<word>[<parameter>]}
where:
<modifier> ::= ! | !! | !!!
<word> ::= any word or phrase in singular in lower case (!)
<parameter> ::= [index] | (key) | (number)
Here are some possibilities:
%%{word}is equivalent to%%{word[0]}(if no modifiers are used).%%{word[index]}is used when symbols is a tuple. symbols[index] gives us anumberused to make a decision on which word form to choose. For example in:PS will be used for "word" and "var2" respectively.T("blabla %s %s %%{word[1]}", (var1, var2))
%%{word(key)}is used to get thenumberparameter from symbols[key] when symbols is a dictionary.%%{word(number)}allows to pass anumberdirectly (e.g.:%%{word(%i)}).
Other placeholders that also allow to pass a number directly are:
%%{?word?number}returns "word" ifnumber == 1, returns thenumberotherwise.%%{?number} or %%{??number}returnsnumberifnumber != 1, return nothing otherwise.
You can use several %%{} placeholders with one index:
T("%%{this} %%{is} %s %%{book}", var)
that generates:
var  output
------------------
 1   this is 1 book
 2   these are 2 books
 3   these are 2 books
 ...
Similarly you can pass a dictionary to symbols:
T("blabla %(var1)s %(wordcnt)s %%{word(wordcnt)}",
    dict(var1="tututu", wordcnt=20))
which produces:
blabla tututu 20 words
You can replace "1" with any word you wish by this placeholder %%{?word?number}. For example:
T("%%{this} %%{is} %%{?a?%s} %%{book}", var)
produces:
var  output
------------------
 1   this is a book
 2   these are 2 books
 3   these are 3 books
 ...
Inside %%{...} you can also use the following modifiers:
!to capitalize the text (equivalent tostring.capitalize)!!to capitalize every word (equivalent tostring.title)!!!to capitalize every character (equivalent tostring.upper)
Notice you can use \ to escape ! and ?.
Translations, pluralization, and MARKMIN
You can also use the powerful MARKMIN syntax inside translation strings by replacing
T("hello world")
with
T.M("hello world")
Now the string accepts MARKMIN markup as described in Chapter 5
Cookies
web2py uses the Python cookies modules for handling cookies.
Cookies from the browser are in request.cookies and cookies sent by the server are in response.cookies.
You can set a cookie as follows:
response.cookies['mycookie'] = 'somevalue'
response.cookies['mycookie']['expires'] = 24 * 3600
response.cookies['mycookie']['path'] = '/'
The second line tells the browser to keep the cookie for 24 hours. The third line tells the browser to send the cookie back to any application (URL path) at the current domain. Note, if you do not specify a path for the cookie, the browser will assume the path of the URL that was requested, so the cookie will only be returned to the server when that same URL path is requested.
The cookie can be made secure with:
response.cookies['mycookie']['secure'] = True
This tells the browser only to send the cookie back over HTTPS and not over HTTP.
The cookie can be retrieved with:
if request.cookies.has_key('mycookie'):
    value = request.cookies['mycookie'].value
Unless sessions are disabled, web2py, under the hood, sets the following cookie and uses it to handle sessions:
response.cookies[response.session_id_name] = response.session_id
response.cookies[response.session_id_name]['path'] = "/"
Note, if a single application includes multiple subdomains, and you want to share the session across those subdomains (e.g., sub1.yourdomain.com, sub2.yourdomain.com, etc.), you must explicitly set the domain of the session cookie as follows:
if not request.env.remote_addr in ['127.0.0.1', 'localhost']:
    response.cookies[response.session_id_name]['domain'] = ".yourdomain.com"
The above can be useful if, for example, you want to allow the user to remain logged in across subdomains.
Application init
When you deploy web2py, you will want to set a default application, i.e., the application that starts when there is an empty path in the URL, as in:
http://127.0.0.1:8000
By default, when confronted with an empty path, web2py looks for an application called init. If there is no init application it looks for an application called welcome.
The name of the default application can be changed from init to another name by setting default_application in routes.py:
default_application = "myapp"
Note: default_application first appeared in web2py version 1.83.
Here are four ways to set the default application:
- Call your default application "init".
- Set
default_applicationto your application's name in routes.py - Make a symbolic link from "applications/init" to your application's folder.
- Use URL rewrite as discussed in the next section.
URL rewrite
web2py has the ability to rewrite the URL path of incoming requests prior to calling the controller action (URL mapping), and conversely, web2py can rewrite the URL path generated by the URL function (reverse URL mapping). One reason to do this is for handling legacy URLs, another is to simplify paths and make them shorter.
web2py includes two distinct URL rewrite systems: an easy-to-use parameter-based system for most use cases, and a flexible pattern-based system for more complex cases. To specify the URL rewrite rules, create a new file in the "web2py" folder called routes.py (the contents of routes.py will depend on which of the two rewrite systems you choose, as described in the next two sections). The two systems cannot be mixed.
Notice that if you edit routes.py, you must reload it. This can be done in two ways: by restarting the web server or by clicking on the routes reload button in admin. If there is a bug in routes, they will not reload.
Parameter-based system
The parameter-based (parametric) router provides easy access to several "canned" URL-rewrite methods. Its capabilities include:
- Omitting default application, controller and function names from externally-visible URLs (those created by the URL() function)
- Mapping domains (and/or ports) to applications or controllers
- Embedding a language selector in the URL
- Removing a fixed prefix from incoming URLs and adding it back to outgoing URLs
- Mapping root files such as /robots.txt to an applications static directory
The parametric router also provides somewhat more flexible validation of incoming URLs.
Suppose you've written an application called myapp and wish to make it the default, so that the application name is no longer part of the URL as seen by the user. Your default controller is still default, and you want to remove its name from user-visible URLs as well. Here's what you put in routes.py:
routers = dict(
    BASE  = dict(default_application='myapp'),
)
That's it. The parametric router is smart enough to know how to do the right thing with URLs such as:
http://domain.com/myapp/default/myapp
or
http://domain.com/myapp/myapp/index
where normal shortening would be ambiguous. If you have two applications, myapp and myapp2, you'll get the same effect, and additionally myapp2's default controller will be stripped from the URL whenever it's safe (which is mostly all the time).
Here is another case: suppose you want to support URL-based languages, where your URLs look like this:
http://myapp/en/some/path
or (rewritten)
http://en/some/path
Here's how:
routers = dict(
    BASE  = dict(default_application='myapp'),
    myapp = dict(languages=['en', 'it', 'jp'], default_language='en'),
)
Now an incoming URL like this:
http:/domain.com/it/some/path
will be routed to:
/myapp/some/path
and request.uri_language will be set to 'it', so you can force the translation. You can also have language-specific static files.
http://domain.com/it/static/filename
will be mapped to:
applications/myapp/static/it/filename
if that file exists. If it doesn't, then URLs like:
http://domain.com/it/static/base.css
will still map to:
applications/myapp/static/base.css
(because there is no static/it/base.css).
So you can now have language-specific static files, including images, if you need to. Domain mapping is supported as well:
routers = dict(
    BASE  = dict(
        domains = {
            'domain1.com' : 'app1',
            'domain2.com' : 'app2',
        }
    ),
)
does what you'd expect.
routers = dict(
    BASE  = dict(
        domains = {
            'domain.com:80'  : 'app/insecure',
            'domain.com:443' : 'app/secure',
        }
    ),
)
maps http://domain.com accesses to the controller named insecure, while HTTPS accesses go to the secure controller. Alternatively, you can map different ports to different apps, in the obvious way.
For further information, please consult the file "routes.parametric.example.py" provided in the "examples" folder of the standard web2py distribution.
Note: The parameter-based system first appeared in web2py version 1.92.1.
Pattern-based system
Although the parameter-based system just described should be sufficient for most use cases, the alternative pattern-based system provides some additional flexibility for more complex cases. To use the pattern-based system, instead of defining routers as dictionaries of routing parameters, you define two lists (or tuples) of 2-tuples, routes_in and routes_out. Each tuple contains two elements: the pattern to be replaced and the string that replaces it. For example:
routes_in = (
    ('/testme', '/examples/default/index'),
)
routes_out = (
    ('/examples/default/index', '/testme'),
)
With these routes, the URL:
http://127.0.0.1:8000/testme
is mapped into:
http://127.0.0.1:8000/examples/default/index
To the visitor, all links to the page URL looks like /testme.
The patterns have the same syntax as Python regular expressions. For example:
(r'.*\.php', '/init/default/index'),
maps all URLs ending in ".php" to the index page.
The second term of a rule can also be a redirection to another page:
(r'.*\.php', '303->http://example.com/newpage'),
Here 303 is the HTTP code for the redirect response.
Sometimes you want to get rid of the application prefix from the URLs because you plan to expose only one application. This can be achieved with:
routes_in = (
    ('/(?P<any>.*)', '/init/\g<any>'),
)
routes_out = (
    ('/init/(?P<any>.*)', '/\g<any>'),
)
There is also an alternative syntax that can be mixed with the regular expression notation above. It consists of using $name instead of (?P<name>\w+) or \g<name>. For example:
routes_in = (
    ('/$c/$f', '/init/$c/$f'),
)

routes_out = (
    ('/init/$c/$f', '/$c/$f'),
)
would also eliminate the "/init" application prefix in all URLs.
Using the $name notation, you can automatically map routes_in to routes_out, provided you don't use any regular expressions. For example:
routes_in = (
    ('/$c/$f', '/init/$c/$f'),
)

routes_out = [(x, y) for (y, x) in routes_in]
If there are multiple routes, the first to match the URL is executed. If no pattern matches, the path is left unchanged.
You can use $anything to match anything (.*) until the end of the line.
Here is a minimal "routes.py" for handling favicon and robots requests:
routes_in = (
    (r'/favicon\.ico', '/examples/static/favicon.ico'),
    (r'/robots\.txt', '/examples/static/robots.txt'),
)
routes_out = ()
Here is a more complex example that exposes a single app "myapp" without unnecessary prefixes but also exposes admin, appadmin and static:
routes_in = (
    ('/admin/$anything', '/admin/$anything'),
    ('/static/$anything', '/myapp/static/$anything'),
    ('/appadmin/$anything', '/myapp/appadmin/$anything'),
    ('/favicon.ico', '/myapp/static/favicon.ico'),
    ('/robots.txt', '/myapp/static/robots.txt'),
)
routes_out = [(x, y) for (y, x) in routes_in[:-2]]
The general syntax for routes is more complex than the simple examples we have seen so far. Here is a more general and representative example:
routes_in = (
    (r'140\.191\.\d+\.\d+:https?://www\.web2py\.com:post /(?P<any>.*)\.php',
     '/test/default/index?vars=\g<any>'),
)
It maps http or https POST requests (note lower case "post") to host www.web2py.com from a remote IP matching the regular expression
r'140\.191\.\d+.\d+'
requesting a page matching the regular expression
r'/(?P<any>.*)\.php'
into
'/test/default/index?vars=\g<any>'
where \g<any> is replaced by the matching regular expression.
The general syntax is
'[remote address]:[protocol]://[host]:[method] [path]'
If the first section of the pattern (all but [path]) is missing, web2py provides a default:
'.*?:https?://[^:/]+:[a-z]+'
The entire expression is matched as a regular expression, so "." must be escaped and any matching subexpression can be captured using (?P<...>...) using Python regex syntax. The request method (typically GET or POST) must be lower case. The URL being matched has had any %xx escapes unquoted.
This allows to reroute requests based on the client IP address or domain, based on the type of the request, on the method, and the path. It also allows web2py to map different virtual hosts into different applications. Any matched subexpression can be used to build the target URL and, eventually, passed as a GET variable.
All major web servers, such as Apache and lighttpd, also have the ability to rewrite URLs. In a production environment that may be an option instead of routes.py. Whatever you decide to do we strongly suggest that you do not hardcode internal URLs in your app and use the URL function to generate them. This will make your application more portable in case routes should change.
Application-Specific URL rewrite
When using the pattern-based system, an application can set its own routes in an application-specific routes.py file located in the applications base folder. This is enabled by configuring routes_app in the base routes.py to determine from an incoming URL the name of the application to be selected. When this happens, the application-specific routes.py is used in place of the base routes.py.
The format of routes_app is identical to routes_in, except that the replacement pattern is simply the application name. If applying routes_app to the incoming URL does not result in an application name, or the resulting application-specific routes.py is not found, the base routes.py is used as usual.
Note: routes_app first appeared in web2py version 1.83.
Default application, controller, and function
When using the pattern-based system, the name of the default application, controller, and function can be changed from init, default, and index respectively to another name by setting the appropriate value in routes.py:
default_application = "myapp"
default_controller = "admin"
default_function = "start"
Note: These items first appeared in web2py version 1.83.
Routes on error
You can also use routes.py to re-route requests to special actions in case there is an error on the server. You can specify this mapping globally, for each app, for each error code, or for each app and error code. Here is an example:
routes_onerror = [
    ('init/400', '/init/default/login'),
    ('init/*', '/init/static/fail.html'),
    ('*/404', '/init/static/cantfind.html'),
    ('*/*', '/init/error/index')
]
For each tuple, the first string is matched against "[app name]/[error code]". If a match is found, the failed request is re-routed to the URL in the second string of the matching tuple. If the error handling URL is a not a static file, the following GET variables will be passed to the error action:
code: the HTTP status code (e.g., 404, 500)ticket: in the form of "[app name]/[ticket number]" (or "None" if no ticket)requested_uri: equivalent torequest.env.request_urirequest_url: equivalent torequest.url
These variables will be accessible to the error handling action via request.vars and can be used in generating the error response. In particular, it is a good idea for the error action to return the original HTTP error code instead of the default 200 (OK) status code. This can be done by setting response.status = request.vars.code. It is also possible to have the error action send (or queue) an email to an administrator, including a link to the ticket in admin.
Unmatched errors display a default error page. This default error page can also be customized here (see "routes.parametric.example.py" and "routes.patterns.example.py" in the "examples" folder):
error_message = '<html><body><h1>%s</h1></body></html>'
error_message_ticket = '''<html><body><h1>Internal error</h1>
     Ticket issued: <a href="/admin/default/ticket/%(ticket)s"
     target="_blank">%(ticket)s</a></body></html>'''
The first variable contains the error message when an invalid application or function is requested. The second variable contains the error message when a ticket is issued.
routes_onerror work with both routing mechanisms.
In "routes.py" you can also specify an action in charge of error handling:
error_handler = dict(application='error',
                     controller='default',
                     function='index')
If the error_handler is specified the action is called without user redirection and the handler action will be in charge of dealing with the error. In the event that the error-handling page itself returns an error, web2py will fall back to its old static responses.
Static asset management
Since version 2.1.0, web2py has the ability to manage static assets.
When an application is in development, static file can change often, therefore web2py sends static files with no cache headers. This has the side-effect of "forcing" the browser to request static files at every request. This results in low performance when loading the page.
In a "production" site, you may want to serve static files with cache headers to prevent un-necessary downloads since static files do not change.
cache headers allow the browser to fetch each file only once, thus saving bandwidth and reducing loading time.
Yet there is a problem: What should the cache headers declare? When should the files expire? When the files are first served, the server cannot forecast when they will be changed.
A manual approach consists of creating subfolders for different versions of static files. For example an early version of "layout.css" can be made available at the URL "/myapp/static/css/1.2.3/layout.css". When you change the file, you create a new subfolder and you link it as "/myapp/static/css/1.2.4/layout.css".
This procedure works but it is pedantic since every time you update the css file, you must remember to move it to another folder, change the URL of the file in your layout.html and deploy.
Static asset management solves the problem by allowing the developer to declare a version for a group of static files and they will be requested again only when the version number changes. The asset version number is made part of the file url as in the previous example. The difference from the previous approach is that the version number only appears in the URL, not in the file system.
If you want to serve "/myapp/static/layout.css" with the cache headers, you just need to include the file with a modified URL that includes a version number:
/myapp/static/_1.2.3/layout.css
(notice the URL defines a version number, it does not appear anywhere else).
Notice that the URL starts with "/myapp/static/", followed by a version number composed by an underscore and 3 integers separated by a period (as described in SemVer), then followed by the filename. Also notice that you do not have to create a "_1.2.3/" folder.
Every time the static file is requested with a version in the url, it will be served with "far in the future" cache headers, specifically:
Cache-Control : max-age=315360000
Expires: Thu, 31 Dec 2037 23:59:59 GMT
This means that the browser will fetch those files only once, and they will be saved "forever" in the browser's cache.
Every time the "_1.2.3/filename" is requested, web2py will remove the version part from the path and serve your file with far in the future headers so they will be cached forever. If you changed the version number in the URL, this tricks the browser into thinking it is requesting a different file, and the file is fetched again.
You can use "_1.2.3", "_0.0.0", "_999.888.888", as long as the version starts with underscore followed by three numbers separated by period.
When in development, you can use response.files.append(...) to link the static URLs of static files. In this case you can include the "_1.2.3/" part manually, or you take advantage of a new parameter of the response object: response.static_version. Just include the files the way you used to, for example
{{response.files.append(URL('static', 'layout.css'))}}
and in models set
response.static_version = '1.2.3'
This will rewrite automatically every "/myapp/static/layout.css" url as "/myapp/static/_1.2.3/layout.css", for every file included in response.files.
In models, you can also set
response.static_version_urls = True
to rewrite any link to the static directory, aside from just those included in response.files.
Often in production you let the webserver (apache, nginx, etc.) serve the static files. You need to adjust your configuration in such a way that it will "skip" the "_1.2.3/" part.
For example, in Apache, change this:
AliasMatch ^/([^/]+)/static/(.*) /home/www-data/web2py/applications/$1/static/$2
into this:
AliasMatch ^/([^/]+)/static/(?:_[\d]+.[\d]+.[\d]+/)?(.*) /home/www-data/web2py/applications/$1/static/$2
Similarly, in Nginx change this:
location ~* /(\w+)/static/ {
    root /home/www-data/web2py/applications/;
    expires max;
}
into this:
location ~* /(\w+)/static(?:/_[\d]+.[\d]+.[\d]+)?/(.*)$ {
   alias /home/www-data/web2py/applications/$1/static/$2;
   expires max;
}
Running tasks in the background
In web2py, every HTTP request is served in its own thread. Threads are recycled for efficiency and managed by the web server. For security, the web server sets a time-out on each request. This means that actions should not run tasks that take too long, should not create new threads, and should not fork processes (it is possible but not recommended).
The proper way to run time-consuming tasks is doing it in the background. There is not a single way of doing it, but here we describe three mechanisms that are built into web2py: cron, homemade task queues, and scheduler.
By cron we refer to a web2py functionality not to the Unix Cron mechanism. The web2py cron works on windows too.
web2py cron is the way to go if you need tasks in the background at scheduled times and these tasks take a relatively short time compared to the time interval between two calls. Each task runs in its own process, and multiple tasks can run concurrently, but you have no control over how many tasks run. If accidentally one task overlaps with itself, it can cause a database lock and a spike in memory usage.
web2py scheduler takes a different approach. The number of running processes is fixed, and they can run on different machines. Each process is called a worker. Each worker picks a task when available and executes it as soon as possible after the time when it is scheduled to run, but not necessarily at that exact time. There cannot be more processes running than the number of scheduled tasks and therefore no memory spikes. Scheduler tasks can be defined in models and are stored in the database. The web2py scheduler does not implement a distributed queue since it assumes that the time to distribute tasks is negligible compared with the time to run the tasks. Workers pick up the task from the database.
Homemade tasks queues can be a simpler alternative to the web2py scheduler in some cases.
Cron
The web2py cron provides the ability for applications to execute tasks at preset times, in a platform-independent manner.
For each application, cron functionality is defined by a crontab file:
app/cron/crontab
It follows the syntax defined in ref. [cron] (with some extensions that are specific to web2py).
Before web2py 2.1.1, cron was enabled by default and could be disabled with the
-Ncommand line option. Since 2.1.1, cron is disabled by default and can be enabled by the-Yoption. This change was motivated by the desire to push users toward using the new scheduler (which is superior to the cron mechanism) and also because cron may impact on performance.
This means that every application can have a separate cron configuration and that cron config can be changed from within web2py without affecting the host OS itself.
Here is an example:
0-59/1  *  *  *  *  root python /path/to/python/script.py
30      3  *  *  *  root *applications/admin/cron/db_vacuum.py
*/30    *  *  *  *  root **applications/admin/cron/something.py
@reboot root    *mycontroller/myfunction
@hourly root    *applications/admin/cron/expire_sessions.py
The last two lines in this example use extensions to regular cron syntax to provide additional web2py functionality.
The file "applications/admin/cron/expire_sessions.py" actually exists and ships with the admin app. It checks for expired sessions and deletes them. "applications/admin/cron/crontab" runs this task hourly.
If the task/script is prefixed with an asterisk (*) and ends with .py, it will be executed in the web2py environment. This means you will have all the controllers and models at your disposal. If you use two asterisks (**), the models will not be executed. This is the recommended way of calling, as it has less overhead and avoids potential locking problems.
Notice that scripts/functions executed in the web2py environment require a manual db.commit() at the end of the function or the transaction will be reverted.
web2py does not generate tickets or meaningful tracebacks in shell mode, which is how cron is run, so make sure that your web2py code runs without errors before you set it up as a cron task as you will likely not be able to see those errors when run from cron. Moreover, be careful how you use models: while the execution happens in a separate process, database locks have to be taken into account in order to avoid pages waiting for cron tasks that may be blocking the database. Use the ** syntax if you don't need to use the database in your cron task.
You can also call a controller function, in which case there is no need to specify a path. The controller and function will be that of the invoking application. Take special care about the caveats listed above. Example:
*/30 * * * * root *mycontroller/myfunction
If you specify @reboot in the first field in the crontab file, the given task will be executed only once, at web2py startup. You can use this feature if you want to pre-cache, check, or initialize data for an application on web2py startup. Note that cron tasks are executed in parallel with the application --- if the application is not ready to serve requests until the cron task is finished, you should implement checks to reflect this. Example:
@reboot root *mycontroller/myfunction
Depending on how you are invoking web2py, there are four modes of operation for web2py cron.
- soft cron: available under all execution modes
- hard cron: available if using the built-in web server (either directly or via Apache mod_proxy)
- external cron: available if you have access to the system's own cron service
- No cron
The default is hard cron if you are using the built-in web server; in all other cases, the default is soft cron. Soft cron is the default method if you are using CGI, FASTCGI or WSGI (but note that soft cron is not enabled by default in the standard wsgihandler.py file provided with web2py).
With soft cron your tasks will be executed on the first call (page load) to web2py after the time specified in crontab; but only after processing the page, so no delay will be observed by the user. Obviously, there is some uncertainty regarding precisely when the task will be executed, depending on the traffic the site receives. Also, the cron task may get interrupted if the web server has a page load timeout set. If these limitations are not acceptable, see external cron. Soft cron is a reasonable last resort, but if your web server allows other cron methods, they should be preferred over soft cron.
Hard cron is the default if you are using the built-in web server (either directly or via Apache mod_proxy). Hard cron is executed in a parallel thread, so unlike soft cron, there are no limitations with regard to run time or execution time precision.
External cron is not default in any scenario, but requires you to have access to the system cron facilities. It runs in a parallel process, so none of the limitations of soft cron apply. This is the recommended way of using cron under WSGI or FASTCGI.
Example of line to add to the system crontab, (usually /etc/crontab):
0-59/1 * * * * web2py cd /var/www/web2py/ && python web2py.py -J -C -D 1 >> /tmp/cron.output 2>&1
With external cron, make sure to add either -J (or --cronjob, which is the same) as indicated above so that web2py knows that task is executed by cron. Web2py sets this internally with soft and hard cron.
Homemade task queues
While cron is useful to run tasks at regular time intervals, it is not always the best solution to run a background task. For this purpose web2py provides the ability to run any Python script as if it were inside a controller:
python web2py.py -S app -M -R applications/app/private/myscript.py -A a b c
where -S app tells web2py to run "myscript.py" as "app", -M tells web2py to execute models, and -A a b c passes optional command line arguments:
sys.argv = ['applications/app/private/myscript.py', 'a', 'b', 'c']
to "myscript.py".
This type of background process should not be executed via cron (except perhaps for cron @reboot) because you need to be sure that no more than one instance is running at the same time. With cron it is possible that a process starts at cron iteration 1 and is not completed by cron iteration 2, so cron starts it again, and again, and again - thus jamming the mail server.
In Chapter 8, we will provide an example of how to use the above method to send emails.
web2py Scheduler
The mainstream web2py solution for running tasks in the background (and therefore away from the webserver process) is the built-in scheduler.
The stable API consists of these functions:
- disable()
- resume()
- terminate()
- kill()
- queue_task()
- task_status()
- stop_task()
The web2py scheduler works very much like the task queue described in the previous sub-section with some differences:
- It provides a standard mechanism for creating, scheduling, and monitoring tasks.
- There is not a single background process but a set of workers processes.
- The job of worker nodes can be monitored because their state, as well as the state of the tasks, is stored in the database.
- It works without web2py but that is not documented here.
The scheduler does not use cron, although one can use cron @reboot to start the worker nodes.
More information about deploying the scheduler under Linux and Windows is in Chapter 13.
In the scheduler, a task is simply a function defined in a model (or in a module and imported by a model). For example:
def task_add(a, b):
    return a + b
Tasks will always be called in the same environment seen by controllers and therefore they see all the global variables defined in models, including database connections (db). Tasks differ from a controller action because they are not associated with an HTTP request and therefore there is no request.env. Also, tasks can access another environmental variable that is not present in normal requests: W2P_TASK. W2P_TASK.id holds the scheduler_task.id and W2P_TASK.uuid the scheduler_task.uuid field of the task that is running.
Remember to call
db.commit()at the end of every task if it involves inserts/updates to the database. web2py commits by default at the end of a successful action but the scheduler tasks are not actions.
To enable the scheduler you must instantiate the Scheduler class in a model. The recommended way to enable the scheduler to your app is to create a model file named scheduler.py and define your function there. After the functions, you can put the following code into the model:
from gluon.scheduler import Scheduler
scheduler = Scheduler(db)
If your tasks are defined in a module (as opposed to a model) you may have to restart the workers.
The task is scheduled with
scheduler.queue_task(task_add, pvars=dict(a=1, b=2))
Parameters
The first argument of the Scheduler class must be the database to be used by the scheduler to communicate with the workers. This can be the db of the app or another dedicated db, perhaps one shared by multiple apps. If you use SQLite it's recommended to use a separate db from the one used by your app in order to keep the app responsive. Once the tasks are defined and the Scheduler is instantiated, all that is needed to do is to start the workers. You can do that in several ways:
python web2py.py -K myapp
starts a worker for the app myapp. If you want start multiple workers for the same app, you can do so just passing myapp,myapp. You can pass also the group_names (overriding the one set in your model) with
python web2py.py -K myapp:group1:group2,myotherapp:group1
If you have a model called scheduler.py you can start/stop the workers from web2py's default window (the one you use to set the ip address and the port).
Scheduler Deployment
One last nice addition: if you use the embedded webserver, you can start the webserver and the scheduler with just one line of code (this assumes you don't want the web2py window popping up, else you can use the "Schedulers" menu instead)
python web2py.py -a yourpass -K myapp -X
You can pass the usual parameters (-i, -p, here -a prevents the window from showing up), pass whatever app in the -K parameter and append a -X. The scheduler will run alongside the webserver!
Windows users looking to create a service should see in Chapter 13.
Complete Scheduler signature
Scheduler's complete signature is:
Scheduler(db,
          tasks=None,
          migrate=True,
          worker_name=None,
          group_names=None,
          heartbeat=HEARTBEAT,
          max_empty_runs=0,
          discard_results=False,
          utc_time=False)
Let's see them in order:
dbis the database DAL instance where you want the scheduler tables be placed.tasksis a dictionary that maps task names into functions. If you do not pass this parameter, function will be searched in the app environment.worker_nameis None by default. As soon as the worker is started, a worker name is generated as hostname-uuid. If you want to specify that, be sure that it's unique.group_namesis by default set to [main]. All tasks have agroup_nameparameter, set to main by default. Workers can only pick up tasks of their assigned group.
NB: This is useful if you have different workers instances (e.g. on different machines) and you want to assign tasks to a specific worker.
NB2: It's possible to assign a worker more groups, and they can be also all the same, as
['mygroup','mygroup']. Tasks will be distributed taking into consideration that a worker with group_names['mygroup','mygroup']is able to process the double of the tasks a worker with group_names['mygroup']is.
heartbeatis by default set to 3 seconds. This parameter is the one controlling how often a scheduler will check its status on thescheduler_workertable and see if there are any ASSIGNED tasks to itself to process.max_empty_runsis 0 by default, that means that the worker will continue to process tasks as soon as they are ASSIGNED. If you set this to a value of, let's say, 10, a worker will die automatically if it's ACTIVE and no tasks are ASSIGNED to it for 10 loops. A loop is when a worker searches for tasks, every 3 seconds (or the setheartbeat)discard_resultsis False by default. If set to True, no scheduler_run records will be created.
NB: scheduler_run records will be created as before for FAILED, TIMEOUT and STOPPED tasks's statuses.
utc_timeis False by default. If you need to coordinate with workers living in different timezones, or do have problems with solar/DST times, supplying datetimes from different countries, etc, you can set this to True. The scheduler will honor the UTC time and work leaving the local time aside. Caveat: you need to schedule tasks with UTC times (for start_time, stop_time, and so on).
Now we have the infrastructure in place: defined the tasks, told the scheduler about them, started the worker(s). What remains is to actually schedule the tasks.
Tasks
Tasks can be scheduled programmatically or via appadmin. In fact, a task is scheduled simply by adding an entry in the table "scheduler_task", which you can access via appadmin:
http://127.0.0.1:8000/myapp/appadmin/insert/db/scheduler_task
The meaning of the fields in this table is obvious. The "args" and "vars"" fields are the values to be passed to the task in JSON format. In the case of the "task_add" above, an example of "args" and "vars" could be:
args = [3, 4]
vars = {}
or
args = []
vars = {'a': 3, 'b': 4}
The scheduler_task table is the one where tasks are organized.
To add tasks via the API, use
scheduler.queue_task('mytask', ...)
as explained later in this chapter in queue_task.
Task Lifecycle
All tasks follow a lifecycle
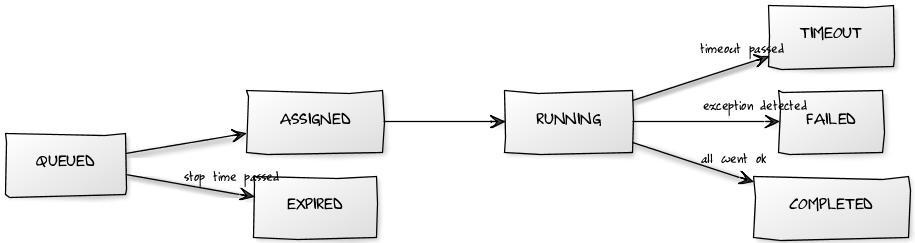
By default, when you send a task to the scheduler, it is in the QUEUED status. If you need it to be executed later, use the start_time parameter (default = now). If for some reason you need to be sure that the task does not get executed after a certain point in time (maybe a request to a web service that shuts down at 1AM, a mail that needs to be sent not after the working hours, etc...) you can set a stop_time (default = None) for it. If your task is NOT picked up by a worker before stop_time, it will be set as EXPIRED. Tasks with no stop_time set or picked up BEFORE stop_time are ASSIGNED to a worker. When a workers picks up a task, its status is set to RUNNING.
RUNNING tasks may end up:
- TIMEOUT when more than
nseconds passed withtimeoutparameter (default = 60 seconds). - FAILED when an exception is detected,
- COMPLETED when they successfully complete.
Values for start_time and stop_time should be datetime objects. To schedule "mytask" to run at 30 seconds from the current time, for example, you would do the following:
from datetime import timedelta as timed
scheduler.queue_task('mytask', start_time=request.now + timed(seconds=30))
Additionally, you can control how many times a task should be repeated (i.e. you need to aggregate some data at specified intervals). To do so, set the repeats parameter (default = 1 time only, 0 = unlimited). You can influence how many seconds should pass between executions with the period parameter (default = 60 seconds).
Default behavior: The time period is not calculated between the END of the first round and the START of the next, but from the START time of the first round to the START time of the next cycle). This can cause accumulating 'drift' in the start time of a job. After v 2.8.2, a new parameter
prevent_driftwas added, defaulting to False. If set to True when queing a task, the start_time parameter will take precedence over the period, preventing drift.
You can also set how many times the function can raise an exception (i.e. requesting data from a slow web service) and be queued again instead of stopping in FAILED status using the parameter retry_failed (default = 0, -1 = unlimited).
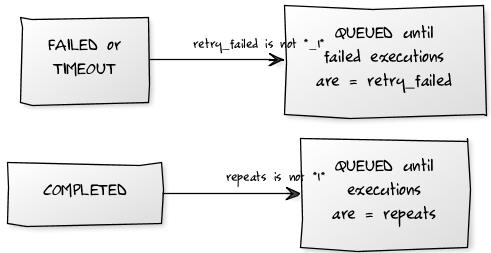
Summary: you have
periodandrepeatsto get an automatically rescheduled functiontimeoutto be sure that a function doesn't exceed a certain amount of timeretry_failedto control how many times the task can "fail"start_timeandstop_timeto schedule a function in a restricted timeframe
queue_task
The method:
scheduler.queue_task(function,
                     pargs=[],
                     pvars={},
                     start_time=now,  # datetime
                     stop_time=None,  # datetime
                     timeout = 60,  # seconds
                     prevent_drift=False,
                     period=60,  # seconds
                     immediate=False,
                     repeats=1)
allows you to queue tasks to be executed by workers. It returns a row (see here), and it takes the following parameters:
function(required): It can be a task name or a reference to an actual function.pargs: are the arguments to be passed to the task, stored as a Python list.pvars: are the named arguments to be passed to the task, stored as a Python dictionary.- all other scheduler_task columns can be passed as keyword arguments; the most important are shown.
For example:
scheduler.queue_task('demo1', [1, 2])
does the exact same thing as
scheduler.queue_task('demo1', pvars={'a': 1, 'b': 2})
as
st.validate_and_insert(function_name='demo1', args=json.dumps([1, 2]))
and as:
st.validate_and_insert(function_name='demo1', vars=json.dumps({'a': 1, 'b': 2}))
Here is a more complex complete example:
def task_add(a, b):
    return a + b

scheduler = Scheduler(db, tasks=dict(demo1=task_add))

scheduler.queue_task('demo1', pvars=dict(a=1, b=2), repeats = 0, period=180)
Since version 2.4.1 if you pass an additional parameter immediate=True it will force the main worker to reassign tasks. Until 2.4.1, the worker checks for new tasks every 5 cycles (so, 5*heartbeats seconds). If you had an app that needed to check frequently for new tasks, to get a snappy behaviour you were forced to lower the heartbeat parameter, putting the db under pressure for no reason. With immediate=True you can force the check for new tasks: it will happen at most as heartbeat seconds are passed
A call to scheduler.queue_task returns the task id and uuid of the task you queued (can be the one you passed or the auto-generated one), and possible errors:
<Row {'errors': {}, 'id': 1, 'uuid': '08e6433a-cf07-4cea-a4cb-01f16ae5f414'}>
If there are errors (usually syntax error or input validation errors), you get the result of the validation, and id and uuid will be None
<Row {'errors': {'period': 'enter an integer greater than or equal to 0'}, 'id': None, 'uuid': None}>
task_status
To query the scheduler about tasks, use task_status
scheduler.task_status(ref, output=False)
The argument ref can be
- integer --> lookup will be done by scheduler_task.id
- string --> lookup will be done by scheduler_task.uuid
- query --> lookup as you wish (as in db.scheduler_task.task_name == 'test1')
output=True fetches the scheduler_run record
It returns a single Row object, for the most recent queued task matching the criteria.
scheduler_run record is fetched by a left join, so it can have all fields == None
Example: retrieving scheduler task status, results and tracebacks
Here the scheduler instance is mysched
task = mysched.queue_task(f, ...)
task_status = mysched.task_status(task.id, output=True)
traceback = task_status.scheduler_run.traceback
result = task_status.scheduler_run.run_result #or
result = task_status.result
Results and output
The table "scheduler_run" stores the status of all running tasks. Each record references a task that has been picked up by a worker. One task can have multiple runs. For example, a task scheduled to repeat 10 times an hour will probably have 10 runs (unless one fails or they take longer than 1 hour). Beware that if the task has no return values, it is removed from the scheduler_run table as soon as it is finished.
Possible run statuses are:
RUNNING, COMPLETED, FAILED, TIMEOUT
If the run is completed, no exceptions are thrown, and there is no task timeout, the run is marked as COMPLETED and the task is marked as QUEUED or COMPLETED depending on whether it is supposed to run again at a later time. The output of the task is serialized in JSON and stored in the run record.
When a RUNNING task throws an exception, the run is mark as FAILED and the task is marked as FAILED. The traceback is stored in the run record.
Similarly, when a run exceeds the timeout, it is stopped and marked as TIMEOUT, and the task is marked as TIMEOUT.
In any case, the stdout is captured and also logged into the run record.
Due to multiprocessing limitations, beware of using either huge return values or huge print statements on the queued functions. As the output is buffered, your task may fail just because the parent process hangs on reading values. Also, leave print statements to the minimum, and if in need use a proper logging library that doesn't clutter stdout. As for huge return values, a better option can be to use a table where the function saves the result: you can return only the reference to the specific line of results without hindering the master process of the scheduler.
Using appadmin, one can check all RUNNING tasks, the output of COMPLETED tasks, the error of FAILED tasks, etc.
The scheduler also creates one more table called "scheduler_worker", which stores the workers' heartbeat and their status.
Managing processes
Worker fine management is hard. This module tries not to leave behind any platform (Mac, Win, Linux) .
When you start a worker, you may later want to:
- kill it "no matter what it's doing"
- kill it only if it is not processing tasks
- put it to sleep
Maybe you have yet some tasks queued, and you want to save some resources. You know you want them processed every hour, so, you'll want to:
- process all queued tasks and die automatically
All of these things are possible managing Scheduler parameters or the scheduler_worker table. To be more precise, for started workers you can change the status value of any worker to influence its behavior. As for tasks, workers can be in one of the following statuses: ACTIVE, DISABLED, TERMINATE or KILLED.
ACTIVE and DISABLED are "persistent", while TERMINATE or KILL, as statuses name suggest, are more "commands" than real statuses. Hitting ctrl+c is equal to set a worker to KILL

There are a few commodity functions since version 2.4.1 (self-explanatory)
scheduler.disable()
scheduler.resume()
scheduler.terminate()
scheduler.kill()
each function take an optional parameter, that can be a string or a list, to manage workers based on their group_names. It defaults to the group_names defined in the scheduler istantiation.
An example is better than a thousand words: scheduler.terminate('high_prio') will TERMINATE all the workers that are processing the high_prio tasks, while scheduler.terminate(['high_prio', 'low_prio']) will terminate all high_prio and low_prio workers.
Watch out: if you have a worker processing
high_prioandlow_prio,scheduler.terminate('high_prio')will terminate the worker alltogether, even if you didn't want to terminatelow_priotoo.
Everything that one can do via appadmin one can do programmatically by inserting and updating records in these tables.
Anyway, one should not update records relative to RUNNING tasks as this may create an un-expected behavior. The best practice is to queue tasks using the "queue_task" method.
For example:
scheduler.queue_task(function_name='task_add',
                     pargs=[],
                     pvars={'a': 3, 'b': 4},
                     repeats=10,  # run 10 times
                     period=3600,  # every 1h
                     timeout=120,  # should take less than 120 seconds
                     )
Notice that "scheduler_task" table fields "times_run", "last_run_time" and "assigned_worker_name" are not provided at schedule time but are filled automatically by the workers.
You can also retrieve the output of completed tasks:
completed_runs = db(db.scheduler_run.run_status='COMPLETED').select()
The scheduler is considered experimental because it needs more extensive testing and because the table structure may change as more features are added.
Reporting progress percentages
A special "word" encountered in the print statements of your functions clear all the previous output. That word is !clear!. This, coupled with the sync_output parameter, allows to report percentages.
Here is an example:
def reporting_percentages():
    time.sleep(5)
    print '50%'
    time.sleep(5)
    print '!clear!100%'
    return 1
The function reporting_percentages sleeps for 5 seconds, outputs 50%. Then, it sleeps other 5 seconds and outputs 100%. Note that the output in the scheduler_run table is synced every 2 seconds and that the second print statement that contains !clear!100% gets the 50% output cleared and replaced by 100% only.
scheduler.queue_task(reporting_percentages, sync_output=2)
Third party modules
web2py is written in Python, so it can import and use any Python module, including third party modules. It just needs to be able to find them. As with any Python application, modules can be installed in the official Python "site-packages" directory, and they can then be imported from anywhere inside your code.
Modules in the "site-packages" directory are, as the name suggests, site-level packages. Applications requiring site-packages are not portable unless these modules are installed separately. The advantage of having modules in "site-packages" is that multiple applications can share them. Let's consider, for example, the plotting package called "matplotlib". You can install it from the shell using the PEAK easy_install command [easy-install] (or its modern replacement pip [PIP] ):
easy_install py-matplotlib
and then you can import it into any model/controller/view with:
import matplotlib
The web2py source distribution, and the Windows binary distribution has a site-packages in the top-level folder. The Mac binary distribution has a site-packages folder in the folder:
web2py.app/Contents/Resources/site-packages
The problem with using site-packages is that it becomes difficult to use different versions of a single module at the same time, for example there could be two applications but each one uses a different version of the same file. In this example, sys.path cannot be altered because it would affect both applications.
For this kind of situation, web2py provides another way to import modules in such a way that the global sys.path is not altered: by placing them in the "modules" folder of an application. One side benefit is that the module will be automatically copied and distributed with the application.
Once a module "mymodule.py" is placed into an app "modules/" folder, it can be imported from anywhere inside a web2py application (without need to alter
sys.pathwith):import mymodule
Execution environment
While everything discussed here works fine, we recommend instead building your application using components, as described in Chapter 12.
web2py model and controller files are not Python modules in that they cannot be imported using the Python import statement. The reason for this is that models and controllers are designed to be executed in a prepared environment that has been pre-populated with web2py global objects (request, response, session, cache and T) and helper functions. This is necessary because Python is a statically (lexically) scoped language, whereas the web2py environment is created dynamically.
web2py provides the exec_environment function to allow you to access models and controllers directly. exec_environment creates a web2py execution environment, loads the file into it and then returns a Storage object containing the environment. The Storage object also serves as a namespace mechanism. Any Python file designed to be executed in the execution environment can be loaded using exec_environment. Uses for exec_environment include:
- Accessing data (models) from other applications.
- Accessing global objects from other models or controllers.
- Executing controller functions from other controllers.
- Loading site-wide helper libraries.
This example reads rows from the user table in the cas application:
from gluon.shell import exec_environment
cas = exec_environment('applications/cas/models/db.py')
rows = cas.db().select(cas.db.user.ALL)
Another example: suppose you have a controller "other.py" that contains:
def some_action():
    return dict(remote_addr=request.env.remote_addr)
Here is how you can call this action from another controller (or from the web2py shell):
1 2 3 | from gluon.shell import exec_environment
other = exec_environment('applications/app/controllers/other.py', request=request)
result = other.some_action()
|
In line 2, request=request is optional. It has the effect of passing the current request to the environment of "other". Without this argument, the environment would contain a new and empty (apart from request.folder) request object. It is also possible to pass a response and a session object to exec_environment. Be careful when passing request, response and session objects --- modification by the called action or coding dependencies in the called action could lead to unexpected side effects.
The function call in line 3 does not execute the view; it simply returns the dictionary unless response.render is called explicitly by "some_action".
One final caution: don't use exec_environment inappropriately. If you want the results of actions in another application, you probably should implement an XML-RPC API (implementing an XML-RPC API with web2py is almost trivial). Don't use exec_environment as a redirection mechanism; use the redirect helper.
Cooperation
There are many ways applications can cooperate:
- Applications can connect to the same database and thus share tables. It is not necessary that all tables in the database are defined by all applications, but they must be defined by those applications that use them. All applications that use the same table, but one, must define the table with
migrate=False. - Applications can embed components from other applications using the LOAD helper (described in Chapter 12).
- Applications can share sessions.
- Applications can call each other's actions remotely via XML-RPC.
- Applications can access each other's files via the filesystem (assuming they share the same filesystem).
- Applications can call each other's actions locally using
exec_environmentas discussed above. - Applications can import each other's modules using the syntax:
from applications.otherapp.modules import mymodule
or
import applications.otherapp.modules.othermodule
- Applications can import any module in the
PYTHONPATHsearch path,sys.path.
One app can load the session of another app using the command:
session.connect(request, response, masterapp='appname', db=db)
Here "appname" is the name of the master application, the one that sets the initial session_id in the cookie. db is a database connection to the database that contains the session table (web2py_session). All apps that share sessions must use the same database for session storage.
Logging
Python provides logging APIs. Web2py provides a mechanism to configure it so that apps can use it.
In your application, you can create a logger, for example in a model:
import logging
logger = logging.getLogger("web2py.app.myapp")
logger.setLevel(logging.DEBUG)
and you can use it to log messages of various importance
logger.debug("Just checking that %s", details)
logger.info("You ought to know that %s", details)
logger.warn("Mind that %s", details)
logger.error("Oops, something bad happened %s", details)
logging is a standard Python module described at https://docs.python.org/2/library/logging.html (Python 2.x) and https://docs.python.org/3/library/logging.html (Python 3.x)
The string "web2py.app.myapp" defines an app-level logger.
For this to work properly, you need a configuration file for the logger. One is provided by web2py in the "examples" folder "logging.example.conf". You need to copy the file to web2py's directory and rename the file to "logging.conf" and customize it as necessary.
This file is self documenting, so you should open it and read it.
To create a configurable logger for application "myapp", you must add myapp to the [loggers] keys list:
[loggers]
keys=root,rocket,markdown,web2py,rewrite,app,welcome,myapp
and you must add a [logger_myapp] section, using [logger_welcome] as a starting point.
[logger_myapp]
level=WARNING
qualname=web2py.app.myapp
handlers=consoleHandler
propagate=0
The "handlers" directive specifies the type of logging and here it is logging "myapp" to the console.
WSGI
web2py and WSGI have a love-hate relationship. Our perspective is that WSGI was developed as a protocol to connect web servers to web applications in a portable way, and we use it for that purpose. web2py at its core is a WSGI application: gluon.main.wsgibase. Some developers have pushed WSGI to its limits as a protocol for middleware communications and develop web applications as an onion with many layers (each layer being a WSGI middleware developed independently of the entire framework). web2py does not adopt this structure internally. This is because we feel the core functionality of a frameworks (handling cookies, session, errors, transactions, dispatching) can be better optimized for speed and security if they are handled by a single comprehensive layer.
Yet web2py allows you to use third party WSGI applications and middleware in three ways (and their combinations):
- You can edit the file "wsgihandler.py" and include any third party WSGI middleware.
- You can connect third party WSGI middleware to any specific action in your apps.
- You can call a third party WSGI app from your actions.
The only limitation is that you cannot use third party middleware to replace core web2py functions.
External middleware
Consider the file "wsgihandler.py":
#...
LOGGING = False
#...
if LOGGING:
    application = gluon.main.appfactory(wsgiapp=gluon.main.wsgibase,
                                        logfilename='httpserver.log',
                                        profilerfilename=None)
else:
    application = gluon.main.wsgibase
When LOGGING is set to True, gluon.main.wsgibase is wrapped by the middleware function gluon.main.appfactory. It provides logging to the "httpserver.log" file. In a similar fashion you can add any third party middleware. We refer to the official WSGI documentation for more details.
Internal middleware
Given any action in your controllers (for example index) and any third party middleware application (for example MyMiddleware, which converts output to upper case), you can use a web2py decorator to apply the middleware to that action. Here is an example:
class MyMiddleware:
    """converts output to upper case"""
    def __init__(self, app):
        self.app = app
    def __call__(self, environ, start_response):
        items = self.app(environ, start_response)
        return [item.upper() for item in items]

@request.wsgi.middleware(MyMiddleware)
def index():
    return 'hello world'
We cannot promise that all third party middleware will work with this mechanism.
Calling WSGI applications
It is easy to call WSGI app from a web2py action. Here is an example:
def test_wsgi_app(environ, start_response):
    """this is a test WSGI app"""
    status = '200 OK'
    response_headers = [('Content-type', 'text/plain'),
                        ('Content-Length', '13')]
    start_response(status, response_headers)
    return ['hello world!\n']

def index():
    """a test action that calls the previous app and escapes output"""
    items = test_wsgi_app(request.wsgi.environ,
                          request.wsgi.start_response)
    for item in items:
        response.write(item, escape=False)
    return response.body.getvalue()
In this case, the index action calls test_wsgi_app and verbatim copies the returned value to page output. Notice that index is not itself a WSGI app and it must use the normal web2py API (such as response.write to write to the socket).