Chapter 13: Deployment recipes
Deployment: development and production
AppConfig module
The environment between your development and production system will almost certainly mean a different database configuration, different mail servers and possibly other differences.
Web2py intends the private directory for storing information which is not replicated in a typical deployment to production (although you need to take care to make sure that you are not deploying that directory).
The contributed module AppConfig allows the private directory to store a simple configuration text file to define settings which vary between dev and production, such as database connections. By default it is a text file which is pythonesque, but json is also supported.
The welcome app now uses this module in db.py to read configuration from a file in the application's private directory. By default the path to this file is
private/appconfig.iniBy default, appconfig.ini allows you to define a database connection and smtp configuration. When the application is stable, the module can be set to cached mode to reduce overhead.
from gluon.contrib.appconfig import AppConfig
...
myconf = AppConfig(reload=False)
Applications created in a recent version of web2py default to having the database connection defined with AppConfig.
The values in app_config.ini are fetched and cast from a string value by like so:
myconf = AppConfig()
...
a_config_value = myconf.take('example_section.example_key', cast=int)
Because the casting occurs from a string, and non empty strings cast to True, the safest way to represent a Boolean False is with an empty string:
[example_section]
example_key =
Deployment recipes: Infrastructure
There are multiple ways to deploy web2py in a production environment. The details depend on the configuration and the services provided by the host.
In this chapter we consider the following issues:
- Production deployment (Apache, Nginx, Lighttpd, Cherokee)
- Security
- Scalability using Redis and a load balancer.
- Deployment on PythonAnywhere, Heroku, Amazon EC2, and on the Google App Engine platform(GAE[gae] )
web2py comes with an SSL[ssl] enabled web server, the Rocket wsgiserver[rocket] . While this is a fast web server, it has limited configuration capabilities. For this reason it is best to deploy web2py behind Apache[apache] , Nginx[nginx] Lighttpd[lighttpd] he or Cherokee[cherokee] . These are free and open-source web servers that are customizable and have been proven to be reliable in high traffic production environments. They can be configured to serve static files directly, deal with HTTPS, and pass control to web2py for dynamic content.
Until a few years ago, the standard interface for communication between web servers and web applications was the Common Gateway Interface (CGI)[cgi] . The main problem with CGI is that it creates a new process for each HTTP request. If the web application is written in an interpreted language, each HTTP request served by the CGI scripts starts a new instance of the interpreter. This is slow, and it should be avoided in a production environment. Moreover, CGI can only handle simple responses. It cannot handle, for example, file streaming.
web2py provides a file cgihandler.py to interface to CGI.
One solution to this problem is to use the mod_python module for Apache. We discuss it here because its use is still very common, though the mod_python project has officially been abandoned by the Apache Software Foundation. mod_python starts one instance of the Python interpreter when Apache starts, and serves each HTTP request in its own thread without having to restart Python each time. This is a better solution than CGI, but it is not an optimal solution, since mod_python uses its own interface for communication between the web server and the web application. In mod_python, all hosted applications run under the same user-id/group-id, which presents security issues.
web2py provides a file modpythonhandler.py to interface to mod_python.
In the last few years, the Python community has come together behind a new standard interface for communication between web servers and web applications written in Python. It is called Web Server Gateway Interface (WSGI)[wsgi-w] [wsgi-o] . web2py was built on WSGI, and it provides handlers for using other interfaces when WSGI is not available.
Apache supports WSGI via the module mod_wsgi[modwsgi] developed by Graham Dumpleton.
web2py provides a file wsgihandler.py to interface to WSGI.
Some web hosting services do not support mod_wsgi. In this case, we must use Apache as a proxy and forward all incoming requests to the web2py built-in web server (running for example on localhost:8000).
In both cases, with mod_wsgi and/or mod_proxy, Apache can be configured to serve static files and deal with SSL encryption directly, taking the burden off web2py.
Nginx uses uWSGI instead of WSGI, a similar but different protocol which requires its own python adapter.
The Lighttpd web server does not currently support the WSGI interface, but it does support the FastCGI[fastcgi] interface, which is an improvement over CGI. FastCGI's main aim is to reduce the overhead associated with interfacing the web server and CGI programs, allowing a server to handle more HTTP requests at once.
According to the Lighttpd web site, "Lighttpd powers several popular Web 2.0 sites such as YouTube and Wikipedia. Its high speed IO-infrastructure allows them to scale several times better with the same hardware than with alternative web-servers". Lighttpd with FastCGI is, in fact, faster than Apache with mod_wsgi.
web2py provides a file fcgihandler.py to interface to FastCGI.
web2py also includes a gaehandler.py to interface with the Google App Engine (GAE). On GAE, web applications run "in the cloud". This means that the framework completely abstracts any hardware details. The web application is automatically replicated as many times as necessary to serve all concurrent requests. Replication in this case means more than multiple threads on a single server; it also means multiple processes on different servers. GAE achieves this level of scalability by blocking write access to the file system, and all persistent information must be stored in the Google BigTable datastore or in memcache.
On non-GAE platforms, scalability is an issue that needs to be addressed, and it may require some tweaks in the web2py applications. The most common way to achieve scalability is by using multiple web servers behind a load-balancer (a simple round robin, or something more sophisticated, receiving heartbeat feedback from the servers).
Even if there are multiple web servers, there must be one, and only one, database server. By default, web2py uses the file system for storing sessions, error tickets, uploaded files, and the cache. This means that in the default configuration, the corresponding folders have to be shared folders.
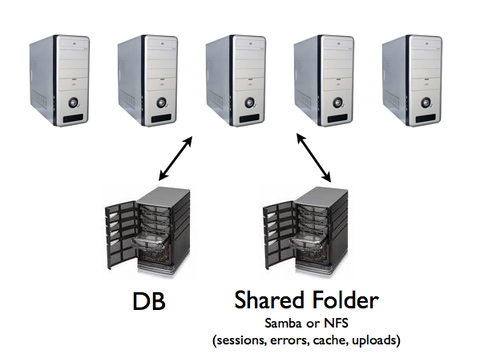
In the rest of the chapter, we consider various recipes that may provide an improvement over this naive approach, including:
- Store sessions in the database, in cache or do not store sessions at all.
- Store tickets on local filesystem and move them into the database in batches.
- Use memcache instead of cache.ram and cache.disk.
- Store uploaded files in the database instead of the shared filesystem.
While we recommend following the first three recipes, the fourth recipe may provide an advantage mainly in the case of small files, but may be counterproductive for large files.
anyserver.py
Web2py comes with a file called anyserver.py that implements WSGI interfaces to the following popular servers: bjoern, cgi, cherrypy, diesel, eventlet, fapws, flup, gevent, gunicorn, mongrel2, paste, rocket, tornado, twisted, wsgiref
You can use any of these servers, for example Tornado, simply by doing:
python anyserver.py -s tornado -i 127.0.0.1 -p 8000 -l -PHere -l is for logging and -P is for the profiler. For information on all the command line options use "-h":
python anyserver.py -h
Linux and Unix
One step production deployment
Here are some steps to install apache+python+mod_wsgi+web2py+postgresql from scratch.
On Ubuntu:
wget https://raw.githubusercontent.com/web2py/web2py/master/scripts/setup-web2py-ubuntu.sh
chmod +x setup-web2py-ubuntu.sh
sudo ./setup-web2py-ubuntu.sh
On Fedora:
wget https://raw.githubusercontent.com/web2py/web2py/master/scripts/setup-web2py-fedora.sh
chmod +x setup-web2py-fedora.sh
sudo ./setup-web2py-fedora.sh
Both of these scripts should run out of the box, but every Linux installation is a bit different, so make sure you check the source code of these scripts before you run them. In the case of Ubuntu, most of what they do is explained below. They do not implement the scalability optimizations discussed below.
Apache setup
In this section, we use Ubuntu Server Edition as the reference platform. The configuration commands are very similar on other Debian-based Linux distribution, but they may differ for Fedora-based systems (which uses yum instead of apt-get). You can use either 2.2.x or 2.4.x
First, make sure all the necessary Python and Apache packages are installed by typing the following shell commands:
sudo apt-get update
sudo apt-get -y upgrade
sudo apt-get -y install openssh-server
sudo apt-get -y install python
sudo apt-get -y install python-dev
sudo apt-get -y install apache2
sudo apt-get -y install libapache2-mod-wsgi
sudo apt-get -y install libapache2-mod-proxy-html
Then, enable the SSL module, the proxy module, and the WSGI module in Apache:
sudo ln -s /etc/apache2/mods-available/proxy_http.load            /etc/apache2/mods-enabled/proxy_http.load
sudo a2enmod ssl
sudo a2enmod proxy
sudo a2enmod proxy_http
sudo a2enmod wsgi
Create the SSL folder, and put the SSL certificates inside it:
sudo mkdir /etc/apache2/ssl
You should obtain your SSL certificates from a trusted Certificate Authority such as verisign.com, but, for testing purposes, you can generate your own self-signed certificates following the instructions in ref.[openssl]
Then restart the web server:
sudo /etc/init.d/apache2 restart
The Apache configuration file is:
/etc/apache2/sites-available/default
The Apache logs are in:
/var/log/apache2/
mod_wsgi
Download and unzip web2py source on the machine where you installed the web server above.
Install web2py under /home/www-data/, for example, and give ownership to user www-data and group www-data. These steps can be performed with the following shell commands:
cd /home/www-data/
sudo wget http://web2py.com/examples/static/web2py_src.zip
sudo unzip web2py_src.zip
sudo chown -R www-data:www-data /home/www-data/web2py
To set up web2py with mod_wsgi, create a new Apache configuration file:
/etc/apache2/sites-available/web2py
and include the following code:
<VirtualHost *:80>
  ServerName web2py.example.com
  WSGIDaemonProcess web2py user=www-data group=www-data display-name=%{GROUP}
  WSGIProcessGroup web2py
  WSGIScriptAlias / /home/www-data/web2py/wsgihandler.py

#This is Apache 2.2.x permission syntax. See Apache docs for 2.4 syntax
# http://httpd.apache.org/docs/2.4/upgrading.html#run-time

  <Directory /home/www-data/web2py>
    AllowOverride None
    Order Allow,Deny
    Deny from all
    <Files wsgihandler.py>
      Allow from all
    </Files>
  </Directory>

  AliasMatch ^/([^/]+)/static/(?:_[\d]+.[\d]+.[\d]+/)?(.*)            /home/www-data/web2py/applications/$1/static/$2
  <Directory /home/www-data/web2py/applications/*/static/>
    Order Allow,Deny
    Allow from all
  </Directory>

  <Location /admin>
  Deny from all
  </Location>

  <LocationMatch ^/([^/]+)/appadmin>
  Deny from all
  </LocationMatch>

  CustomLog /private/var/log/apache2/access.log common
  ErrorLog /private/var/log/apache2/error.log
</VirtualHost>
When you restart Apache, it should pass all the requests to web2py without going through the Rocket wsgiserver.
Move the handler script
Finally, you need to relocate the handler script web2py/handlers/wsgihandler.py. As documented in the handlers directory, the script you want should be moved or copied to the parent directory (i.e. the same directory as the web2py.py script). symlinking may cause apache permission problems.
Some wsgi background
Here are some explanations:
WSGIDaemonProcess web2py user=www-data group=www-data display-name=%{GROUP}
defines a daemon process group in context of "web2py.example.com". By defining this inside of the virtual host, only this virtual host can access this using WSGIProcessGroup, including any virtual host with the same server name but on a different port. The "user" and "group" options should be set to the user who has write access to the directory where web2py was setup. You do not need to set "user" and "group" if you made the web2py installation directory writable by the default user that Apache runs as. The "display-name" option makes the process name appears in ps output as "(wsgi-web2py)" instead of as name of Apache web server executable. As no "processes" or "threads" options are specified, the daemon process group will have a single process with 15 threads running within that process. This is usually more than adequate for most sites and should be left as is. If overriding it, do not use "processes=1" as doing so will disable any in-browser WSGI debugging tools that check the "wsgi.multiprocess" flag. This is because any use of the "processes" option will cause that flag to be set to true, even a single process, and such tools expect that it be set to false. Note: if your application code or third party extension module is not thread safe, use options "processes=5 threads=1" instead. This will create five processes in the daemon process group where each process is single threaded. You might consider using "maximum-requests=1000" if your application leaks Python objects because it is unable to garbage collect properly.
WSGIProcessGroup web2py
delegates running of all WSGI applications to the daemon process group that was configured using the WSGIDaemonProcess directive.
WSGIScriptAlias / /home/www-data/web2py/wsgihandler.py
mounts the web2py application. In this case it is mounted at the root of the web site.
<Directory /home/www-data/web2py>
  ...
</Directory>
gives Apache permission to access the WSGI script file.
<Directory /home/www-data/web2py/applications/*/static/>
  Order Allow,Deny
  Allow from all
</Directory>
Instructs Apache to bypass web2py when searching static files.
<Location /admin>
  Deny from all
</Location>
and
<LocationMatch ^/([^/]+)/appadmin>
  Deny from all
</LocationMatch>
blocks public access to admin and appadmin
Normally we would just allow permission to the whole directory where the WSGI script file is located, but web2py places the WSGI script file in a directory which contains other source code, including the admin interface password. Opening up the whole directory would cause security issues, because technically Apache would be given permission to serve all the files up to any user who traversed to that directory via a mapped URL. To avoid security problems, explicitly deny access to the contents of the directory, except for the WSGI script file, and prohibit a user from doing any overrides from a .htaccess file to be extra safe.
You can find a completed, commented, Apache wsgi configuration file in:
scripts/web2py-wsgi.conf
This section was created with help from Graham Dumpleton, developer of mod_wsgi.
Setting password
In production it may be necessary to set the admin password programmatically. This can be done from the Bash shell with
sudo -u www-data python -c "from gluon.main import save_password; save_password(raw_input('admin password: '), 443)"
mod_wsgi and SSL
To force some applications (for example admin and appadmin) to go over HTTPS, store the SSL certificate and key files:
/etc/apache2/ssl/server.crt
/etc/apache2/ssl/server.key
and edit the Apache configuration file web2py.conf and append:
<VirtualHost *:443>
  ServerName web2py.example.com
  SSLEngine on
  SSLCertificateFile /etc/apache2/ssl/server.crt
  SSLCertificateKeyFile /etc/apache2/ssl/server.key

  WSGIProcessGroup web2py

  WSGIScriptAlias / /home/www-data/web2py/wsgihandler.py

  <Directory /home/www-data/web2py>
    AllowOverride None
    Order Allow,Deny
    Deny from all
    <Files wsgihandler.py>
      Allow from all
    </Files>
  </Directory>

  AliasMatch ^/([^/]+)/static/(?:_[\d]+.[\d]+.[\d]+/)?(.*)         /home/www-data/web2py/applications/$1/static/$2

  <Directory /home/www-data/web2py/applications/*/static/>
    Order Allow,Deny
    Allow from all
  </Directory>

  CustomLog /private/var/log/apache2/access.log common
  ErrorLog /private/var/log/apache2/error.log

</VirtualHost>
Restart Apache and you should be able to access:
https://www.example.com/admin
https://www.example.com/examples/appadmin
http://www.example.com/examples
but not:
http://www.example.com/admin
http://www.example.com/examples/appadmin
mod_proxy
Some Unix/Linux distributions can run Apache, but do not support mod_wsgi. In this case, the simplest solution is to run Apache as a proxy and have Apache deal with static files only.
Here is a minimal Apache configuration:
NameVirtualHost *:80
#### deal with requests on port 80
<VirtualHost *:80>
   Alias / /home/www-data/web2py/applications
   ### serve static files directly
   <LocationMatch "^/welcome/static/.*">
    Order Allow, Deny
    Allow from all
   </LocationMatch>
   ### proxy all the other requests
   <Location "/welcome">
     Order deny,allow
     Allow from all
     ProxyRequests off
     ProxyPass http://localhost:8000/welcome
     ProxyPassReverse http://localhost:8000/
     ProxyHTMLURLMap http://127.0.0.1:8000/welcome/ /welcome
   </Location>
   LogFormat "%h %l %u %t "%r" %>s %b" common
   CustomLog /var/log/apache2/access.log common
</VirtualHost>
The above script exposes only the "welcome" application. To expose other applications, you need to add the corresponding <Location>...</Location> with the same syntax as done for the "welcome" app.
The script assumes there is a web2py server running on port 8000. Before restarting Apache, make sure this is the case:
nohup python web2py.py -a '<recycle>' -i 127.0.0.1 -p 8000 &
You can specify a password with the -a option or use the "<recycle>" parameter instead of a password. In the latter case, the previously stored password is reused and the password is not stored in the shell history.
You can also use the parameter "<ask>", to be prompted for a password.
The nohup commands makes sure the server does not die when you close the shell. nohup logs all output into nohup.out.
To force admin and appadmin over HTTPS use the following Apache configuration file instead:
NameVirtualHost *:80
NameVirtualHost *:443
#### deal with requests on port 80
<VirtualHost *:80>
   Alias / /home/www-data/web2py/applications
   ### admin requires SSL
   <LocationMatch "^/admin">
     SSLRequireSSL
   </LocationMatch>
   ### appadmin requires SSL
   <LocationMatch "^/welcome/appadmin/.*">
     SSLRequireSSL
   </LocationMatch>
   ### serve static files directly
   <LocationMatch "^/welcome/static/.*">
     Order Allow,Deny
     Allow from all
   </LocationMatch>
   ### proxy all the other requests
   <Location "/welcome">
     Order deny,allow
     Allow from all
     ProxyPass http://localhost:8000/welcome
     ProxyPassReverse http://localhost:8000/
   </Location>
   LogFormat "%h %l %u %t "%r" %>s %b" common
   CustomLog /var/log/apache2/access.log common
</VirtualHost>
<VirtualHost *:443>
   SSLEngine On
   SSLCertificateFile /etc/apache2/ssl/server.crt
   SSLCertificateKeyFile /etc/apache2/ssl/server.key
   <Location "/">
     Order deny,allow
     Allow from all
     ProxyPass http://localhost:8000/
     ProxyPassReverse http://localhost:8000/
   </Location>
   LogFormat "%h %l %u %t "%r" %>s %b" common
   CustomLog /var/log/apache2/access.log common
</VirtualHost>
The administrative interface must be disabled when web2py runs on a shared host with mod_proxy, or it will be exposed to other users.
Start as Linux daemon
Unless you are using mod_wsgi, you should setup the web2py server so that it can be started/stopped/restarted as any other Linux daemon, and so it can start automatically at the computer boot stage.
The process to set this up is specific to various Linux/Unix distributions.
In the web2py folder, there are two scripts which can be used for this purpose:
scripts/web2py.ubuntu.sh
scripts/web2py.fedora.sh
On Ubuntu, or other Debian-based Linux distribution, edit "web2py.ubuntu.sh" and replace the "/usr/lib/web2py" path with the path of your web2py installation, then type the following shell commands to move the file into the proper folder, register it as a startup service, and start it:
sudo cp scripts/web2py.ubuntu.sh /etc/init.d/web2py
sudo update-rc.d web2py defaults
sudo /etc/init.d/web2py start
On Fedora, or any other distributions based on Fedora, edit "web2py.fedora.sh" and replace the "/usr/lib/web2py" path with the path of your web2py installation, then type the following shell commands to move the file into the proper folder, register it as a startup service and start it:
sudo cp scripts/web2py.fedora.sh /etc/rc.d/init.d/web2pyd
sudo chkconfig --add web2pyd
sudo service web2py start
Nginx
Nginx is a free, open-source web server that has rapidly been gaining popularity for its amazing performance.
Unlike traditional servers, Nginx does not use threads. Instead it uses an ansynchronous/event-driven architecture to handle concurrency. This architecture results in a small and predictable memory usage, even under heavy load.
Nginx is more than an HTTP server and reverse proxy, it is also an IMAP/POP3 proxy server.
Nginx is easy to configure and its configuration files and simpler and more compact than the corresponding Apache ones.
Nginx does not support WSGI but provides native support for the uWSGI [uwsgi] protocol.
On Ubuntu you can install Nginx with:
apt-get -y install nginx-full
Then you will need to create a configuration file such as the following:
# file /etc/nginx/sites-available/web2py
server {
        listen          80;
        server_name     $hostname;
        #to enable correct use of response.static_version
        #location ~* /(\w+)/static(?:/_[\d]+.[\d]+.[\d]+)?/(.*)$ {
        #    alias /home/www-data/web2py/applications/$1/static/$2;
        #    expires max;
        #}
        location ~* /(\w+)/static/ {
            root /home/www-data/web2py/applications/;
            #remove next comment on production
            #expires max;
        }
        location / {
            #uwsgi_pass      127.0.0.1:9001;
            uwsgi_pass      unix:///tmp/web2py.socket;
            include         uwsgi_params;
            uwsgi_param     UWSGI_SCHEME $scheme;
            uwsgi_param     SERVER_SOFTWARE    nginx/$nginx_version;
        }
}
server {
        listen 443 default_server ssl;
        server_name     $hostname;
        ssl_certificate         /etc/nginx/ssl/web2py.crt;
        ssl_certificate_key     /etc/nginx/ssl/web2py.key;
        ssl_prefer_server_ciphers on;
        ssl_session_cache shared:SSL:10m;
        ssl_session_timeout 10m;
        ssl_ciphers ECDHE-RSA-AES256-SHA:DHE-RSA-AES256-SHA:DHE-DSS-AES256-SHA:DHE-RSA-AES128-SHA:DHE-DSS-AES128-SHA;
        ssl_protocols SSLv3 TLSv1;
        keepalive_timeout    70;
        location / {
            #uwsgi_pass      127.0.0.1:9001;
            uwsgi_pass      unix:///tmp/web2py.socket;
            include         uwsgi_params;
            uwsgi_param     UWSGI_SCHEME $scheme;
            uwsgi_param     SERVER_SOFTWARE    nginx/$nginx_version;
        }

}
You will need to symlink the file and remove the default
ln -s /etc/nginx/sites-available/web2py /etc/nginx/sites-enabled/web2py
rm /etc/nginx/sites-enabled/default
You may also need to create the ssl folder for certificates and put certificates in there:
mkdir /etc/nginx/ssl
cp web2py.key /etc/nginx/ssl
cp web2py.crt /etc/nginx/ssl
You then need to install and setup uWSGI
sudo mkdir /etc/uwsgi
sudo mkdir /var/log/uwsgi
And create a configuration file "/etc/uwsgi/web2py.xml":
<uwsgi>
    <socket>/tmp/web2py.socket</socket>
    <pythonpath>/home/www-data/web2py/</pythonpath>
    <mount>/=wsgihandler:application</mount>
    <master/>
    <processes>4</processes>
    <harakiri>60</harakiri>
    <reload-mercy>8</reload-mercy>
    <cpu-affinity>1</cpu-affinity>
    <stats>/tmp/stats.socket</stats>
    <max-requests>2000</max-requests>
    <limit-as>512</limit-as>
    <reload-on-as>256</reload-on-as>
    <reload-on-rss>192</reload-on-rss>
    <uid>www-data</uid>
    <gid>www-data</gid>
    <no-orphans/>
</uwsgi>
This file assumes web2py is installed under "/home/www-data/web2py", as in the Apache case.
You also need to edit a second configuration file "/etc/init/uwsgi-emperor.conf":
# Emperor uWSGI script
description "uWSGI Emperor"
start on runlevel [2345]
stop on runlevel [06]
respawn
exec uwsgi --master --die-on-term --emperor /etc/uwsgi --logto /var/log/uwsgi/uwsgi.log
Finally restart everything:
start uwsgi-emperor
/etc/init.d/nginx restart
You can reload uwsgi with
restart uwsgi-emperor
You can stop it with
stop uwsgi-emperor
You can reload web2py only (without restarting uwsgi) with
touch /etc/uwsgi/web2py.xml
All these steps are performed automatically by the provided scripts:
scripts/setup-web2py-nginx-uwsgi-on-centos.sh
scripts/setup-web2py-nginx-uwsgi-ubuntu.sh
Lighttpd
You can install Lighttpd on a Ubuntu or other Debian-based Linux distribution with the following shell command:
apt-get -y install lighttpd
Once installed, edit /etc/rc.local and create a fcgi web2py background process
cd /var/www/web2py && sudo -u www-data nohup python fcgihandler.py &
Then, you need to edit the Lighttpd configuration file
/etc/lighttpd/lighttpd.conf
so that it can find the socket created by the above process. In the config file, write something like:
server.modules              = (
        "mod_access",
        "mod_alias",
        "mod_compress",
        "mod_rewrite",
        "mod_fastcgi",
        "mod_redirect",
        "mod_accesslog",
        "mod_status",
)

server.port = 80
server.bind = "0.0.0.0"
server.event-handler = "freebsd-kqueue"
server.error-handler-404 = "/test.fcgi"
server.document-root = "/home/www-data/web2py/"
server.errorlog      = "/tmp/error.log"

fastcgi.server = (
  "/handler_web2py.fcgi" => (
      "handler_web2py" => ( #name for logs
         "check-local" => "disable",
         "socket" => "/tmp/fcgi.sock"
      )
   ),
)

$HTTP["host"] = "(^|.)example.com$" {
 server.document-root="/var/www/web2py"
    url.rewrite-once = (
      "^(/.+?/static/.+)$" => "/applications$1",
      "(^|/.*)$" => "/handler_web2py.fcgi$1",
    )
}
Now check for syntax errors:
lighttpd -t -f /etc/lighttpd/lighttpd.conf
and (re)start the web server with:
/etc/init.d/lighttpd restart
Notice that FastCGI binds the web2py server to a Unix socket, not to an IP socket:
/tmp/fcgi.sock
This is where Lighttpd forwards the HTTP requests to and receives responses from. Unix sockets are lighter than Internet sockets, and this is one of the reasons Lighttpd+FastCGI+web2py is fast. As in the case of Apache, it is possible to setup Lighttpd to deal with static files directly, and to force some applications over HTTPS. Refer to the Lighttpd documentation for details.
Examples in this section were taken from John Heenan's post in web2pyslices.
The administrative interface must be disabled when web2py runs on a shared host with FastCGI, or it will be exposed to the other users.
Shared hosting with mod_python
There are times, specifically on shared hosts, when one does not have the permission to configure the Apache config files directly. At the time of writing most of these hosts still run mod_python even if it is not maintained any more in favor of mod_wsgi.
You can still run web2py. Here we show an example of how to set it up.
Place contents of web2py into the "htdocs" folder.
In the web2py folder, create a file "web2py_modpython.py" file with the following contents:
from mod_python import apache
import modpythonhandler

def handler(req):
    req.subprocess_env['PATH_INFO'] = req.subprocess_env['SCRIPT_URL']
    return modpythonhandler.handler(req)
Create/update the file ".htaccess" with the following contents:
SetHandler python-program
PythonHandler web2py_modpython
#PythonDebug On
This example was provided by Niktar.
Cherokee with FastCGI
Here are the steps required to setup web2py with Cherokee:
Download Cherokee[cherokee]
Untar, build, and install:
tar -xzf cherokee-0.9.4.tar.gz
cd cherokee-0.9.4
./configure --enable-fcgi && make
make install
Start web2py normally at least once to make sure it creates the "applications" folder.
Write a shell script named "startweb2py.sh" with the following code:
#!/bin/bash
cd /var/web2py
python /var/web2py/fcgihandler.py &
and give the script execute privileges and run it. This will start web2py under FastCGI handler.
Start Cherokee and cherokee-admin:
sudo nohup cherokee &
sudo nohup cherokee-admin &
By default, cherokee-admin only listens at local interface on port 9090. This is not a problem if you have full, physical access on that machine. If this is not the case, you can force it to bind to an IP address and port by using the following options:
-b,  --bind[=IP]
-p,  --port=NUM
or do an SSH port-forward (more secure, recommended):
ssh -L 9090:localhost:9090 remotehost
Open "http://localhost:9090" in your browser. If everything is ok, you will get cherokee-admin.
In cherokee-admin web interface, click "info sources". Choose "Local Interpreter". Write in the following code, then click "Add New".
Nick: web2py
Connection: /tmp/fcgi.sock
Interpreter: /var/web2py/startweb2py.sh
Finally, perform the following remaining steps:
- Click "Virtual Servers", then click "Default".
- Click "Behavior", then, under that, click "default".
- Choose "FastCGI" instead of "List and Send" from the list box.
- At the bottom, select "web2py" as "Application Server"
- Put a check in all the checkboxes (you can leave Allow-x-sendfile). If there is a warning displayed, disable and enable one of the checkboxes. (It will automatically re-submit the application server parameter. Sometimes it doesn't, which is a bug).
- Point your browser to "http://yoursite", and "Welcome to web2py" will appear.
Postgresql
PostgreSQL is a free and open source database which is used in demanding production environments, for example, to store the .org domain name database, and has been proven to scale well into hundreds of terabytes of data. It has very fast and solid transaction support, and provides an auto-vacuum feature that frees the administrator from most database maintenance tasks.
On an Ubuntu or other Debian-based Linux distribution, it is easy to install PostgreSQL and its Python API with:
sudo apt-get -y install postgresql
sudo apt-get -y install python-psycopg2
It is wise to run the web server(s) and the database server on different machines. In this case, the machines running the web servers should be connected with a secure internal (physical) network, or should establish SSL tunnels to securely connect with the database server.
Edit the PostgreSQL configuration file
sudo nano /etc/postgresql/9.1/main/postgresql.conf
and make sure it contains these two lines
...
listen_addresses = 'localhost'
...
track_counts = on
...
autovacuum = on   # Enable autovacuum subprocess?  'on'
...
Edit the PostgreSQL client authentication file
sudo nano /etc/postgresql/9.1/main/pg_hba.conf
and change the method of those lines to trust
...
# "local" is for Unix domain socket connections only
local   all             all                                     trust
# IPv4 local connections:
host    all             all             127.0.0.1/32            trust
# IPv6 local connections:
host    all             all             ::1/128                 trust
...
Start the database server with:
sudo /etc/init.d/postgresql restart
When restarting the PostgreSQL server, it should notify which port it is running on. Unless you have multiple database servers, it should be 5432.
The PostgreSQL logs are in:
/var/log/postgresql/
Once the database server is up and running, create a user and a database so that web2py applications can use it:
sudo -u postgres createuser -PE -s myuser
postgresql> createdb -O myuser -E UTF8 mydb
postgresql> echo 'The following databases have been created:'
postgresql> psql -l
postgresql> psql mydb
The first of the commands will grant superuser-access to the new user, called myuser. It will prompt you for a password.
Any web2py application can connect to this database with the command:
db = DAL("postgres://myuser:mypassword@localhost:5432/mydb")
where mypassword is the password you entered when prompted, and 5432 is the port where the database server is running.
Normally you use one database for each application, and multiple instances of the same application connect to the same database. It is also possible for different applications to share the same database.
For database backup details, read the PostgreSQL documentation; specifically the commands pg_dump and pg_restore.
Start the scheduler as a Linux service (upstart)
To install the scheduler as a permanent daemon on Linux (w/ Upstart), put the following into /etc/init/web2py-scheduler.conf, assuming your web2py instance is installed in <user>'s home directory, running as <user>, with app <myapp>, on network interface eth0.
description "web2py task scheduler"
start on (local-filesystems and net-device-up IFACE=eth0)
stop on shutdown
respawn limit 8 60 # Give up if restart occurs 8 times in 60 seconds.
exec sudo -u <user> python /home/<user>/web2py/web2py.py -K <myapp>
respawn
You can then start/stop/restart/check status of the daemon with:
sudo start web2py-scheduler
sudo stop web2py-scheduler
sudo restart web2py-scheduler
sudo status web2py-scheduler
Initial Queuing of a Repeating Task
Task definition is done in a model file. But the initial queuing of a repeating task is most easily done from a non-exposed controller function. By doing this in a controller rather than in a model file, you remove unnecessary database accesses that would occur on every request to your website.
[The function could also be in a module or a private file, but in the controller, the web2py API and environment is readily accessible.]
A non-exposed function is any controller function that has an argument, so writing something like the following in a controller (e.g. default.py) gives you
def reinit_sched(protect=None):
    # put any preparatory code here
    #
    # schedule 2 tasks:
    sched.queue_task(foo)
    sched.queue_task(bar)
    #
    # put any afters code here
    db.commit()
and you can then easily call it with web2py.py -M -S appname/default/reinit_sched (a similar function can be used to stop a repeating task, perhaps for maintenance reasons)
Populating a Database on Deployment
Your application may have a need for a pre-populated database table. A simple example might be a table of color names, or the names of the months (perhaps in a special format not used in Python datetime routines). More complicated examples might include an initial inventory of parts, or the initial pages of a wiki.
The simple examples might be done via db.mycolors.insert(); the more complex examples might use a CSV file to fill in the values. As in the task queuing section above, this should be done using non-exposed controller functions. Table definition for a database is done in model files, but model files are read on every request, so one-time actions should not be in the model files where they would lower the responsiveness of your site.
[The function could also be in a module or a private file, but in the controller, the web2py API and environment is readily accessible.]
Again, a non-exposed function is any controller function that has an argument, so writing something like the following in a controller (e.g. default.py) gives you
def populate_colors(protected=None)
    collist = ["lime", "#00FF00", "olive", "#808000",
                "fuchsia", "#FF00FF", "maroon", "#800000"]:
    for i in range(0, len(collist), 2):
        k, v = collist[i:i+2]
        db.mycolors.insert(name=k, code=v)
    db.commit()
you can then easily call it with web2py.py -M -S appname/default/populate_colors
For the complex example using a CSV file, your function might look like:
def populate_colors(exposed=False):
  db.mycolors.import_from_csv_file(
    open(os.path.join(request.folder,
                      os.path.join('private', db_colors.csv')
                     ),
         'r')
    )
  db.commit()
and this would be called with web2py.py -M -S appname/default/populate_colors
See also Chapter 14, Populating database with dummy
Windows
IIS
If you don't need to run Apache for some other application on the server, on modern Windows Servers installing web2py behind IIS is easier (and more performant). The following steps explain how to setup IIS in order to serve web2py: Windows Server 2008R2 or higher is needed.
We'll start from the assumption that you're running 2012R2. The terms used for 2008R2 are slightly different but it shouldn't be a problem to reconcile the instructions. Of course the requirements are a Python installed on the server and you being able to run web2py with something like
python web2py.py -a 'yourpassword'This means that nothing is broken in your installation and that you can host successfully web2py behind IIS.
In order to run Python, IIS needs the CGI feature installed. In order to serve static files with IIS, we need also the Url Rewrite module that you can install from here
To let IIS "speak" with python, we need to install the wfastcgi module from here . This will install a little script, wfasctgi.py, that is the handler the IIS will use to communicate with Python.
Now, open the Internet Information Services (IIS) Manager and click on the node representing the server.
We need to create a FastCGI process that will be mapped to the handler running web2py.
Click on the FastCGI Settings box, and then to "Add Application": the "full path" needs to point to the python executable (something like "C:\Python27\python.exe") while the "Arguments" needs to point to the wfastcgi.py path (usually C:\Python27\Scripts\wfastcgi.py").
From 2.10.4, web2py ships with a configuration file (web.config, inside the examples directory) that overrides the default handlers in order to work. The IIS configuration prohibits altering the handlers from a configuration file, but it's easy to disable the check: go to "Feature Delegation", find "Handler Mappings" and set it to Read/Write. Web2py needs also to be able to write files in his directory, so please make sure that the IIS_IUSRS group has read/write access to the folder where web2py is.
If you want to use web2py under the root of IIS, copy the source code under the root of IIS (that is usually C:\inetpub\wwwroot). Now, copy the web.config out of the examples directory and put it on the root folder, alongside web2py.py. You only need to replace SCRIPT_PROCESSOR (near the end of the file) to match the FastCGI application we created earlier: it has a funny syntax, but it needs to match the format Full Path|Arguments of the FastCGI application.
If you have everything installed in the default paths, it needs to be something like C:\Python27\python.exe|C:\Python27\Scripts\wfastcgi.py
This is sufficient to use web2py as the "root" application of a site. If instead you need to run web2py under a subfolder (let's say, "web2pyapps", so you can reach the welcome app at http://hostname/web2pyapps/welcome/ instead of the default http://hostname/welcome/), two additional steps are needed:
- move the code to a subfolder named web2pyapps
- create a routes.py file with
routers = dict(BASE=dict(path_prefix = "web2pyapps"))in it - inside the IIS Manager, locate the web2pyapps folder, right click on it and select "Convert to Application"
Apache and mod_wsgi
Installing Apache, and mod_wsgi, under Windows requires a slightly different procedure. However, it is quite similar to Linux, so please read the Linux Apache notes above.
Here we assume a Windows binary Python 2.x is installed, you are running from source and web2py is located at c:/web2py.
Modern apache Windows binaries (e.g. 2.4.x) are not actually downloaded from apache.org. Instead, you download them from partner sites, such as ApacheHaus. The Apache site has a full list of such partners; search for Apache 2.4 windows binaries.
However, the Windows binary may not come with the wsgi module. In that case, visit the modwsgi home (currently at http://code.google.com/p/modwsgi/) and download the precompiled binary for your version of python and Apache. After you install Apache, put the .so library in the modules directory.
You'll need to modify httpd.conf to load the wsgi module; follow the example of other module load config lines.
LoadModule wsgi_module modules/mod_wsgi.so
The modwsgi wiki mentions Windows specifics: recommended reading.
You will need to setup httpd.conf as per any new Apache installation.
Certificate installation is the same for Windows as under Linux.
The Windows binary is most likely configured to load and configure the SSL modules 'out of the box' (the Apache Haus binary is like this).
web2py should be served on https and optionally on http. Typically this means port 80 and port 443 although your Windows server may be using these ports because IIS may be installed, in which case choose alternate ports.
However, we'll assume 80 and 443 for now. look for "Listen 80" and add this line after it
Listen 443
append the following lines at the end changing drive letter, port number, ServerName according to your values
NameVirtualHost *:443
<VirtualHost *:443>
  DocumentRoot "C:/web2py/applications"
  ServerName server1

  <Directory "C:/web2py">
    Order allow,deny
    Deny from all
  </Directory>

  <Location "/">
    Order deny,allow
    Allow from all
  </Location>

  <LocationMatch "^(/[\w_]*/static/.*)">
    Order Allow,Deny
    Allow from all
  </LocationMatch>

  WSGIScriptAlias / "C:/web2py/wsgihandler.py"
#and don't forget to move the handler script out of the handlers directory

  SSLEngine On
#these cert settings are correct for self-signed certificates
  SSLCertificateFile conf/server.crt
  SSLCertificateKeyFile conf/server.key

  LogFormat "%h %l %u %t "%r" %>s %b" common
  CustomLog logs/access.log common
</VirtualHost>
Save and check the config using: [Start > Program > Apache HTTP Server 2.2 > Configure Apache Server > Test Configuration]
If there are no problems you will see a command screen open and close. Now you can start Apache:
[Start > Program > Apache HTTP Server 2.2 > Control Apache Server > Start]
or better yet start the taskbar monitor
[Start > Program > Apache HTTP Server 2.2 > Control Apache Server]Now you can right-click on the red feather-like taskbar icon to "Open Apache Monitor" and then start, stop and restart Apache as required.
This section was first contributed by Jonathan Lundell.
Using nssm to run as a Windows service
What Linux calls a daemon, Windows calls a service. The web2py built-in rocket server can easily be installed/started/stopped as a Windows service. The same is true of the web2py scheduler.
Rather than maintaining Windows service code in web2py.py, the developers support the external wrapper-tool 'nssm'.
nssm is a well respected Windows tool with good features, such as automatic restart of services. It also means a consistent way of running web2py services, scheduler services and clean-up processes like session deletes. The use of the previous -W command-line option is no longer supported. The nssm method does not use the options.py file of the old method. Instead, options are passed on the command line (some exmaples are provided below)
nssm recipe: running the scheduler as a Windows service with nssm
Running the scheduler as a Windows service makes a lot of sense. The easiest approach is to download nssm (from htp://www.nssm.cc). nssm is an open source scheduling helper. It wraps around an executable command to turn it into a service. The command to start the scheduler is pythonw.exe -K <appname> We use nssm to wrap around this, becoming a service. Before doing this, you need to choose a name for your service. There are strong advantages to creating a specific service for each app which needs a scheduler. Therefore, your naming convention for services may be web2py_scheduler_app1
After extracting the nssm zip file, open a Windows command prompt in the folder containing the version for your architecture (32-bit or 64-bit), and type
nssm install web2py_scheduler_app1
This shows a dialog asking you to enter Application and Options. Application is the pythonw.exe executable from your Python installation. Options is the rest of the command line. You may need to provide the full path to your web2py.py script. For example, the options field in the nssm dialog may be:
c:\web2py\web2py.py -K app1
where app1 is the name of your application.
It is possible to invoke the scheduler with multiple applications. However, in this mode, web2py detaches each application's scheduler into a subprocess. Therefore, the process started by the service will not die if one of the scheduler instances runs into problems; rather, that child process would die. We then can't take advantage of Windows automatic service restart in case of failure. Using one app per service enables this feature.
nssm recipe: running web2py.py as a service
The example above shows how to use nssm. To run web2py in SSL mode on port 8041, and including some other options, you could give nssm a command line (in the options field of the nssm dialog) like this:
c:\web2py.py -p 8041 -i "0.0.0.0" --password="112233" --folder="d:\web2py_internet" --socket-timeout=10 --timeout=120 -c "d:\web2py_internet\applications\example.com.au.crt" -k "d:\web2py_internet\applications\web2py.key
(note that this is not best-practice for storing passwords, since a task manager which shows command lines reveals the password. Investigate the web2py command line option -a "<recycle>")
Securing sessions and admin
It is very dangerous to publicly expose the admin application and the appadmin controllers unless they run over HTTPS. Moreover, your password and credentials should never be transmitted unencrypted. This is true for web2py and any other web application.
In your applications, if they require authentication, you should make the session cookies secure with:
session.secure()
An easy way to setup a secure production environment on a server is to first stop web2py and then remove all the parameters_*.py files from the web2py installation folder. Then start web2py without a password. This will completely disable admin and appadmin.
nohup python web2py --nogui -p 8001 -i 127.0.0.1 -a '' &
Next, start a second web2py instance accessible only from localhost:
nohup python web2py --nogui -p 8002 -i 127.0.0.1 -a '<ask>'
and create an SSH tunnel from the local machine (the one from which you wish to access the administrative interface) to the server (the one where web2py is running, example.com), using:
ssh -L 8002:127.0.0.1:8002 username@example.com
Now you can access the administrative interface locally via the web browser at localhost:8002.
This configuration is secure because admin is not reachable when the tunnel is closed (the user is logged out).
This solution is secure on shared hosts if and only if other users do not have read access to the folder that contains web2py; otherwise users may be able to steal session cookies directly from the server.
Efficiency and scalability
web2py is designed to be easy to deploy and to setup. This does not mean that it compromises on efficiency or scalability, but it means you may need to tweak it to make it scalable.
In this section we assume multiple web2py installations behind a NAT server that provides local load-balancing.
In this case, web2py works out-of-the-box if some conditions are met. In particular, all instances of each web2py application must access the same database servers and must see the same files. This latter condition can be implemented by making the following folders shared:
applications/myapp/sessions
applications/myapp/errors
applications/myapp/uploads
applications/myapp/cache
The shared folders must support file locking. Possible solutions are ZFS (ZFS was developed by Sun Microsystems and is the preferred choice.), NFS (With NFS you may need to run thenlockmgr daemon to allow file locking.), or Samba (SMB).
It is possible to share the entire web2py folder or the entire applications folder, but this is not a good idea because this would cause a needless increase of network bandwidth usage.
We believe the configuration discussed above to be very scalable because it reduces the database load by moving to the shared filesystems those resources that need to be shared but do not need transactional safety (only one client at a time is supposed to access a session file, cache always needs a global lock, uploads and errors are write once/read many files).
Ideally, both the database and the shared storage should have RAID capability. Do not make the mistake of storing the database on the same storage as the shared folders, or you will create a new bottleneck there.
On a case-by-case basis, you may need to perform additional optimizations and we will discuss them below. In particular, we will discuss how to get rid of these shared folders one-by-one, and how to store the associated data in the database instead. While this is possible, it is not necessarily a good solution. Nevertheless, there may be reasons to do so. One such reason is that sometimes we do not have the freedom to set up shared folders.
Efficiency tricks
web2py application code is executed on every request, so you want to minimize this amount of code. Here is what you can do:
- Run once with
migrate=Truethen set all your tables tomigrate=False. - Bytecode compile your app using admin.
- Use
cache.ramas much as you can but make sure to use a finite set of keys, or else the amount of cache used will grow arbitrarily. - Minimize the code in models: do not define functions there, define functions in the controllers that need them or - even better - define functions in modules, import them and use those functions as needed.
- Do not put many functions in the same controller but use many controllers with few functions.
- Call
session.forget(response)in all controllers and/or functions that do not change the session. - Try to avoid web2py cron, and use a background process instead. web2py cron can start too many Python instances and cause excessive memory usage.
Sessions in database
It is possible to instruct web2py to store sessions in a database instead of in the sessions folder. This has to be done for each individual web2py application, although they may all use the same database to store sessions.
Given a database connection
db = DAL(...)
you can store the sessions in this database (db) by simply stating the following, in the same model file that establishes the connection:
session.connect(request, response, db)
If it does not exist already, web2py creates, under the hood, a table in the database called web2py_session_appname containing the following fields:
Field('locked', 'boolean', default=False),
Field('client_ip'),
Field('created_datetime', 'datetime', default=request.now),
Field('modified_datetime', 'datetime'),
Field('unique_key'),
Field('session_data', 'text')
"unique_key" is a uuid key used to identify the session in the cookie. "session_data" is the cPickled session data.
To minimize database access, you should avoid storing sessions when they are not needed with:
session.forget()
Sessions are automatically forgotten if unchanged.
With sessions in database, "sessions" folder does not need to be a shared folder because it will no longer be accessed.
Notice that, if sessions are disabled, you must not pass the
sessiontoform.acceptsand you cannot usesession.flashnor CRUD.
HAProxy a high availability load balancer
If you need multiple web2py processes running on multiple machines, instead of storing sessions in the database or in cache, you have the option to use a load balancer with sticky sessions.
Pound[pound] and HAProxy[haproxy] are two HTTP load balancers and Reverse proxies that provides sticky sessions. Here we discuss the latter because it seems to be more common on commercial VPS hosting.
By sticky sessions, we mean that once a session cookie has been issued, the load balancer will always route requests from the client associated to the session, to the same server. This allows you to store the session in the local filesystem without need for a shared filesystem.
To use HAProxy:
First, install it, on out Ubuntu test machine:
sudo apt-get -y install haproxy
Second edit the configuration file "/etc/haproxy.cfg" to something like this:
## this config needs haproxy-1.1.28 or haproxy-1.2.1

global
      log 127.0.0.1   local0
      maxconn 1024
      daemon

defaults
      log     global
      mode    http
      option  httplog
      option  httpchk
      option  httpclose
      retries 3
      option redispatch
      contimeout      5000
      clitimeout      50000
      srvtimeout      50000

listen 0.0.0.0:80
      balance url_param WEB2PYSTICKY
      balance roundrobin
      server  L1_1 10.211.55.1:7003  check
      server  L1_2 10.211.55.2:7004  check
      server  L1_3 10.211.55.3:7004  check
      appsession WEB2PYSTICKY len 52 timeout 1h
The listen directive tells HAProxy, which port to wait for connection from. The server directive tells HAProxy where to find the proxied servers. The appsession directory makes a sticky session and uses the a cookie called WEB2PYSTICKY for this purpose.
Third, enable this config file and start HAProxy:
/etc/init.d/haproxy restart
You can find similar instructions to setup Pound at the URL
http://web2pyslices.com/main/slices/take_slice/33
Cleaning up sessions
You should be aware that on a production environment, sessions pile up fast. web2py provides a script called:
scripts/sessions2trash.py
that when run in the background, periodically deletes all sessions that have not been accessed for a certain amount of time. Web2py provides a script to cleanup these sessions (it works for both file-based sessions and database sessions).
Here are some typical use cases:
- Delete expired sessions every 5 minutes:
nohup python web2py.py -S app -M -R scripts/sessions2trash.py &
or in Windows, use nssm as described above in the scheduler section. You will probably need to include the full path to both web2py.py and the scripts folder, and the trailing & is not needed.
- Delete sessions older than 60 minutes regardless of expiration, with verbose output, then exit:
python web2py.py -S app -M -R scripts/sessions2trash.py -A -o -x 3600 -f -v
- Delete all sessions regardless of expiry and exit:
python web2py.py -S app -M -R scripts/sessions2trash.py -A -o -x 0
session2trash.py has it own specific command line options that can be passed while launching web2py shell with the
command line.

NOTE: They must be preceeded by web2py command line option "-A" for them to be passed on to the script.

  -f, --force          Ignore session expiration. Force expiry based on -x option or auth.settings.expiration.
  -o, --once           Delete sessions, then exit. Essential when trigger trash sessions from system CRON JOB
  -s SECONDS, --sleep  Number of seconds to sleep between executions. Default 300.
  -v, --verbose        print verbose output, a second -v increases verbosity
  -x SECONDS, --expiration
                       Expiration value for sessions without expiration (in seconds)
- One last example if you want to launch sessions2trash.py from system CRON JOB and delete all expired sessions and exit:
python web2py.py -S app -M -R scripts/sessions2trash.py -C -A -o
In the previous examples app is the name of your application.
Uploading files in database
By default, all uploaded files handled by SQLFORMs are safely renamed and stored in the filesystem under the "uploads" folder. It is possible to instruct web2py to store uploaded files in the database instead.
Now, consider the following table:
db.define_table('dog',
    Field('name')
    Field('image', 'upload'))
where dog.image is of type upload. To make the uploaded image go in the same record as the name of the dog, you must modify the table definition by adding a blob field and link it to the upload field:
db.define_table('dog',
    Field('name')
    Field('image', 'upload', uploadfield='image_data'),
    Field('image_data', 'blob'))
Here "image_data" is just an arbitrary name for the new blob field.
Line 3 instructs web2py to safely rename uploaded images as usual, store the new name in the image field, and store the data in the uploadfield called "image_data" instead of storing the data on the filesystem. All of this is be done automatically by SQLFORMs and no other code needs to be changed.
With this tweak, the "uploads" folder is no longer needed.
On Google App Engine, files are stored by default in the database without the need to define an uploadfield, since one is created by default.
Collecting tickets
By default, web2py stores tickets (errors) on the local file system. It would not make sense to store tickets directly in the database, because the most common origin of error in a production environment is database failure.
Storing tickets is never a bottleneck, because this is ordinarily a rare event. Hence, in a production environment with multiple concurrent servers, it is more than adequate to store them in a shared folder. Nevertheless, since only the administrator needs to retrieve tickets, it is also OK to store tickets in a non-shared local "errors" folder and periodically collect them and/or clear them.
One possibility is to periodically move all local tickets to the database.
For this purpose, web2py provides the following script:
scripts/tickets2db.py
By default the script gets the db uri from a file saved into the private folder, ticket_storage.txt. This file should contain a string that is passed directly to a DAL instance, like:
mysql://username:password@localhost/test
postgres://username:password@localhost/test
...
This allows to leave the script as it is: if you have multiple applications, it will dynamically choose the right connection for every application. If you want to hardcode the uri in it, edit the second reference to db_string, right after the except line. You can run the script with the command:
nohup python web2py.py -S myapp -M -R scripts/tickets2db.py &
where myapp is the name of your application.
This script runs in the background and moves all tickets every 5 minutes to a table and removes the local tickets. You can later view the errors using the admin app, clicking on the "switch to: db" button at the top, with the same exact functionality as if they were stored on the file system.
With this tweak, the "errors" folder does not need to be a shared folder any more, since errors will be stored into the database.
Memcache
We have shown that web2py provides two types of cache: cache.ram and cache.disk. They both work on a distributed environment with multiple concurrent servers, but they do not work as expected. In particular, cache.ram will only cache at the server level; thus it becomes useless. cache.disk will also cache at the server level unless the "cache" folder is a shared folder that supports locking; thus, instead of speeding things up, it becomes a major bottleneck.
The solution is not to use them, but to use memcache instead. web2py comes with a memcache API.
To use memcache, create a new model file, for example 0_memcache.py, and in this file write (or append) the following code:
from gluon.contrib.memcache import MemcacheClient
memcache_servers = ['127.0.0.1:11211']
cache.memcache = MemcacheClient(request, memcache_servers)
cache.ram = cache.disk = cache.memcache
The first line imports memcache. The second line has to be a list of memcache sockets (server:port). The third line defines cache.memcache. The fourth line redefines cache.ram and cache.disk in terms of memcache.
You could choose to redefine only one of them to define a totally new cache object pointing to the Memcache object.
With this tweak the "cache" folder does not need to be a shared folder any more, since it will no longer be accessed.
This code requires having memcache servers running on the local network. You should consult the memcache documentation for information on how to setup those servers.
Sessions in memcache
If you do need sessions and you do not want to use a load balancer with sticky sessions, you have the option to store sessions in memcache:
from gluon.contrib.memdb import MEMDB
session.connect(request, response, db=MEMDB(cache.memcache))
Caching with Redis
[redis]An alternative to Memcache is use Redis.
Assuming we have Redis installed and running on localhost at port 6379, we can connect to it using the following code (in a model):
from gluon.contrib.redis_utils import RConn
from gluon.contrib.redis_cache import RedisCache
rconn = RConn('localhost', 6379)
cache.redis = RedisCache(redis_conn=rconn, debug=True)
We can now use cache.redis in place of (or along with) cache.ram and cache.disk.
We can also obtain Redis statistics by calling:
cache.redis.stats()
Redis cache subsystem allows you to prevent the infamous "thundering herd problem": this is not active by default because usually you choose redis for speed, but at a negligible cost you can make sure that only one thread/process can set a value concurrently. To activate this behaviour, just pass the with_lock=True param to the RedisCache call. You can also enable the behaviour "on-demand" with value = cache.redis('mykey', lambda: time.time(), with_lock=True)
Sessions in Redis
If you have Redis in your stack, why not use it for sessions ?
from gluon.contrib.redis_utils import RConn
from gluon.contrib.redis_session import RedisSession
rconn = RConn()
sessiondb = RedisSession(redis_conn=rconn, session_expiry=False)
session.connect(request, response, db=sessiondb)
The code has been tested with ~1M sessions. As long as Redis can fit in memory, the time taken to handle 1 or 1M sessions is the same. While against file-based sessions or db-based sessions the speedup is unnoticeable for ~40K sessions, over that barrier the improvement is remarkable. A big improvement can be also noticed when you're running a "farm" of web2py instances, because sharing the sessions folder or having multiple processes connected to a database often hogs down the system. You'll end up with 1 key per session, plus 2 keys, one holding an integer (needed for assigning different session keys) and the other holding the set of all sessions generated (so for 1000 sessions, 1002 keys).
If session_expiry is not set, sessions will be handled as usual, you'd need to cleanup sessions as usual once a while.
However, when session_expiry is set will delete automatically sessions after n seconds (e.g. if set to 3600, session will expire exactly one hour later having been updated the last time), you should occasionally run sessions2trash.py just to clean the key holding the set of all the sessions previously issued (for ~1M sessions, cleaning up requires 3 seconds). The redis backend for sessions is the only one that can prevent concurrent modifications to the same session: this is especially true for ajax-intensive applications that write to sessions often in a semi-concurrent way. To favour speed this is by default not enforced, however if you want to turn on the locking behaviour, just turn it on with with_lock=True parameter passed to the RedisSession object.
Removing applications
In a production setting, it may be better not to install the default applications: admin, examples and welcome. Although these applications are quite small, they are not necessary.
Removing these applications is as easy as deleting the corresponding folders under the applications folder.
Using replicated databases
In a high performance environment you may have a master-slave database architecture with many replicated slaves and perhaps a couple of replicated servers. The DAL can handle this situation and conditionally connect to different servers depending on the request parameters. The API to do this was described in Chapter 6. Here is an example:
from random import sample
db = DAL(sample(['mysql://...1', 'mysql://...2', 'mysql://...3'], 3))
In this case, different HTTP requests will be served by different databases at random, and each DB will be hit more or less with the same probability.
We can also implement a simple Round-Robin
def fail_safe_round_robin(*uris):
     i = cache.ram('round-robin', lambda: 0, None)
     uris = uris[i:]+uris[:i] # rotate the list of uris
     cache.ram('round-robin', lambda: (i+1)%len(uris), 0)
     return uris
db = DAL(fail_safe_round_robin('mysql://...1', 'mysql://...2', 'mysql://...3'))
This is fail-safe in the sense that if the database server assigned to the request fails to connect, DAL will try the next one in the order.
It is also possible to connect to different databases depending on the requested action or controller. In a master-slave database configuration, some action performs only a read and some person both read/write. The former can safely connect to a slave db server, while the latter should connect to a master. So you can do:
if request.function in read_only_actions:
   db = DAL(sample(['mysql://...1', 'mysql://...2', 'mysql://...3'], 3))
elif request.action in read_only_actions:
   db = DAL(shuffle(['mysql://...1', 'mysql://...2', 'mysql://...3']))
else:
   db = DAL(sample(['mysql://...3', 'mysql://...4', 'mysql://...5'], 3))
where 1, 2, 3 are slaves and 3, 4, 5 are masters.
Compress static files
Browsers can decompress content on-the-fly, so compressing content for those browsers saves your bandwidth and theirs, lowering response times. Nowadays most web servers can compress your content on the fly and send it to the browsers requesting gzipped content. However, for static files, you are wasting CPU cycles to compress the same content over and over.
You can use scripts/zip_static_files.py to create gzipped versions of your static files and serve those without wasting CPU. Run as python web2py.py -S myapp -R scripts/zip_static_files.py in cron. The script takes care to create (or update) the gzipped version and saves them along with your files, appending a .gz to their name. You just need to let your webserver know when to send those files [apache-content-negotiation] [nginx-gzipstatic]
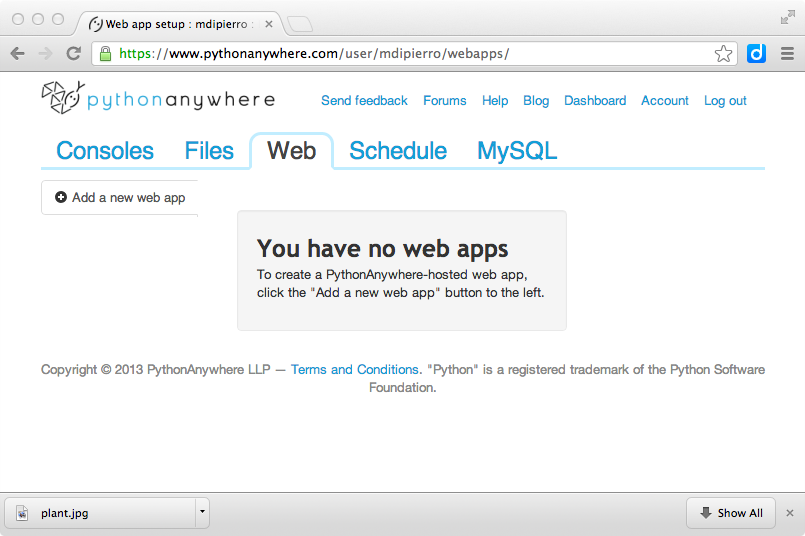
Deploying on PythonAnywhere
PythonAnywhere
PythonAnywhere is the simplest way to deploy web2py applications.
PythonAnywhere is a Python development and hosting environment that displays in your web browser and runs on cloud servers. They are already set up with everything you need to run Python and they support web2py specifically. In our experience PythonAnywhere is easy to use, fast, and powerful. They also provide MySQL databases, python shells and Dropbox integration. Professional hosting is available if the free basic one is not enough for you.
In order to use PythonAnywhere you need to create an account, login, then use the provided web Dashboard to add a new Web App of type web2py.

The interface also ask you for an administrative password.
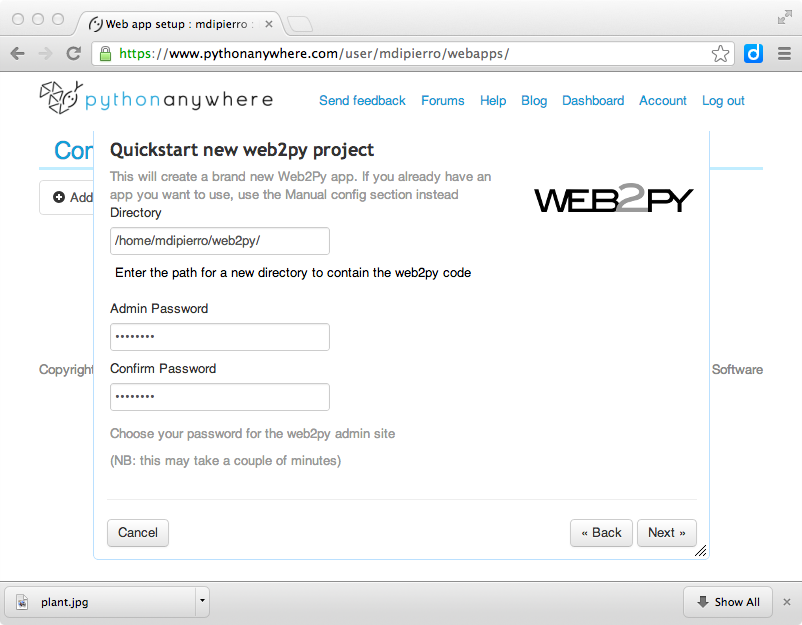
The web2py folder will be created in your user folder.
Alternatively, you can also use the web based BASH shell to install web2py as you normally do:
wget http://www.web2py.com/examples/static/web2py_src.zip
unzip web2py_src.zip
Always from the shell you should create an admin password for later use:
python -c "from gluon.main import save_password; save_password(raw_input('admin password: '), 443)"
Then visit the "Web" panel using the web interface and edit the "/var/www/<username>_pythonanywhere_com_wsgi.py" file. This is the entry point for your program (in our case web2py) and, as you may guess, it is based on the WSGI protocol.
Edit the "/var/www/<username>_pythonanywhere_com_wsgi.py" file and write in it:
import sys
path = '/home/<username>/web2py'
if path not in sys.path: sys.path.append(path)
from wsgihandler import application # the web2py handler
Here "<username>" is your PythonAnywhere username.
After you've installed web2py, notice that you do not need to start or configure a web server. PythonAnywhere provides one and it is reloaded when you edit the above config file. or press the "Reload web app" button on the Dashboard. Everyone can immediately access it at the url:
http://yourusername.pythonanywhere.com/
They also provide a secure version of the site, and you're forced to use it for using the web2py Administrative interface at:
https://yourusername.pythonanywhere.com/admin/default/index
We thank the PythonAnywhere team for their help and support.
Deploying on Heroku
[heroku]
Heroku is a modern and agile multiplatform hosting solution. It allows you to push your applications to a cloud server using Git. In order to use Heroku you must have Git and the Heroku SDK installed. You interact with Heroku using the SDK locally and your commands will be pushed and executed on the server.
Applications running on Heroku cannot rely on a persistent filesystem since it is refreshed periodically, for this reason only the application code can be stored on the file system. All data must be stored in the database. Heroku relies on PostgreSQL. Yet the PostgreSQL is also configured using the Heroku SDK and the URI for the database is assigned dynamically at run-time and stored in an environment variable.
This means that web2py applications must be modified to work on Heroku in order to use the database.
Web2py provides a "heroku.sh" script to help you. All you need to do is replace:
db = DAL(...)
in your code with:
from gluon.contrib.heroku import get_db
db = get_db(name=None, pool_size=10)
Here name is the environment variable containing the Heroku PostgreSQL URI (something like HEROKU_POSTGRESQL_RED_URL). It defaults to None and if there is only one HEROKU_POSTGRESQL_*_URL environment variable it will use that. pool_size is the usual DAL pool size.
When non-running on the Heroku platform get_db will use a development database "sqlite://heroku.test.sqlite".
In both cases sessions will be stored in database.
Web2py provides a script "scripts/setup-web2py-heroku.sh" to deploy your web2py installation on heroku. It performs the following steps:
It installs virtualenv and the psycopg2 driver:
sudo pip install virtualenv
sudo pip install psycopg2
It creates and activates a virtualenv
virtualenv venv --distribute
source venv/bin/activate
Then creates a requirement file:
pip freeze > requirements.txt
And creates a "Procfile" which tells Heroku how to start web2py:
echo "web: python web2py.py -a 'yourpassword' -i 0.0.0.0 -p $PORT" > Procfile
You can change this line to use a different server. You must edit it to select your own admin password. $PORT is a variable which is correctly escaped since its value is set at runtime. You should also consider starting web2py with gunicorn using anyserver.py since this is one of the recommended web servers for Python.
Finally the script creates a Git repository:
git init
git add .
git add Procfile
git commit -a -m "first commit"
pushes everything to Heroku, and starts it:
heroku create
git push heroku master
heroku addons:add heroku-postgresql:dev
heroku scale web=1
heroku open
heroku here is a shell command part of the Heroku SDK.
We thank Craig Krestiens from Heroku for his help with this recipe.
Deploying on EC2
Amazon Elastic Compute Cloud (Amazon EC2) is a web service that provides resizable computing capacity in the cloud. It is one of the largest and most popular clouds. Many other cloud platforms run on EC2. You can run any application on EC2 by creating and deploying a disk image. Amazon then provides API to replicate the image while sharing part of the file system.
A description of the entire process is beyond the scope of this book but, assuming you have an existing Amazon EC2 account, you can use the Turnkey Hub find and deploy a ready made web2py image:
https://hub.turnkeylinux.org/amazon/launch/web2py/Once your image is deployed you can login into it as a normal VPS and you can manage (backup/restore/copy) it via the Amazon EC2 web interface.
Deploying on Google App Engine
It is possible to run web2py code on Google App Engine (GAE)[gae] , including DAL code.
GAE supports two versions of Python: 2.5 and 2.7 but web2py requires 2.7. Look into the "app.yaml" file described below for configuration details.
GAE also supports a Google SQL database (compatible with MySQL) and a Google NoSQL (referred to as "Datastore").
web2py supports both, and indeed, can connect to both at the same time, using the connection strings detailed in Chapter 6.
The GAE platform provides several advantages over normal hosting solutions:
- Ease of deployment. Google completely abstracts the underlying architecture.
- Scalability. Google will replicate your app as many times as it takes to serve all concurrent requests.
- One can choose between a SQL and a NoSQL database (or both together).
But also some disadvantages:
- No read or write access to the file system.
- Not all Python libraries are supported (you can deploy any pure Python library but not the binary ones but PIL and numpy are alreday installed).
While Google Cloud SQL is a regular mysql database, Google Datastore has some specific disadvantages:
- No typical transactions; eventual consistency rather than strong consistency for queries.
- No complex datastore queries. In particular there are no
JOIN,LIKE, andDATE/DATETIMEoperators.
Here we provide a quick overview of GAE and we focus on web2py specific issues, we refer you to the official GAE documentation online for details.
Attention: You must run the web2py source distribution, not a binary distribution.
Configuration
There are three configuration files to be aware of:
web2py/app.yaml
web2py/queue.yaml
web2py/index.yaml
app.yaml and queue.yaml are most easily created by using the template files app.example.yaml and queue.example.yaml as starting points. index.yaml is created automatically by the Google deployment software.
app.yaml has the following structure (it has been shortened using ...):
application: web2py
version: 1
api_version: 1
runtime: python
handlers:
- url: /_ah/stats.*
  ...
- url: /(?P<a>.+?)/static/(?P<b>.+)
  ...
- url: /_ah/admin/.*
  ...
- url: /_ah/queue/default
  ...
- url: .*
  ...
skip_files:
...
app.example.yaml (when copied to app.yaml) is configured to deploy the web2py welcome application, but not the admin or example applications. You must replace web2py with the application id that you used when registering with Google App Engine.
url: /(.+?)/static/(.+) instructs GAE to serve your app static files directly, without calling web2py logic, for speed.
url:.* instructs web2py to use the gaehandler.py for every other request.
The skip_files: session is list of regular expressions for files that do not need to deployed on GAE. In particular the lines:
 (applications/(admin|examples)/.*)|
 ((admin|examples|welcome).(w2p|tar))|
tell GAE not to deploy the default applications, except for the unpacked welcome scaffolding application. You can add more applications to be ignored here.
Except for the application id and version, you probably do not need to edit app.yaml, though you may wish to exclude the welcome application.
The file queue.yaml is used to configure GAE task queues.
The file index.yaml is automatically generated when you run your application locally using the GAE appserver (the web server that comes with the Google SDK). It contains something like this:
indexes:
- kind: person
  properties:
  - name: name
    direction: desc
In this example it tells GAE to create an index for table "person" that will be used to sort by "name" in reversed alphabetical order. You will not be able to search and sort records in your app without corresponding indexes.
It is important to always run your apps locally with the appserver and try every functionality of your app, before deployment. This will be important for testing purposes, but also to automatically generate the "index.yaml" file. Occasionally you may want to edit this file and perform cleanup, such as removing duplicate entries.
Running and deployment
Linux
Here we assume you have installed the GAE SDK. At the time of writing, web2py for GAE requires Python 2.7. You can run your app from inside the "web2py" folder by using the appserver command:
python dev_appserver.py ../web2py
This will start the appserver and you can run your application at the URL:
http://127.0.0.1:8080/
In order to upload your app on GAE, make sure you have edited the "app.yaml" file as explained before and set the proper application id, then run:
python appcfg.py update ../web2py
Mac, Windows
On Mac and Windows, you can also use the Google App Engine Launcher. You can download the software from ref.[gae] .
Choose [File][Add Existing Application], set the path to the path of the top-level web2py folder, and press the [Run] button in the toolbar. After you have tested that it works locally, you can deploy it on GAE by simply clicking on the [Deploy] button on the toolbar (assuming you have an account).

On GAE, the web2py tickets/errors are also logged into the GAE administration console where logs can be accessed and searched online.

Configuring the handler
The file gaehandler.py is responsible for serving files on GAE and it has a few options. Here are their default values:
LOG_STATS = False
APPSTATS = True
DEBUG = False
LOG_STATS will log the time to serve pages in the GAE logs.
APPSTATS will enable GAE appstats which provides profiling statistics. They will be made available at the URL:
http://localhost:8080/_ah/stats
DEBUG sets debug mode. It make no difference in practice unless checked explicitly in your code via gluon.settings.web2py_runtime.
Avoid the filesystem
On GAE you have no access to the filesystem. You cannot open any file for writing.
For this purpose, on GAE, web2py automatically stores all uploaded files in the datastore, whether or not "upload" Field(s) have a uploadfield attribute.
You also should store sessions and tickets in the database and you have to be explicit:
if request.env.web2py_runtime_gae
    db = DAL('gae')
    session.connect(request, response, db)
else:
    db = DAL('sqlite://storage.sqlite')
The above code checks whether you are running on GAE, connects to BigTable, and instructs web2py to store sessions and tickets in there. It connects to a sqlite database otherwise. This code is already in the scaffolding app in the file "db.py".
Memcache
If you prefer, you can store sessions in memcache too:
from gluon.contrib.gae_memcache import MemcacheClient
from gluon.contrib.memdb import MEMDB
cache.memcache = MemcacheClient(request)
cache.ram = cache.disk = cache.memcache
session.connect(request, response, db=MEMDB(cache.memcache.client))
Notice that on GAE cache.ram and cache.disk should not be used, so we make them point to cache.memcache.
Datastore issues
While the Google Clould SQL functions as a regular SQL database, and is indeed based at the time of writing on mysql, Google Datastore presents significant differences.
Lack of JOINs
The lack of JOIN operations and typical relational functionality of the Datastore requires removing JOINs from web2py queries and de-normalizing the database.
Google App Engine supports some special field types, such as ListProperty and StringListProperty. You can use these types with web2py using the following old syntax:
from gluon.dal import gae
db.define_table('product',
    Field('name'),
    Field('tags', type=gae.StringListProperty())
or the equivalent new syntax:
db.define_table('product',
    Field('name'),
    Field('tags', 'list:string')
In both cases the "tags" field is a StringListProperty therefore its values must be lists of strings, compatibly with the GAE documentation. The second notation is to be preferred because web2py will treat the field in a smarter way in the context of forms and because it will work with relational databases too.
Similarly, web2py supports list:integer and list:reference which map into a ListProperty(int).
list types are discussed in more detail in Chapter 6.
Database migrations
A good practice for migrations using Google AppEngine is the following. AppEngine supports multiple code versions. Use one code version (e.g., version 1) for the user-visible site, and another code version (e.g., version 2) for the admin code. In app.yaml for version 2, declare the handler as follows (assuming Python 2.7 is used):
- url: .*
  script: gaehandler.wsgiapp    # WSGI (Python 2.7 only)
  secure: optional
  login: admin
The login: admin clause ensures that only admins can use version 2. In the database connection string, specify migrate_enabled=False. To perform a migration, it is best to disable database access concurrent to the migration. Proceed as follows:
- Add a file named
DISABLEDto the top directory of your version 1 application (the parent directory of the/controllers,/views, etc. directories), and upload the new version to GAE. This will disable version 1, and display a message "The site is temporarily down for maintenance". - Upload to version 2 code with
migrate_enabled=Truein the db connection string, and visit it from an admin account, triggering the migration. - Upload to version 2 code with
migrate_enabled=False, to disable further migrations. - Remove the file named
DISABLEDfrom version 1, and upload the code to version 1. This makes the site again visible to all.
GAE and https
If you application has id "myapp" your GAE domain is
http://myapp.appspot.com/
and it can also be accessed via HTTPS
https://myapp.appspot.com/
In this case it will use an "appspot.com" certificate provided by Google.
You can register a DNS entry and use any other domain name you own for your app but you will not be able to use HTTPS on it. At the time of writing, this is a GAE limitation.