Chapter 12: Components and plugins
Components and plugins
Components and plugins are relatively new features of web2py, and there is some disagreement between developers about what they are and what they should be. Most of the confusion stems from the different uses of these terms in other software projects and from the fact that developers are still working to finalize the specifications.
However, plugin support is an important feature and we need to provide some definitions. These definitions are not meant to be final, just consistent with the programming patterns we want to discuss in this chapter.
We will try to address two issues here:
- How can we build modular applications that minimize server load and maximize code reuse?
- How can we distribute pieces of code in a more or less plugin-and-play fashion?
Components address the first issue; plugins address the second.
Components
A component is a functionally autonomous part of a web page.
A component may be composed of modules, controllers and views, but there is no strict requirement other than, when embedded in a web page, it must be localized within an html tag (for example a DIV, a SPAN, or an IFRAME) and it must perform its task independently of the rest of the page. We are specifically interested in components that are loaded in the page and communicate with the component controller function via Ajax.
An example of a component is a "comments component" that is contained into a DIV and shows users' comments and a post-new-comment form. When the form is submitted, it is sent to the server via Ajax, the list is updated, and the comment is stored server-side in the database. The DIV content is refreshed without reloading the rest of the page.
The web2py LOAD function makes this easy to do without explicit JavaScript/Ajax knowledge or programming.
Our goal is to be able to develop web applications by assembling components into page layouts.
Consider a simple web2py app "test" that extends the default scaffolding app with a custom model in file "models/db_comments.py":
db.define_table('comment',
   Field('body','text',label='Your comment'),
   Field('posted_on','datetime',default=request.now),
   Field('posted_by',db.auth_user,default=auth.user_id))
db.comment.posted_on.writable=db.comment.posted_on.readable=False
db.comment.posted_by.writable=db.comment.posted_by.readable=False
one action in "controllers/comments.py"
@auth.requires_login()
def post():
    return dict(form=crud.create(db.comment),
                comments=db(db.comment).select())
and the corresponding "views/comments/post.html"
{{extend 'layout.html'}}
{{for comment in comments:}}
<div class="comment">
  on {{=comment.posted_on}} {{=comment.posted_by.first_name}}
  says <span class="comment_body">{{=comment.body}}</span>
</div>
{{pass}}
{{=form}}
You can access it as usual at:
http://127.0.0.1:8000/test/comments/post
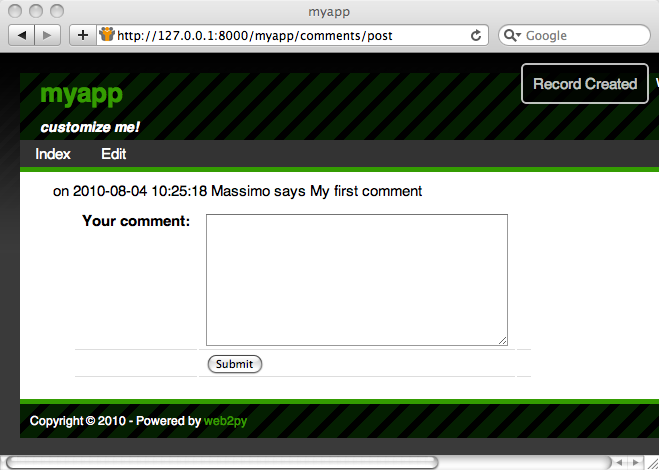
So far there is nothing special in this action, but we can turn it into a component by defining a new view with extension ".load" that does not extend the layout.
Hence we create a "views/comments/post.load":
{{#extend 'layout.html' <- notice this is commented out!}}
{{for comment in comments:}}
<div class="comment">
  on {{=comment.posted_on}} {{=comment.posted_by.first_name}}
  says <span class="comment_body">{{=comment.body}}</span>
</div>
{{pass}}
{{=form}}
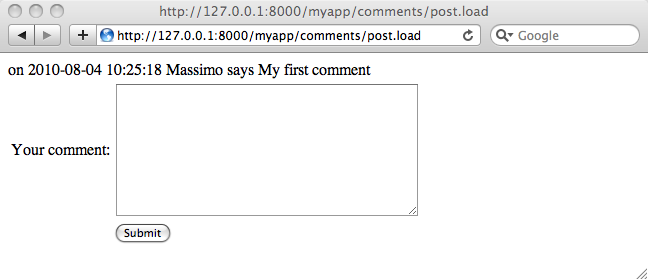
We can access it at the URL
http://127.0.0.1:8000/test/comments/post.load
and it will look like this:
This is a component that we can embed into any other page by simply doing
{{=LOAD('comments','post.load',ajax=True)}}
For example in "controllers/default.py" we can edit
def index():
    return dict()
and in the corresponding view add the component:
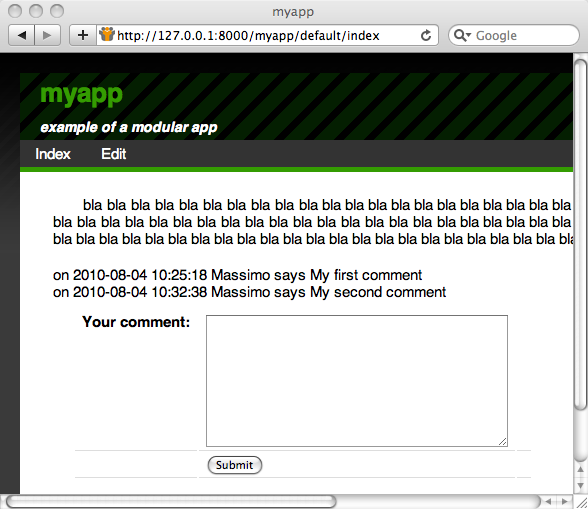
{{extend 'layout.html'}}
<p>{{='bla '*100}}</p>
{{=LOAD('comments','post.load',ajax=True)}}
Visiting the page
http://127.0.0.1:8000/test/default/index
will show the normal content and the comments component:
The {{=LOAD(...)}} component is rendered as follows:
<script type="text/javascript"><!--
web2py_component("/test/comment/post.load","c282718984176")
//--></script><div id="c282718984176">loading...</div>
(the actual generated code depends on the options passed to the LOAD function).
The web2py_component(url,id) function is defined in "web2py_ajax.html" and it performs all the magic: it calls the url via Ajax and embeds the response into the DIV with corresponding id; it traps every form submission into the DIV and submits those forms via Ajax. The Ajax target is always the DIV itself.
The full signature of the LOAD helper is the following:
LOAD(c=None, f='index', args=[], vars={},
     extension=None, target=None,
     ajax=False, ajax_trap=False,
     url=None,user_signature=False,
     content='loading...',**attr):
Here:
- the first two arguments
candfare the controller and the function that we want to call respectively. argsandvarsare the arguments and variables that we want to pass to the function. The former is a list, the latter is a dictionary.extensionis an optional extension. Notice that the extension can also be passed as part of the function as inf='index.load'.targetis theidof the target DIV. If it is not specified a random targetidis generated.ajaxshould be set toTrueif the DIV has to be filled via Ajax and toFalseif the DIV has to be filled before the current page is returned (thus avoiding the Ajax call).ajax_trap=Truemeans that any form submission in the DIV must be captured and submitted via Ajax, and the response must be rendered inside the DIV.ajax_trap=Falseindicates that forms must be submitted normally, thus reloading the entire page.ajax_trapis ignored and assumed to beTrueifajax=True.url, if specified, overrides the values ofc,f,args,vars, andextensionand loads the component at theurl. It is used to load as components pages served by other applications (which my or may not be created with web2py).user_signaturedefaults to False but, if you are logged in, it should be set to True. This will make sure the ajax callback is digitally signed. This is documented in chapter 4.contentis the content to be displayed while performing the ajax call. It can be a helper as incontent=IMG(..).- optional
**attr(attributes) can be passed to the containedDIV.
If no .load view is specified, there is a generic.load that renders the dictionary returned by the action without layout. It works best if the dictionary contains a single item.
If you LOAD a component having the .load extension and the corresponding controller function redirects to another action (for example a login form), the .load extension propagates and the new url (the one to redirect too) is also loaded with a .load extension.
*Please note:* Because Ajax post does not support multipart forms, i.e. file uploads, upload fields will not work with the LOAD component. You could be fooled into thinking it would work because upload fields will function normally if POST is done from the individual component's .load view. Instead, uploads are done with ajax-compatible 3rd-party widgets and web2py manual upload store commands.
Client-Server component communications
When the action of a component is called via Ajax, web2py passes two HTTP headers with the request:
web2py-component-location
web2py-component-element
which can be accessed by the action via the variables:
request.env.http_web2py_component_location
request.env.http_web2py_component_element
The latter is also accessible via:
request.cid
The former contains the URL of the page that called the component action. The latter contains the id of the DIV that will contain the response.
The component action can also store data in two special HTTP response headers that will be interpreted by the full page upon response. They are:
web2py-component-flash
web2py-component-command
and they can be set via:
response.headers['web2py-component-flash']='....'
response.headers['web2py-component-command']='...'
or (if the action is called by a component) automatically via:
response.flash='...'
response.js='...'
The former contains text that you want to be flashed upon response. The latter contains JavaScript code that you want to be executed upon response. It cannot contain newlines.
As an example, let's define a contact form component in "controllers/contact/ask.py" that allows the user to ask a question. The component will email the question to the system administrator, flash a "thank you" message, and remove the component from the page:
def ask():
    form=SQLFORM.factory(
        Field('your_email',requires=IS_EMAIL()),
        Field('question',requires=IS_NOT_EMPTY()))
    if form.process().accepted:
        if mail.send(to='admin@example.com',
                  subject='from %s' % form.vars.your_email,
                  message = form.vars.question):
            response.flash = 'Thank you'
            response.js = "jQuery('#%s').hide()" % request.cid
        else:
            form.errors.your_email = "Unable to send the email"
    return dict(form=form)
The first four lines define the form and accept it. The mail object used for sending is defined in the default scaffolding application. The last four lines implement all the component-specific logic by getting data from the HTTP request headers and setting the HTTP response headers.
Now you can embed this contact form in any page via
{{=LOAD('contact','ask.load',ajax=True)}}
Notice that we did not define a .load view for our ask component. We do not have to because it returns a single object (form) and therefore the "generic.load" will do just fine. Remember that generic views are a development tool. In production you should copy "views/generic.load" into "views/contact/ask.load".
user_signature argument:{{=LOAD('contact','ask.load',ajax=True,user_signature=True)}}
which add a digital signature to the URL. The digital signature must then be validated using a decorator in the callback function:
@auth.requires_signature()
def ask(): ...
Trapped Ajax links
Normally a link is not trapped, and by clicking in a link inside a component, the entire linked page is loaded. Sometimes you want the linked page to be loaded inside the component. This can be achieved using the A helper:
{{=A('linked page',_href='http://example.com',cid=request.cid)}}
If cid is specified, the linked page is loaded via Ajax. The cid is the id of the html element where to place the loaded page content. In this case we set it to request.cid, i.e. the id of the component that generates the link. The linked page can be and usually is an internal URL generated using the URL command.
Plugins
A plugin is any subset of the files of an application.
and we really mean any:
- A plugin is not a module, is not a model, it is not a controller, is not a view, yet it may contain modules, models, controllers and/or views.
- A plugin does not need to be functionally autonomous and it may depend on other plugins or specific user code.
- A plugin is not a plugins system and therefore has no concept of registration nor isolation, although we will give rules to try to achieve some isolation.
- We are talking about a plugin for your app, not a plugin for web2py.
So why is it called a plugin? Because it provides a mechanism for packing a subset of an app and unpacking it over another app (i.e. plug-in). Under this definition, any file in your app can be treated as a plugin.
When the app is distributed, its plugins are packed and distributed with it.
In practice, the admin provides an interface for packing and unpacking plugins separately from your app. Files and folder of your application that have names with the prefix plugin_name can be packed together into a file called:
web2py.plugin.name.w2p
and distributed together.
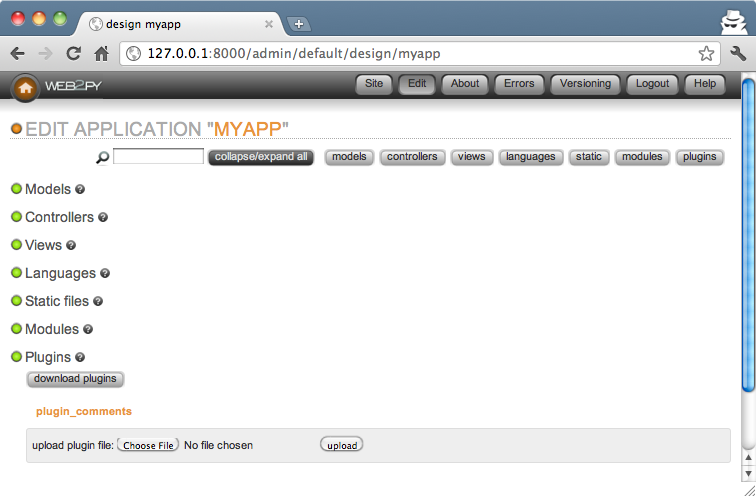
The files that compose a plugin are not treated by web2py any differently than other files except that admin understands from their names that they are meant to be distributed together, and it displays them in a separate page:
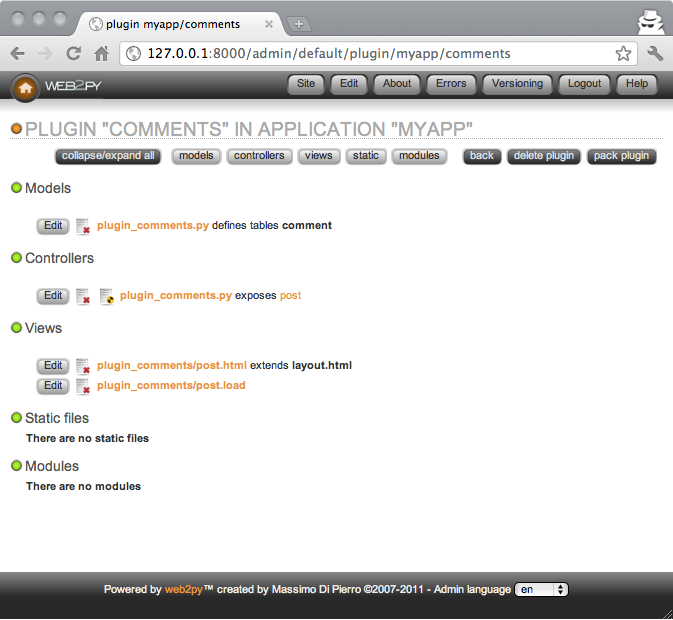
Yet as a matter of fact, by the definition above, these plugins are more general than those recognized as such by admin.
In practice we will only be concerned with two types of plugins:
- Component Plugins. These are plugins that contain components as defined in the previous section. A component plugin can contain one or more components. We can think for example of a
plugin_commentsthat contains the comments component proposed above. Another example could beplugin_taggingthat contains a tagging component and a tag-cloud component that share some database tables also defined by the plugin. - Layout Plugins. These are plugins that contain a layout view and the static files required by such layout. When the plugin is applied it gives the app a new look and feel.
By the above definitions, the components created in the previous section, for example "controllers/contact.py", are already plugins. We can move them from one app to another and use the components they define. Yet they are not recognized as such by admin because there is nothing that labels them as plugins. So there are two problems we need to solve:
- Name the plugin files using a convention, so that admin can recognize them as belonging to the same plugin
- If the plugin has model files, establish a convention so that the objects it defines do not pollute the namespace and do not conflict with each other.
Let's assume a plugin is called name. Here are the rules that should be followed:
Rule 1: Plugin models and controllers should be called, respectively
models/plugin_name.pycontrollers/plugin_name.py
and plugin views, modules, static, and private files should be in folders called, respectively:
views/plugin_name/modules/plugin_name/static/plugin_name/private/plugin_name/
Rule 2: Plugin models can only define objects with names that start with
plugin_namePluginName_
Rule 3: Plugin models can only define session variables with names that start with
session.plugin_namesession.PluginName
Rule 4: Plugins should include license and documentation. These should be placed in:
static/plugin_name/license.htmlstatic/plugin_name/about.html
Rule 5: The plugin can only rely on the existence of the global objects defined in scaffolding "db.py", i.e.
- a database connection called
db - an
Authinstance calledauth - a
Crudinstance calledcrud - a
Serviceinstance calledservice
Some plugins may be more sophisticated and have a configuration parameter in case more than one db instance exists.
Rule 6: If a plugin needs configuration parameters, these should be set via a PluginManager as described below.
By following the above rules we can make sure that:
- admin recognizes all the
plugin_name files and folder as part of a single entity. - plugins do not interfere with each other.
The rules above do not solve the problem of plugin versions and dependencies. That is beyond our scope.
Component plugins
Component plugins are plugins that define components. Components usually access the database and define with their own models.
Here we turn the previous comments component into a comments_plugin by using the same code we wrote before, but following all of the previous rules.
First, we create a model called "models/plugin_comments.py":
db.define_table('plugin_comments_comment',
   Field('body','text', label='Your comment'),
   Field('posted_on', 'datetime', default=request.now),
   Field('posted_by', db.auth_user, default=auth.user_id))
db.plugin_comments_comment.posted_on.writable=False
db.plugin_comments_comment.posted_on.readable=False
db.plugin_comments_comment.posted_by.writable=False
db.plugin_comments_comment.posted_by.readable=False

def plugin_comments():
    return LOAD('plugin_comments','post',ajax=True)
(notice the last two lines define a function that will simplify the embedding of the plugin)
Second, we define a "controllers/plugin_comments.py"
@auth.requires_login()
def post():
    comment = db.plugin_comments_comment
    return dict(form=crud.create(comment),
                comments=db(comment).select())
Third, we create a view called "views/plugin_comments/post.load":
{{for comment in comments:}}
<div class="comment">
  on {{=comment.posted_on}} {{=comment.posted_by.first_name}}
  says <span class="comment_body">{{=comment.body}}</span>
</div>
{{pass}}
{{=form}}
Now we can use admin to pack the plugin for distribution. Admin will save this plugin as:
web2py.plugin.comments.w2p
We can use the plugin in any view by simply installing the plugin via the edit page in admin and adding this to our own views
{{=plugin_comments()}}
Of course we can make the plugin more sophisticated by having components that take parameters and configuration options. The more complex the components, the more difficult it becomes to avoid name collisions. The Plugin Manager described below is designed to avoid this problem.
Plugin manager
The PluginManager is a class defined in gluon.tools. Before we explain how it works inside, we will explain how to use it.
Here we consider the previous comments_plugin and we make it better. We want to be able to customize:
db.plugin_comments_comment.body.label
without having to edit the plugin code itself.
Here is how we can do it:
First, rewrite the plugin "models/plugin_comments.py" in this way:
db.define_table('plugin_comments_comment',
   Field('body','text',label=plugin_comments.comments.body_label),
   Field('posted_on', 'datetime', default=request.now),
   Field('posted_by', db.auth_user, default=auth.user_id))

def plugin_comments()
    from gluon.tools import PluginManager
    plugins = PluginManager('comments', body_label='Your comment')

    comment = db.plugin_comments_comment
    comment.label=plugins.comments.body_label
    comment.posted_on.writable=False
    comment.posted_on.readable=False
    comment.posted_by.writable=False
    comment.posted_by.readable=False
    return LOAD('plugin_comments','post.load',ajax=True)
Notice how all the code except the table definition is encapsulated in a single function. Also notice how the function creates an instance of a PluginManager.
Now in any other model in your app, for example in "models/db.py", you can configure this plugin as follows:
from gluon.tools import PluginManager
plugins = PluginManager()
plugins.comments.body_label = T('Post a comment')
The
pluginsobject is already instantiated in the default scaffolding app in "models/db.py"
The PluginManager object is a thread-level singleton Storage object of Storage objects. That means you can instantiate as many as you like within the same application but (whether they have the same name or not) they act as if there were a single PluginManager instance.
In particular each plugin file can make its own PluginManager object and register itself and its default parameters with it:
plugins = PluginManager('name', param1='value', param2='value')
You can override these parameters elsewhere (for example in "models/db.py") with the code:
plugins = PluginManager()
plugins.name.param1 = 'other value'
You can configure multiple plugins in one place.
plugins = PluginManager()
plugins.name.param1 = '...'
plugins.name.param2 = '...'
plugins.name1.param3 = '...'
plugins.name2.param4 = '...'
plugins.name3.param5 = '...'
When the plugin is defined, the PluginManager must take arguments: the plugin name and optional named arguments which are default parameters. However, when the plugins are configured, the PluginManager constructor must take no arguments. The configuration must precede the definition of the plugin (i.e. it must be in a model file that comes first alphabetically).
Layout plugins
Layout plugins are simpler than component plugins because usually they do not contain code, but only views and static files. Yet you should still follow good practice:
First, create a folder called "static/plugin_layout_name/" (where name is the name of your layout) and place all your static files there.
Second, create a layout file called "views/plugin_layout_name/layout.html" that contains your layout and links the images, CSS and JavaScript files in "static/plugin_layout_name/"
Third, modify the "views/layout.html" so that it simply reads:
{{extend 'plugin_layout_name/layout.html'}}
{{include}}
The benefit of this design is that users of this plugin can install multiple layouts and choose which one to apply simply by editing "views/layout.html". Moreover, "views/layout.html" will not be packed by admin together with the plugin, so there is no risk that the plugin will override the user's code in the previously installed layout.
plugin_wiki
DISCLAIMER: plugin_wiki is still very much under development and therefore we do not promise backward compatibility to the same level as for web2py core functions.
plugin_wiki is a plugin on steroids. What we mean is that it defines multiple useful components and it may change the way you develop your applications:
You can download it from
http://web2py.com/examples/static/web2py.plugin.wiki.w2p
The idea behind plugin_wiki is that most applications include pages that are semi-static. These are pages that do not include complex custom logic. They contain structured text (think of a help page), images, audio, video, crud forms, or a set of standard components (comments, tags, charts, maps), etc. These pages may be public, require login or have other authorization restrictions. These pages may be linked by a menu or only be reachable via wizard form. plugin_wiki provides an easy way to add pages that fit in this category to your regular web2py applications.
In particular plugin_wiki provides:
- A wiki-like interface that allows to add pages to your app and reference them by a slug. These pages (which we will refer to as wiki pages) have versions and are stored in the database.
- Public and private pages (require login). If a page requires login, it may also require that the user have a particular group membership.
- Three levels: 1,2,3. At level 1, pages can only include text, images, audio and video. At level 2, pages can also include widgets (these are components as defined in the previous section that can be embedded in wiki pages). At level 3, pages can also include web2py template code.
- A choice of editing pages with the markmin syntax or in HTML using a WYSIWYG editor.
- A collection of widgets: implemented as components. They are self documenting and they can be embedded as regular components in normal web2py views or, using a simplified syntax, into wiki pages.
- A set of special pages (
meta-code,meta-menu, etc.) that can be used to customize the plugin (for example define code the plugin should run, customize the menu, etc.)
The welcome app plus the plugin_wiki can be thought of as a development environment in itself that is suitable for building simple web applications such as a blog.
From here on we will assume the plugin_wiki is applied to a copy of the welcome scaffolding app.
The first thing you notice after installing the plugin is that it adds a new menu item called pages.
Click on the pages menu item and you will be redirected to the plugin action:
http://127.0.0.1:8000/myapp/plugin_wiki/index
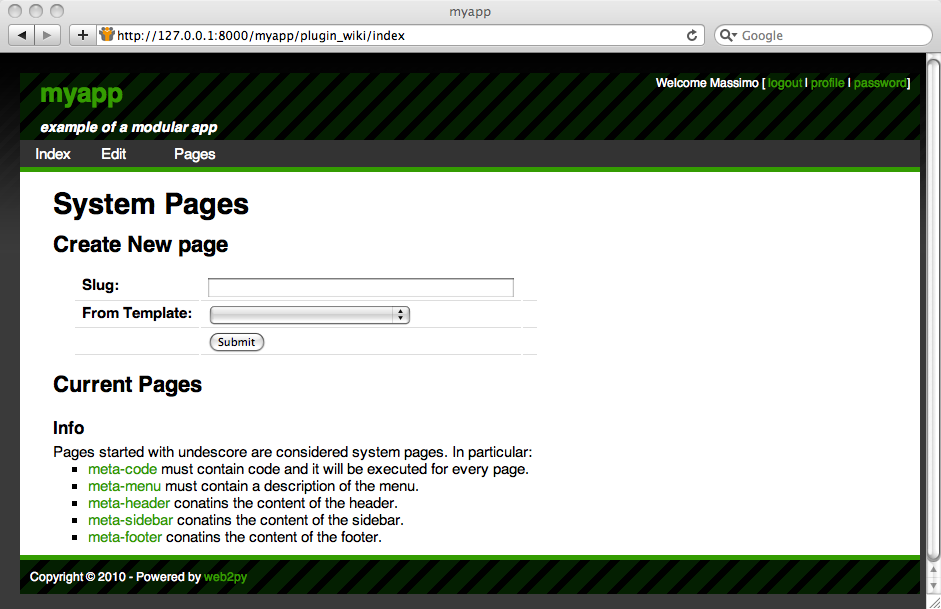
The plugin index page lists the pages created using the plugin itself and allows you to create new ones by choosing a slug. Try creating a home page. You will be redirected to
http://127.0.0.1:8000/myapp/plugin_wiki/page/home
Click on create page to edit its content.
By default, the plugin is at level 3, which means you can insert widgets as well as code in pages. By default it uses the markmin syntax to describe the page content.
MARKMIN syntax
Here is a primer for the markmin syntax:
| markmin | html |
# title | <h1>title</h1> |
## subtitle | <h2>subtitle</h2> |
### subsubtitle | <h3>subsubtitle</h3> |
**bold** | <strong>bold</strong> |
''italic'' | <i>italic</i> |
http://... | <a href="http://...com">http:...</a> |
http://...png | <img src="http://...png" /> |
http://...mp3 | <audio src="http://...mp3"></audio> |
http://...mp4 | <video src="http://...mp4"></video> |
qr:http://... | <a href="http://..."><img src="qr code"/></a> |
embed:http://... | <iframe src="http://..."></iframe> |
Notice that links, images, audio, and video files are embedded automatically. For more information on MARKMIN syntax, please refer to Chapter 5.
If the page does not exist, you will be asked to create one.
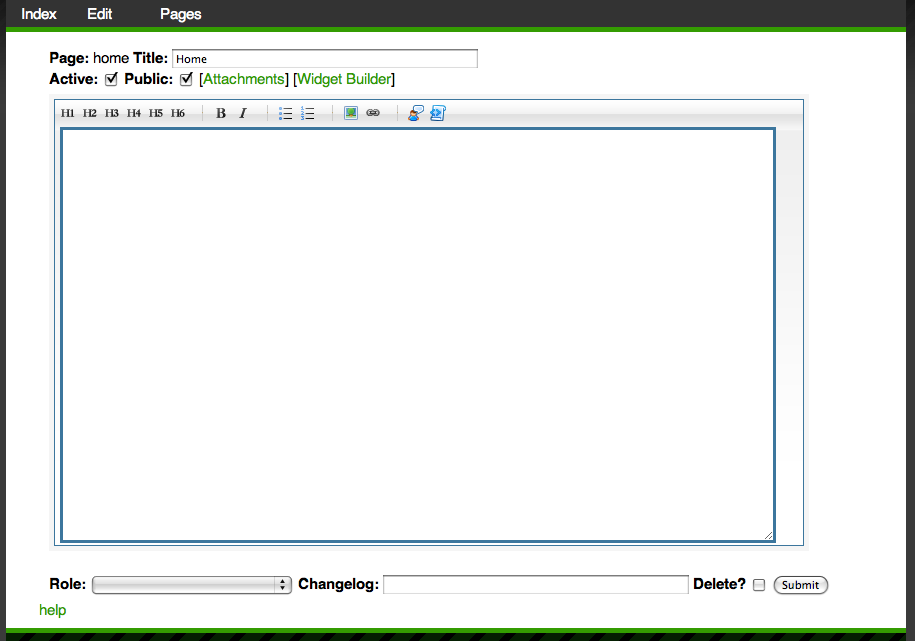
The edit page allows you to add attachments to pages (i.e. static files)

and you can link to them as
[[mylink name attachment:3.png]]
or embed them with
[[myimage attachment:3.png center 200px]]
The size (200px) is optional. center is not optional but it may be replaced by left or right.
You can embed blockquoted text with
-----
this is blockquoted
-----
as well as tables
-----
0 | 0 | X
0 | X | 0
X | 0 | 0
-----
and verbatim text
``
verbatim text
``
You can also prepend an optional :class to the final ----- or the final ``. For blockquoted text and tables it will be translated in the class of the tag, for example:
-----
test
-----:abc
renders as
<blockquote class="abc">test</blockquote>
For verbatim text the class can be used to embed content of different types.
You can, for example, embed code with syntax highlighting by specifying the language with :code_language
``
def index(): return 'hello world'
``:code_python
You can embed widgets:
``
name: widget_name
attribute1: value1
attribute2: value2
``:widget
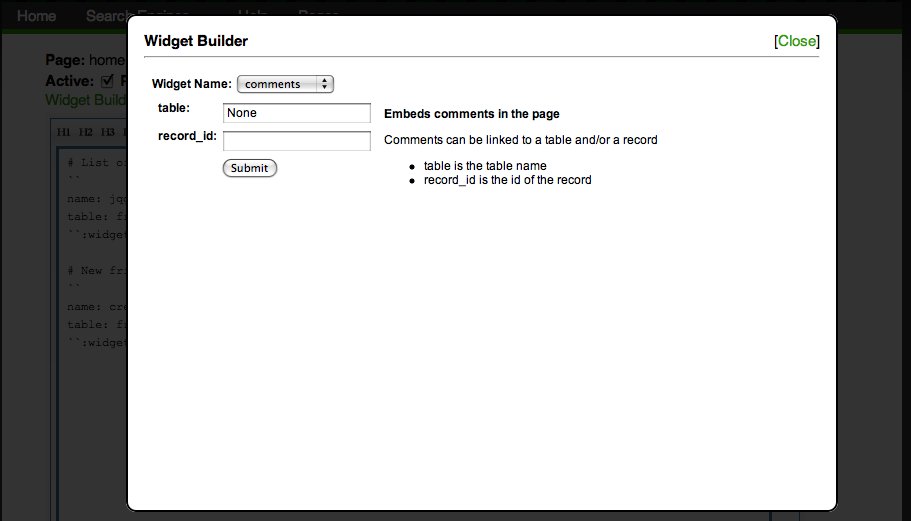
From the edit page you can click on "widget builder" to insert widgets from a list, interactively:
(for a list of widgets see the next subsection).
You can also embed web2py template language code:
``
{{for i in range(10):}}<h1>{{=i}}</h1>{{pass}}
``:template
Page permissions
When editing a page you will find the following fields:
- active (defaults to
True). If a page is not active, it will not be accessible to visitors (even if public). - public (defaults to
True). If a page is public, it can be accessed by visitors without logging in. - role (defaults to None). If a page has a role, the page can be accessed only by visitors who are logged in and are members of the group with the corresponding role.
Special pages
meta-menu contains the menu. If this page does not exist, web2py uses the response.menu defined in "models/menu.py". The content of the meta-menu page overrides the menu. The syntax is the following:
Item 1 Name http://link1.com
   Submenu Item 11 Name http://link11.com
   Submenu Item 12 Name http://link12.com
   Submenu Item 13 Name http://link13.com
Item 2 Name http://link1.com
   Submenu Item 21 Name http://link21.com
      Submenu Item 211 Name http://link211.com
      Submenu Item 212 Name http://link212.com
   Submenu Item 22 Name http://link22.com
   Submenu Item 23 Name http://link23.com
where the indentation determines the submenu structure. Each item is composed of the text of the menu item followed by a link. A link can be page:slug. A link None does not link to any page. Extra spaces are ignored.
Here is another example:
Home             page:home
Search Engines   None
   Yahoo         http://yahoo.com
   Google        http://google.com
   Bing          http://bing.com
Help             page:help
This renders as follows:

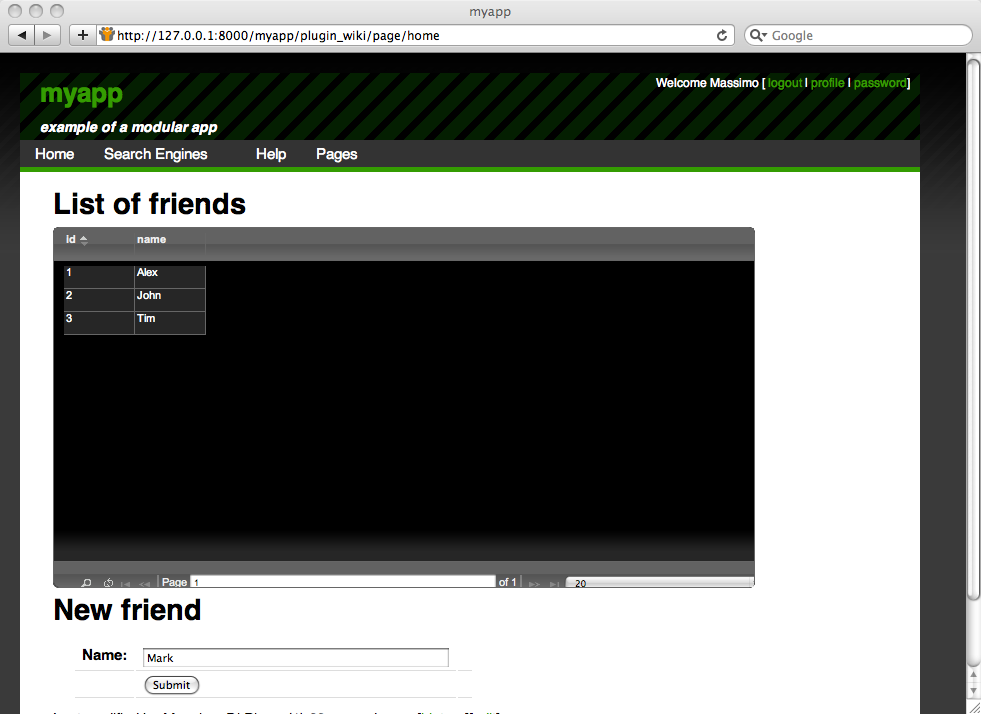
You can define tables in meta-code.
For example, you can create a simple table "friends" by placing this in meta-code:
db.define_table('friend',Field('name',requires=IS_NOT_EMPTY()))
and you can create a friend-management interface by embedding in a page of your choice the following code:
## List of friends
``
name: jqgrid
table: friend
``:widget

## New friend
``
name: create
table: friend
``:widget
The page has two headers (starting with #): "List of friends" and "New friend". The page contains two widgets (under the corresponding headers): a jqgrid widget that lists friends and a crud create widget to add a new friend.
meta-header, meta-footer, meta-sidebar are not used by the default layout in "welcome/views/layout.html". If you want to use them, edit "layout.html" using admin (or the shell) and place the following tags in the appropriate places:
{{=plugin_wiki.embed_page('meta-header') or ''}}
{{=plugin_wiki.embed_page('meta-sidebar') or ''}}
{{=plugin_wiki.embed_page('meta-footer') or ''}}
In this way, the content of those pages will show up in the header, sidebar and footer in the layout.
Configuring plugin_wiki
As with any other plugins in "models/db.py" you can do
from gluon.tools import PluginManager
plugins = PluginManager()
plugins.wiki.editor = auth.user.email == mail.settings.sender
plugins.wiki.level = 3
plugins.wiki.mode = 'markmin' or 'html'
plugins.wiki.theme = 'ui-darkness'
where
- editor is true if the current logged-in user is authorized to edit plugin_wiki pages
- level is the permission: 1 to edit regular pages, 2 to embed widgets in pages, 3 to embed code
- mode determines whether to use a "markmin" editor or a WYSIWYG "html" editor. WYSIWYG
- theme is the name of the required jQuery UI Theme. By default only the color-neutral "ui-darkness" is installed.
You can add themes here:
static/plugin_wiki/ui/%(theme)s/jquery-ui-1.8.1.custom.css
Current widgets
Each widget can be embedded both in plugin_wiki pages and in normal web2py templates.
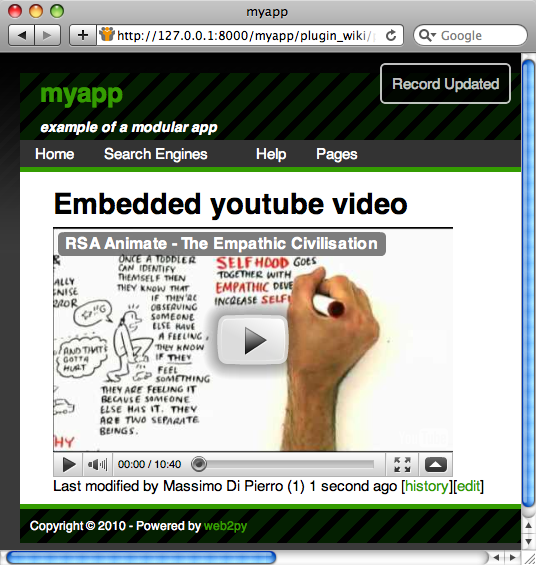
For example, to embed a YouTube video in a plugin_wiki page, you can do
``
name: youtube
code: l7AWnfFRc7g
``:widget
or to embed the same widget in a web2py view, you can do:
{{=plugin_wiki.widget('youtube',code='l7AWnfFRc7g')}}
In either case, this is the output:
Widget arguments that do not have a default value are required.
Here is a list of all current widgets:
read
read(table,record_id=None)
Reads and displays a record
tableis the name of a tablerecord_idis a record number
create
create(table,message='',next='',readonly_fields='',
       hidden_fields='',default_fields='')
Displays a record create form
tableis the name of a tablemessageis a the message to be displayed after record is creatednextis where to redirect, example "page/index/[id]"readonly_fieldsis a list of comma separated fieldshidden_fieldsis a list of comma separated fieldsdefault_fieldsis a list of comma separatedfieldname=value
update
update(table,record_id='',message='',next='',
       readonly_fields='',hidden_fields='',default_fields='')
Displays a record update form
tableis the name of a tablerecord_idis he record to be updated or{{=request.args(-1)}}messageis a the message to be displayed after record is creatednextis where to redirect, example "page/index/[id]"readonly_fieldsis a list of comma separated fieldshidden_fieldsis a list of comma separated fieldsdefault_fieldsis a list of comma separatedfieldname=value
select
select(table,query_field='',query_value='',fields='')
Lists all records in the table
tableis the name of a tablequery_fieldandquery_valueif present will filter records by according to the queryquery_field == query_valuefieldsis a list of comma separate fields to be displayed
search
search(table,fields='')
Widgets for selecting records
tableis the name of a tablefieldsis a list of comma separated fields to be displayed
jqgrid
jqgrid(table,fieldname=None,fieldvalue=None,col_widths='',
       colnames=None,_id=None,fields='',col_width=80,width=700,height=300)
Embeds a jqGrid plugin
tableis the table namefieldname,fieldvalueare an optional filter:fieldname==fieldvaluecol_widthsis the width of each columncolnamesis a list of column names that are displayed_idis the "id" of the TABLE that contains the jqGridfieldsis a list of columns to be displayedcol_widthis the default width of columnsheightis the height of the jqGridwidthis the width of the jqGrid
Once you have the plugin_wiki installed, you can easily use the jqGrid in your other views too. Example usage (displays yourtable filtered by fk_id==47):
{{=plugin_wiki.widget('jqgrid','yourtable','fk_id',47,'70,150',
    'Id,Comments',None,'id,notes',80,300,200)}}
latex
latex(expression)
Uses Google charting API to embed LaTeX
pie_chart
pie_chart(data='1,2,3',names='a,b,c',width=300,height=150,align='center')
Embed a pie chart
datais a list of comma separated valuesnamesis a list of comma separated labels (one for data item)widthis the width of the imageheightis the height of the imagealigndetermines the alignment of the image
bar_chart
bar_chart(data='1,2,3',names='a,b,c',width=300,height=150,align='center')
Uses Google charting API to embed a bar chart
datais a list of comma separated valuesnamesis a list of comma separated labels (one for data item)widthis the width of the imageheightis the height of the imagealigndetermines the alignment of the image
slideshow
slideshow(table, field='image', transition='fade', width=200, height=200)
Embeds a slideshow. It gets the images from a table.
tableis the table namefieldis the upload field in the table that contains imagestransitiondetermines the type of transition, e.g. fade, etc.widthis the width of the imageheightis the height of the image
youtube
youtube(code, width=400, height=250)
Embeds a YouTube video (by code)
codeis the code of the videowidthis the width of the imageheightis the height of the image
vimeo
vimeo(code, width=400, height=250)
Embeds a Vimeo video (by code)
codeis the code of the videowidthis the width of the imageheightis the height of the image
mediaplayer
mediaplayer(src, width=400, height=250)
Embeds a media file (such as Flash video or an mp3 file)
srcis the src of the videowidthis the width of the imageheightis the height of the image
comments
comments(table='None', record_id=None)
Embeds comments in the page
Comments can be linked to a table and/or a record
tableis the table namerecord_idis the id of the record
tags
tags(table='None', record_id=None)
Embeds tags in the page
tags can be linked to a table and/or a record
tableis the table namerecord_idis the id of the record
tag_cloud
tag_cloud()
Embeds a tag cloud
map
map(key='....', table='auth_user', width=400, height=200)
Embeds a Google map.
It gets points on the map from a table
keyis the google map api key (default works for 127.0.0.1)tableis the table namewidthis the map widthheightis the map height
The table must have columns: latitude, longitude and map_popup. When clicking on a dot, the map_popup message will appear.
iframe
iframe(src, width=400, height=300)
Embeds a page in an <iframe></iframe>
load_url
load_url(src)
Loads the content of the url using the LOAD function
load_action
load_action(action, controller='', ajax=True)
Loads the content of URL(request.application, controller, action) using the LOAD function
Extending widgets
Widgets to plugin_wiki can be added by creating a new model file called "models/plugin_wiki_"name where name is arbitrary and the file contains something like:
class PluginWikiWidgets(PluginWikiWidgets):
    @staticmethod
    def my_new_widget(arg1, arg2='value', arg3='value'):
        """
        document the widget
	"""
        return "body of the widget"
The first line states that you are extending the list of widgets. Inside the class, you can define as many functions as needed. Each static function is a new widget, except for functions that start with underscores. The function can take an arbitrary number of arguments which may or not have default values. The docstring of the function must document the function using the markmin syntax itself.
When widgets are embedded into plugin_wiki pages, arguments will be passed to the widget as strings. This means the widget function must be able to accept strings for every argument and eventually convert them into the required representation. You can decide what the string representation must be - just make sure this is documented in the docstring.
The widget can return a string of web2py helpers. In this latter case they will be serialized using .xml().
Notice how the new widget can access any variable declared in the global namespace.
As an example, we are going to create a new widget that display the "contact/ask" form created at the beginning of this chapter. This can be done by creating a file "models/plugin_wiki_contact" that contains:
class PluginWikiWidgets(PluginWikiWidgets):
    @staticmethod
    def ask(email_label='Your email', question_label='question'):
        """
	This plugin will display a contact us form that allows
	the visitor to ask a question.
	The question will be emailed to you and the widget will
	disappear from the page.
	The arguments are

	- email_label: the label of the visitor email field
	- question_label: the label of the question field

	"""
        form=SQLFORM.factory(
           Field('your_email', requires=IS_EMAIL(), label=email_label),
           Field('question', requires=IS_NOT_EMPTY()), label=question_label)
        if form.process().accepted:
           if mail.send(to='admin@example.com',
                        subject='from %s' % form.vars.your_email,
                        message = form.vars.question):
	       command="jQuery('#%s').hide()" % div_id
               response.flash = 'Thank you'
               response.js = "jQuery('#%s').hide()" % request.cid
        else:
            form.errors.your_email="Unable to send the email"
        return form.xml()
plugin_wiki widgets are not rendered by a view unless the
response.render(...)function is called explicitly by the widget.