Chapter 7: Forms and validators
Forms and validators
There are four distinct ways to build forms in web2py:
FORMprovides a low-level implementation in terms of HTML helpers. AFORMobject can be serialized into HTML and is aware of the fields it contains. AFORMobject knows how to validate submitted form values.SQLFORMprovides a high-level API for building create, update and delete forms from an existing database table.SQLFORM.factoryis an abstraction layer on top ofSQLFORMin order to take advantage of the form generation features even if there is no database present. It generates a form very similar toSQLFORMfrom the description of a table but without the need to create the database table.CRUDmethods. These are functionally equivalent to SQLFORM and are based on SQLFORM, but provide a more compact notation;CRUDis now deprecated in favor ofSQLFORM.grid()andSQLFORM.smartgrid().
All these forms are self-aware and, if the input does not pass validation, they can modify themselves and add error messages. The forms can be queried for the validated variables and for error messages that have been generated by validation.
Arbitrary HTML code can be inserted into or extracted from the form using helpers.
FORM and SQLFORM are helpers and they can be manipulated in a similar way as the DIV. For example you can set a form style:
form = SQLFORM(..)
form['_style']='border:1px solid black'
FORM
Consider as an example a test application with the following "default.py" controller:
def display_form():
    form = FORM('Your name:', INPUT(_name='name'), INPUT(_type='submit'))
    return dict(form=form)
and the associated "default/display_form.html" view:
{{extend 'layout.html'}}
<h2>Input form</h2>
<form enctype="multipart/form-data"
      action="{{=URL()}}" method="post">
Your name:
<input name="name" />
<input type="submit" />
</form>
<h2>Submitted variables</h2>
{{=BEAUTIFY(request.vars)}}
This is a regular HTML form that asks for the user's name. When you fill the form and click the submit button, the form self-submits, and the variable request.vars.name along with its provided value is displayed at the bottom.
You can generate the same form using helpers. This can be done in the view or in the action. Since web2py processed the form in the action, it is better to define the form in the action itself.
Here is the new controller:
def display_form():
   form=FORM('Your name:', INPUT(_name='name'), INPUT(_type='submit'))
   return dict(form=form)
and the associated "default/display_form.html" view:
{{extend 'layout.html'}}
<h2>Input form</h2>
{{=form}}
<h2>Submitted variables</h2>
{{=BEAUTIFY(request.vars)}}
The code so far is equivalent to the previous code, but the form is generated by the statement {{=form}} which serializes the FORM object.
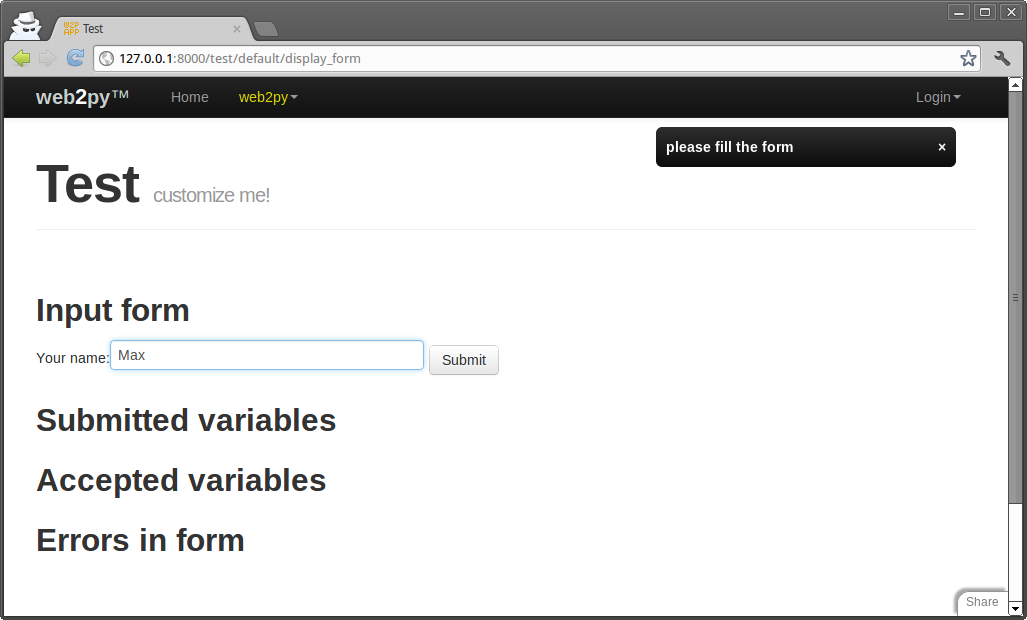
Now we add one level of complexity by adding form validation and processing.
Change the controller as follows:
def display_form():
    form=FORM('Your name:',
              INPUT(_name='name', requires=IS_NOT_EMPTY()),
              INPUT(_type='submit'))
    if form.accepts(request, session):
        response.flash = 'form accepted'
    elif form.errors:
        response.flash = 'form has errors'
    else:
        response.flash = 'please fill the form'
    return dict(form=form)
and the associated "default/display_form.html" view:
{{extend 'layout.html'}}
<h2>Input form</h2>
{{=form}}
<h2>Submitted variables</h2>
{{=BEAUTIFY(request.vars)}}
<h2>Accepted variables</h2>
{{=BEAUTIFY(form.vars)}}
<h2>Errors in form</h2>
{{=BEAUTIFY(form.errors)}}
Notice that:
- In the action, we added the
requires=IS_NOT_EMPTY()validator for the input field "name". - In the action, we added a call to
form.accepts(..) - In the view, we are printing
form.varsandform.errorsas well as the form andrequest.vars.
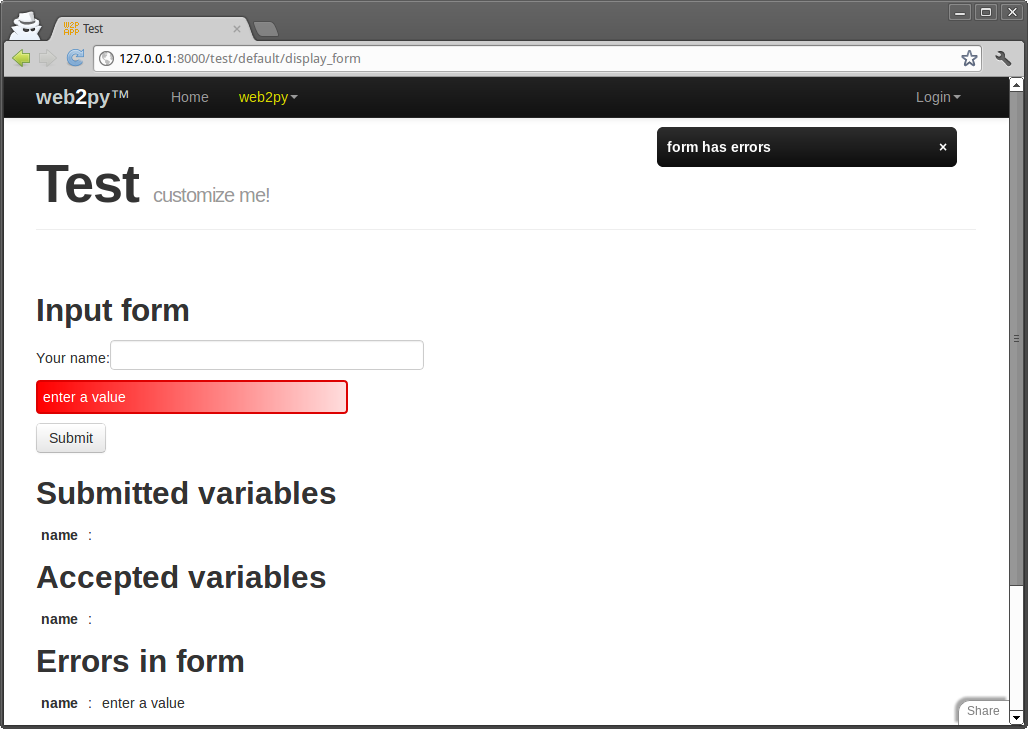
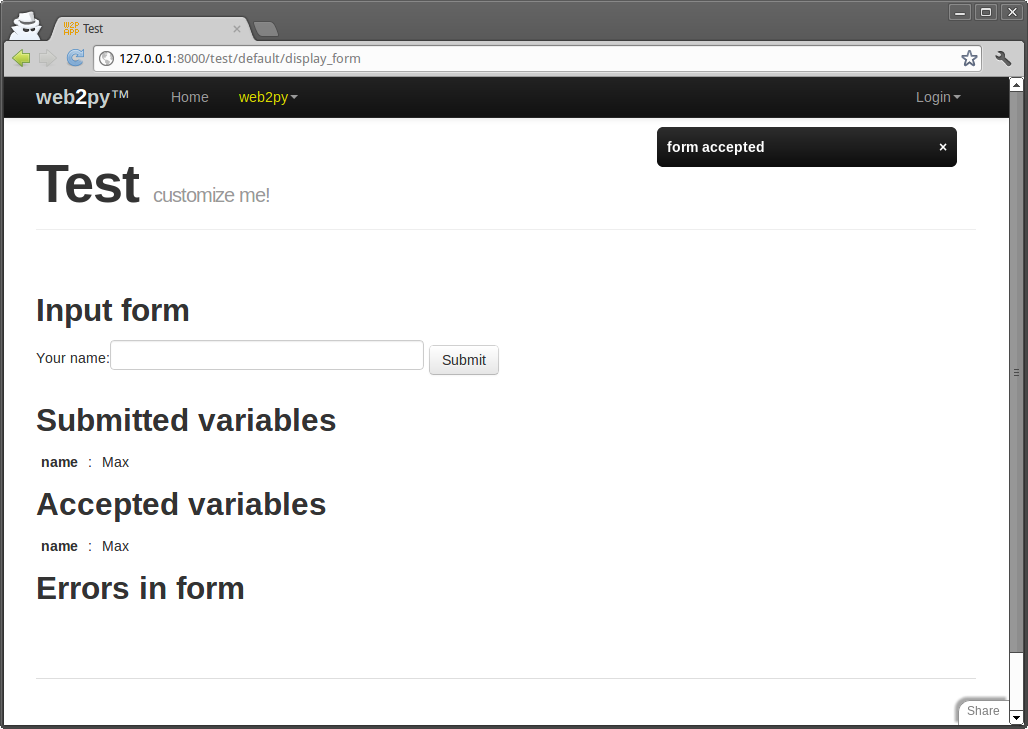
All the work is done by the accepts method of the form object. It filters the request.vars according to the declared requirements (expressed by validators). accepts stores those variables that pass validation into form.vars. If a field value does not meet a requirement, the failing validator returns an error and the error is stored in form.errors. Both form.vars and form.errors are gluon.storage.Storage objects similar to request.vars. The former contains the values that passed validation, for example:
form.vars.name = "Max"
The latter contains the errors, for example:
form.errors.name = "Cannot be empty!"
The full signature of the accepts method is the following:
form.accepts(vars, session=None, formname='default',
             keepvalues=False, onvalidation=None,
             dbio=True, hideerror=False):
The meaning of the optional parameters is explained in the next sub-sections.
The first argument can be request.vars or request.get_vars or request.post_vars or simply request. The latter is equivalent to accepting as input the request.post_vars.
The accepts function returns True if the form is accepted and False otherwise. A form is not accepted if it has errors or when it has not been submitted (for example, the first time it is shown).
Here is how this page looks the first time it is displayed:
Here is how it looks upon invalid submission:
Here is how it looks upon a valid submission:
The process and validate methods
A shortcut for
form.accepts(request.post_vars, session, ...)
is
form.process(...).accepted
the latter does not need the request and session arguments (although you can specify them optionally). it also differs from accepts because it returns the form itself. Internally process calls accepts and passes its arguments to it. The value returned by accepts is stored in form.accepted.
The process function takes some extra argument that accepts does not take:
message_onsuccessonsuccess: if equal to 'flash' (default) and the form is accepted it will flash the abovemessage_onsuccessmessage_onfailureonfailure: if equal to 'flash' (default) and the form fails validation, it will flash the abovemessage_onfailurenextindicates where to redirect the user after the form is accepted.
onsuccess and onfailure can be functions like lambda form: do_something(form).
form.validate(...)
is a shortcut for
form.process(..., dbio=False).accepted
Conditional fields
There are times when you only want a field to show up if a condition is met. For example, consider the following model:
db.define_table('purchase', Field('have_coupon', 'boolean'), Field('coupon_code'))You want to display the field coupon_code if and only if the have_coupon field is checked. This can be done in JavaScript. web2py can help you by generating that JavaScript for you. You just need to declare that the field is conditional to an expression using the field show_if attribute:
def index():
    db.purchase.coupon_code.show_if = (db.purchase.have_coupon==True)
    form = SQLFORM(db.purchase).process()
    return dict(form = form)
The value of show_if is a query and uses the same DAL syntax that you use for database queries. The difference is that this query is not sent to the database but it is converted to JavaScript and sent to the browser where it is executed when the user edits the form.
Hidden fields
When the above form object is serialized by {{=form}}, and because of the previous call to the accepts method, it now looks like this:
<form enctype="multipart/form-data" action="" method="post">
your name:
<input name="name" />
<input type="submit" />
<input value="783531473471" type="hidden" name="_formkey" />
<input value="default" type="hidden" name="_formname" />
</form>
Notice the presence of two hidden fields: "_formkey" and "_formname". Their presence is triggered by the call to accepts and they play two different and important roles:
- The hidden field called "_formkey" is a one-time token that web2py uses to prevent double submission of forms. The value of this key is generated when the form is serialized and stored in the
session. When the form is submitted this value must match, or elseacceptsreturnsFalsewithout errors as if the form was not submitted at all. This is because web2py cannot determine whether the form was submitted correctly. - The hidden field called "_formname" is generated by web2py as a name for the form, but the name can be overridden. This field is necessary to allow pages that contain and process multiple forms. web2py distinguishes the different submitted forms by their names.
- Optional hidden fields specified as
FORM(..., hidden=dict(...)).
The role of these hidden fields and their usage in custom forms and pages with multiple forms is discussed in more detail later in the chapter.
If the form above is submitted with an empty "name" field, the form does not pass validation. When the form is serialized again it appears as:
<form enctype="multipart/form-data" action="" method="post">
your name:
<input value="" name="name" />
<div class="error">cannot be empty!</div>
<input type="submit" />
<input value="783531473471" type="hidden" name="_formkey" />
<input value="default" type="hidden" name="_formname" />
</form>
Notice the presence of a DIV of class "error" in the serialized form. web2py inserts this error message in the form to notify the visitor about the field that did not pass validation. The accepts method, upon submission, determines that the form is submitted, checks whether the field "name" is empty and whether it is required, and eventually inserts the error message from the validator into the form.
The base "layout.html" view is expected to handle DIVs of class "error". The default layout uses jQuery effects to make errors appear and slide down with a red background. See Chapter 11 for more details.
keepvalues
The optional argument keepvalues tells web2py what to do when a form is accepted and there is no redirection, so the same form is displayed again. By default the form is cleared. If keepvalues is set to True, the form is pre-populated with the previously inserted values. This is useful when you have a form that is supposed to be used repeatedly to insert multiple similar records.
dbio
If the dbio argument is set to False, web2py will not perform any DB insert/update after accepting form.
hideerror
If hideerror is set to True and the form contains errors, these will not be displayed when the form is rendered (it will be up to you to display them from form.errors somehow).
onvalidation
The onvalidation argument can be None or can be a function that takes the form and returns nothing. Such a function would be called and passed the form, immediately after validation (if validation passes) and before anything else happens. This function has multiple purposes: for example, to perform additional checks on the form and eventually add errors to the form, or to compute the values of some fields based on the values of other fields, or to trigger some action (like sending an email) before a record is created/updated.
Here is an example:
db.define_table('numbers',
    Field('a', 'integer'),
    Field('b', 'integer'),
    Field('c', 'integer', readable=False, writable=False))

def my_form_processing(form):
    c = form.vars.a * form.vars.b
    if c < 0:
       form.errors.b = 'a*b cannot be negative'
    else:
       form.vars.c = c

def insert_numbers():
   form = SQLFORM(db.numbers)
   if form.process(onvalidation=my_form_processing).accepted:
       session.flash = 'record inserted'
       redirect(URL())
   return dict(form=form)
Detect record change
When filling a form to edit a record there is a small probability that another user may concurrently be editing the same record. So when we save the record we want to check for possible conflicts. This can be done:
db.define_table('dog', Field('name'))

def edit_dog():
    dog = db.dog(request.args(0)) or redirect(URL('error'))
    form=SQLFORM(db.dog, dog)
    form.process(detect_record_change=True)
    if form.record_changed:
        # do something
    elif form.accepted:
        # do something else
    else:
        # do nothing
    return dict(form=form)
record_changed works only with a SQLFORM and not with a FORM.
Forms and redirection
The most common way to use forms is via self-submission, so that the submitted field variables are processed by the same action that generated the form. Once the form is accepted, it is unusual to display the current page again (something we are doing here only to keep things simple). It is more common to redirect the visitor to a "next" page.
Here is the new example controller:
def display_form():
    form = FORM('Your name:',
              INPUT(_name='name', requires=IS_NOT_EMPTY()),
              INPUT(_type='submit'))
    if form.process().accepted:
        session.flash = 'form accepted'
        redirect(URL('next'))
    elif form.errors:
        response.flash = 'form has errors'
    else:
        response.flash = 'please fill the form'
    return dict(form=form)

def next():
    return dict()
In order to set a flash on the next page instead of the current page you must use session.flash instead of response.flash. web2py moves the former into the latter after redirection. Note that using session.flash requires that you do not session.forget().
Multiple forms per page
The content of this section applies to both FORM and SQLFORM objects. It is possible to have multiple forms per page, but you must allow web2py to distinguish them. If these are derived by SQLFORM from different tables, then web2py gives them different names automatically; otherwise you need to explicitly give them different form names. Here is an example:
def two_forms():
    form1 = FORM(INPUT(_name='name', requires=IS_NOT_EMPTY()),
                 INPUT(_type='submit'), _name='form_one')
    form2 = FORM(INPUT(_name='name', requires=IS_NOT_EMPTY()),
                 INPUT(_type='submit'), _name='form_two')
    if form1.process(formname='form_one').accepted:
        response.flash = 'form one accepted'
    if form2.process(formname='form_two').accepted:
        response.flash = 'form two accepted'
    return dict(form1=form1, form2=form2)
and here is the output it produces:
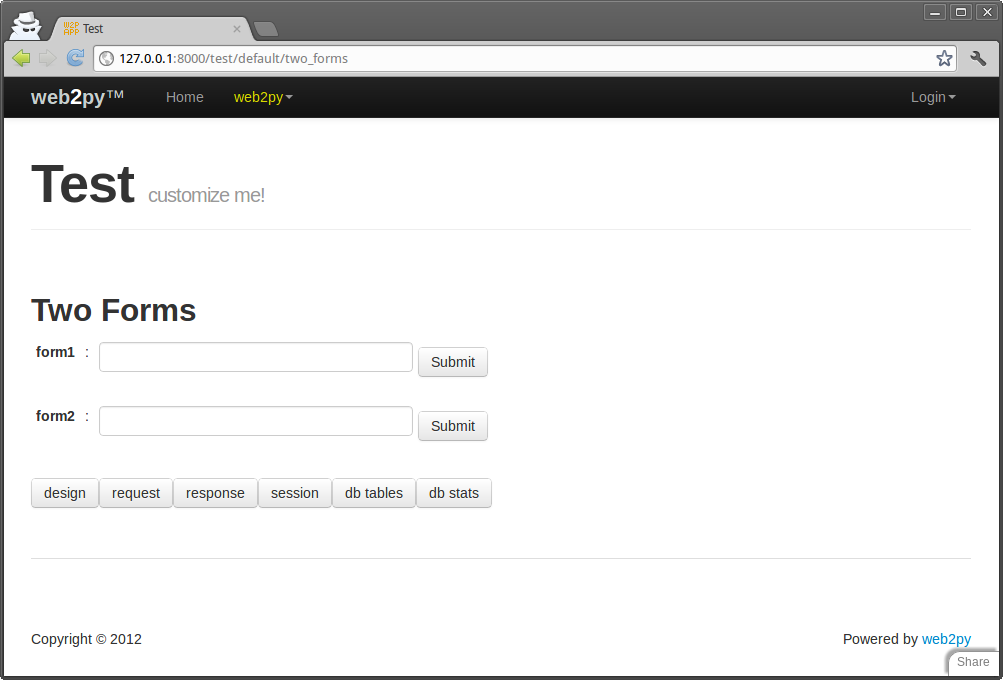
When the visitor submits an empty form1, only form1 displays an error; if the visitor submits an empty form2, only form2 displays an error message.
Sharing forms
The content of this section applies to both FORM and SQLFORM objects. What we discuss here is possible but not recommended, since it is always good practice to have forms that self-submit. Sometimes, though, you don't have a choice, because the action that sends the form and the action that receives it belong to different applications.
It is possible to generate a form that submits to a different action. This is done by specifying the URL of the processing action in the attributes of the FORM or SQLFORM object. For example:
form = FORM(INPUT(_name='name', requires=IS_NOT_EMPTY()),
        INPUT(_type='submit'), _action=URL('page_two'))

def page_one():
    return dict(form=form)

def page_two():
    if form.process(session=None, formname=None).accepted:
         response.flash = 'form accepted'
    else:
         response.flash = 'there was an error in the form'
    return dict()
Notice that since both "page_one" and "page_two" use the same form, we have defined it only once by placing it outside of all the actions, in order not to repeat ourselves. The common portion of code at the beginning of a controller gets executed every time before giving control to the called action.
Since "page_one" does not call process (nor accepts), the form has no name and no key, so you must pass session=None and set formname=None in process, or the form will not validate when "page_two" receives it.
Adding buttons to FORMs
Usually a form provides a single submit button. It is common to want to add a "back" button that instead of submitting the form, directs the visitor to a different page.
This can be done with the add_button method:
form.add_button('Back', URL('other_page'))
You can add more than one button to form. The arguments of add_button are the value of the button (its text) and the url where to redirect to. (See also the buttons argument for SQLFORM, which provides a more powerful approach)
More about manipulation of FORMs
As discussed in the Views chapter, a FORM is an HTML helper. Helpers can be manipulated as Python lists and as dictionaries, which enables run-time creation and modification.
SQLFORM
We now move to the next level by providing the application with a model file:
db = DAL('sqlite://storage.sqlite')
db.define_table('person', Field('name', requires=IS_NOT_EMPTY()))
Modify the controller as follows:
def display_form():
   form = SQLFORM(db.person)
   if form.process().accepted:
       response.flash = 'form accepted'
   elif form.errors:
       response.flash = 'form has errors'
   else:
       response.flash = 'please fill out the form'
   return dict(form=form)
The view does not need to be changed.
In the new controller, you do not need to build a FORM, since the SQLFORM constructor built one from the table db.person defined in the model. This new form, when serialized, appears as:
<form enctype="multipart/form-data" action="" method="post">
  <table>
    <tr id="person_name__row">
       <td><label id="person_name__label"
                  for="person_name">Your name: </label></td>
       <td><input type="text" class="string"
                  name="name" value="" id="person_name" /></td>
       <td></td>
    </tr>
    <tr id="submit_record__row">
       <td></td>
       <td><input value="Submit" type="submit" /></td>
       <td></td>
    </tr>
  </table>
  <input value="9038845529" type="hidden" name="_formkey" />
  <input value="person" type="hidden" name="_formname" />
</form>
The automatically generated form is more complex than the previous low-level form. First of all, it contains a table of rows, and each row has three columns. The first column contains the field labels (as determined from the db.person), the second column contains the input fields (and eventually error messages), and the third column is optional and therefore empty (it can be populated with the fields in the SQLFORM constructor).
All tags in the form have names derived from the table and field name. This allows easy customization of the form using CSS and JavaScript. This capability is discussed in more detail in Chapter 11.
More important is that now the accepts method does a lot more work for you. As in the previous case, it performs validation of the input, but additionally, if the input passes validation, it also performs a database insert of the new record and stores in form.vars.id the unique "id" of the new record.
A SQLFORM object also deals automatically with "upload" fields by saving uploaded files in the "uploads" folder (after having them renamed safely to avoid conflicts and prevent directory traversal attacks) and stores their names (their new names) into the appropriate field in the database. After the form has been processed, the new filename is available in form.vars.fieldname (i.e., it replaces the cgi.FieldStorage object in request.vars.fieldname), so you can easily reference the new name right after upload.
Warning: the default field length is 512 chars. If one's filesystem does not support filenames this long, it can generate names that will cause an error when an attempt is made to create them. This can be solved by setting the
Field(..., length=...)to approriate value. Also notice this may truncate the encoding of the original filename and it may be impossible to recover it upon downloading of the uploaded file.
A SQLFORM displays "boolean" values with checkboxes, "text" values with textareas, values required to be in a definite set or a database with drop-downs, and "upload" fields with links that allow users to download the uploaded files. It hides "blob" fields, since they are supposed to be handled differently, see More on uploads section in Chapter 6 for an example.
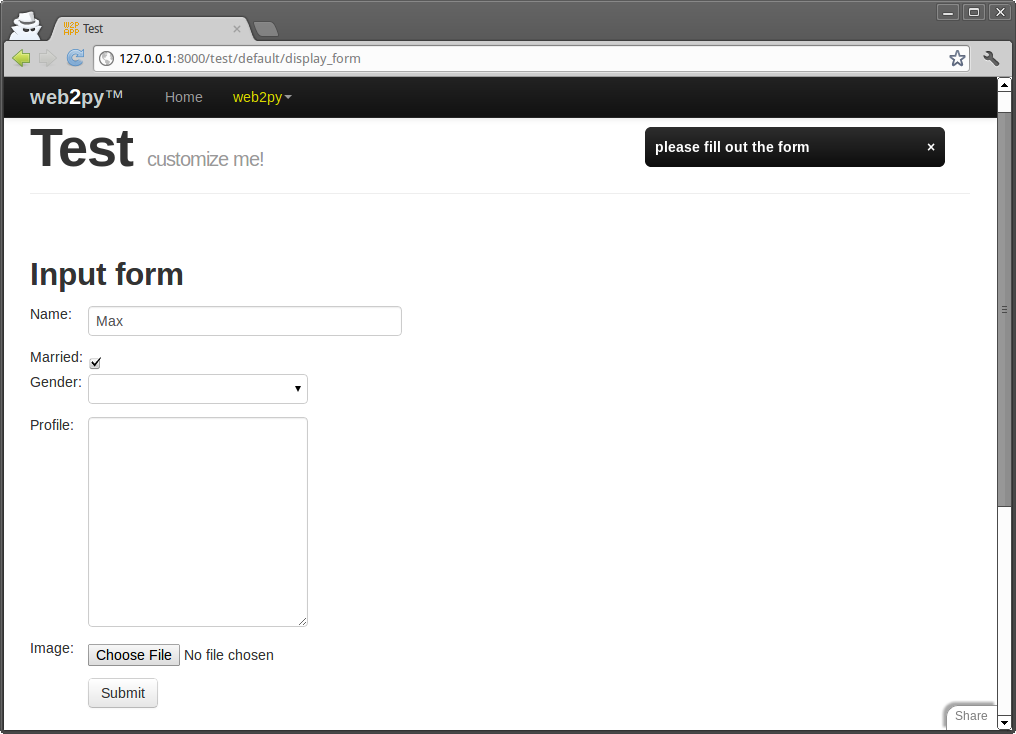
For example, consider the following model:
db.define_table('person',
    Field('name', requires=IS_NOT_EMPTY()),
    Field('married', 'boolean'),
    Field('gender', requires=IS_IN_SET(['Male', 'Female', 'Other'])),
    Field('profile', 'text'),
    Field('image', 'upload'))
In this case, SQLFORM(db.person) generates the form shown below:
The SQLFORM constructor allows various customizations, such as displaying only a subset of the fields, changing the labels, adding values to the optional third column, or creating UPDATE and DELETE forms, as opposed to INSERT forms like the current one. SQLFORM is the single biggest time-saver object in web2py.
The class SQLFORM is defined in "gluon/sqlhtml.py". It can be easily extended by overriding its xml method, the method that serializes the objects, to change its output.
SQLFORM constructor is the following:SQLFORM(table, record=None,
deletable=False, linkto=None,
upload=None, fields=None, labels=None,
col3={}, submit_button='Submit',
delete_label='Check to delete',
showid=True, readonly=False,
comments=True, keepopts=[],
ignore_rw=False, record_id=None,
formstyle='table3cols',
buttons=['submit'], separator=': ',
extra_fields=None,
**attributes)
- The optional second argument turns the INSERT form into an UPDATE form for the specified record (see next subsection). showiddelete_labelid_labelsubmit_button
- If
deletableis set toTrue, the UPDATE form displays a "Check to delete" checkbox. The value of the label for this field is set via thedelete_labelargument. submit_buttonsets the value of the submit button.id_labelsets the label of the record "id"- The "id" of the record is not shown if
showidis set toFalse. fieldsis an optional list of field names that you want to display. If a list is provided, only fields in the list are displayed. For example:
fields = ['name']
labelsis a dictionary of field labels. The dictionary key is a field name and the corresponding value is what gets displayed as its label. If a label is not provided, web2py derives the label from the field name (it capitalizes the field name and replaces underscores with spaces). For example:
labels = {'name':'Your Full Name:'}
col3is a dictionary of values for the third column. For example:
col3 = {'name':A('what is this?',
      _href='http://www.google.com/search?q=define:name')}
linktoanduploadare optional URLs to user-defined controllers that allow the form to deal with reference fields. This is discussed in more detail later in Links to referencing records and SQLFORM and uploads sections respectively.readonly. If set to True, displays the form as readonlycomments. If set to False, does not display the col3 commentsignore_rw. Normally, for a create/update form, only fields marked as writable=True are shown, and for readonly forms, only fields marked as readable=True are shown. Settingignore_rw=Truecauses those constraints to be ignored, and all fields are displayed. This is mostly used in the appadmin interface to display all fields for each table, overriding what the model indicates.- formstyle
formstyledetermines the style to be used when serializing the form in html. The default value is sourced fromresponse.formstyle, currently it is "bootstrap4_inline". Other options are "bootstrap4_stacked", "bootstrap3_inline, "bootstrap3_stacked", "bootstrap2", "table3cols", "table2cols" (one row for label and comment, and one row for input), "ul" (makes an unordered list of input fields), "divs" (represents the form using css friendly divs, for arbitrary customization), "bootstrap" which uses the bootstrap 2.3 form class "form-horizontal".formstylecan also be a function which generates everything inside the FORM tag. You pass to your form constructor function two arguments, form and fields. Hints can be found in the source code file sqlhtml.py (look for functions named formstyle_) - buttons
buttonsis a list ofINPUTs orBUTTONs (though technically could be any combination of helpers) that will be added to a DIV where the submit button would go.
For example, adding a URL-based back-button (for a multi-page form) and a renamed submit button:
buttons = [BUTTON('Back', _type="button", _onClick="parent.location='%s'" % URL(...),
           BUTTON('Next', _type="submit")]
or a button which links to another page:
buttons = [..., A("Go to another page", _class='btn', _href=URL("default", "anotherpage"))]
- separator
separatorsets the string that separates form labels from form input fields, if set to None the default value is sourced fromresponse.form_label_separator - extra_fields
extra_fieldsis a list of extraFields to add. - Optional
attributesare arguments starting with underscore that you want to pass to theFORMtag that renders theSQLFORMobject. Examples are:
_action = '.'
_method = 'POST'
There is a special hidden attribute. When a dictionary is passed as hidden, its items are translated into "hidden" INPUT fields (see the example for the FORM helper in Chapter 5).
form = SQLFORM(..., hidden=...)
causes the hidden fields to be passed with the submission, no more, no less. form.accepts(...) is not intended to read the received hidden fields and move them into form.vars. The reason is security. Hidden fields can be tampered with. So you have to explicitly move hidden fields from the request to the form:
form = SQLFORM(..., hidden=dict(a='b'))
form.vars.a = request.vars.a
The process method
SQLFORM inherits the process method from FORM.
SQLFORM and insert/update/delete
SQLFORM creates a new db record when the form is accepted. Assuming
form = SQLFORM(db.test)
form.vars.id.If you pass a record as the optional second argument to the SQLFORM constructor, the form becomes an UPDATE form for that record. This means that when the form is submitted the existing record is updated and no new record is inserted. If you set the argument deletable=True, the UPDATE form displays a "Check to delete" checkbox. If checked, the record is deleted.
If a form is submitted and the delete checkbox is checked the attribute
form.deletedis set toTrue.
You can modify the controller of the previous example so that when we pass an additional integer argument in the URL path, as in:
/test/default/display_form/2
and if there is a record with the corresponding id, the SQLFORM generates an UPDATE/DELETE form for the record:
def display_form():
   record = db.person(request.args(0)) or redirect(URL('index'))
   form = SQLFORM(db.person, record)
   if form.process().accepted:
       response.flash = 'form accepted'
   elif form.errors:
       response.flash = 'form has errors'
   return dict(form=form)
Line 2 finds the record and line 3 makes an UPDATE/DELETE form. Line 4 does all the corresponding form processing.
An update form is very similar to a create form except that it is pre-populated with the current record and it previews images. By default
deletable = Truewhich means the update form will display a "delete record" option.
Edit forms also contain a hidden INPUT field with name="id" which is used to identify the record. This id is also stored server-side for additional security and, if the visitor tampers with the value of this field, the UPDATE is not performed and web2py raises a SyntaxError, "user is tampering with form".
When a field is marked with writable=False, the field is not shown in create forms, and it is shown readonly in update forms. If a field is marked as writable=False and readable=False, then the field is not shown at all, not even in update forms.
Forms created with
form = SQLFORM(..., ignore_rw=True)
ignore the readable and writable attributes and always show all fields. Forms in appadmin ignore them by default.
Forms created with
form = SQLFORM(table, record_id, readonly=True)
always show all fields in readonly mode, and they cannot be accepted.
Marking a field with writable=False prevents the field from being part of the form, and causes the form processing to disregard the value of request.vars.field when processing the form. However, if you assign a value to form.vars.field, this value will be part of the insert or update when the form is processed. This enables you to change the value of fields that for some reason you do not wish to include in a form.
SQLFORM in HTML
There are times when you want to use SQLFORM to benefit from its form generation and processing, but you need a level of customization of the form in HTML that you cannot achieve with the parameters of the SQLFORM object, so you have to design the form using HTML.
Now, edit the previous controller and add a new action:
def display_manual_form():
    form = SQLFORM(db.person)
    if form.process(session=None, formname='test').accepted:
        response.flash = 'form accepted'
    elif form.errors:
        response.flash = 'form has errors'
    else:
        response.flash = 'please fill the form'
    # Note: no form instance is passed to the view
    return dict()
and insert the form in the associated "default/display_manual_form.html" view:
{{extend 'layout.html'}}
<form action="#" enctype="multipart/form-data" method="post">
<ul>
  <li>Your name is <input name="name" /></li>
</ul>
  <input type="submit" />
  <input type="hidden" name="_formname" value="test" />
</form>
Notice that the action does not return the form because it does not need to pass it to the view. The view contains a form created manually in HTML. The form contains a hidden field "_formname" that must be the same formname specified as an argument of accepts in the action. web2py uses the form name in case there are multiple forms on the same page, to determine which one was submitted. If the page contains a single form, you can set formname=None and omit the hidden field in the view.
form.accepts will look inside response.vars for data that matches fields in the database table db.person. These fields are declared in the HTML in the format
<input name="field_name_goes_here" />
Note: the HTML form uses
POSTprotocol (i.e. form variables will not be passed on the URL) andmultipart/form-dataencoding type. The latter is needed for upload fields to work.
SQLFORM and uploads
Fields of type "upload" are special. They are rendered as INPUT fields of type="file". Unless otherwise specified, the uploaded file is streamed in using a buffer, and stored under the "uploads" folder of the application using a new safe name, assigned automatically. The name of this file is then saved into the field of type "upload".
As an example, consider the following model:
db.define_table('person',
    Field('name', requires=IS_NOT_EMPTY()),
    Field('image', 'upload'))
You can use the same controller action "display_form" shown above.
When you insert a new record, the form allows you to browse for a file. Choose, for example, a jpg image. The file is uploaded and stored as:
applications/test/uploads/person.image.XXXXX.jpg
"XXXXXX" is a random identifier for the file assigned by web2py.
Notice that, by default, the original filename of an uploaded file is b16encoded and used to build the new name for the file. This name is retrieved by the default "download" action and used to set the content disposition header to the original filename.
Only its extension is preserved. This is a security requirement since the filename may contain special characters that could allow a visitor to perform directory traversal attacks or other malicious operations.
The new filename is also stored in form.vars.image.
When editing the record using an UPDATE form, it would be nice to display a link to the existing uploaded file, and web2py provides a way to do it.
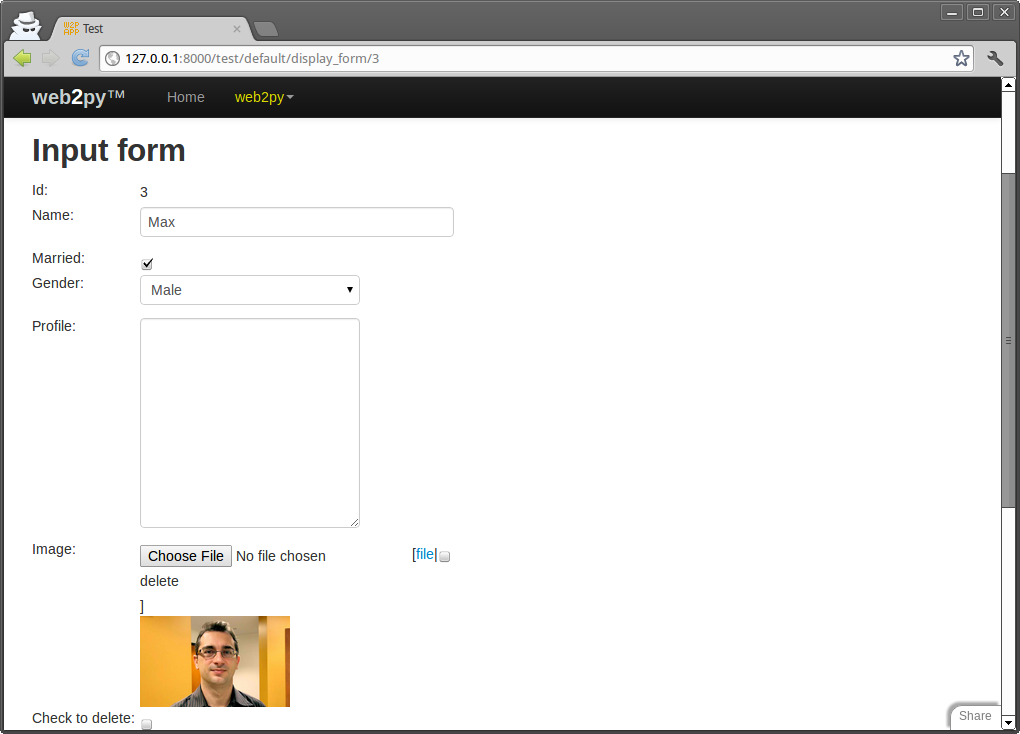
If you pass a URL to the SQLFORM constructor via the upload argument, web2py uses the action at that URL to download the file. Consider the following actions:
def display_form():
   record = db.person(request.args(0))
   form = SQLFORM(db.person, record, deletable=True,
                  upload=URL('download'))
   if form.process().accepted:
       response.flash = 'form accepted'
   elif form.errors:
       response.flash = 'form has errors'
   return dict(form=form)

def download():
    return response.download(request, db)
Now, insert a new record at the URL:
http://127.0.0.1:8000/test/default/display_form
Upload an image, submit the form, and then edit the newly created record by visiting:
http://127.0.0.1:8000/test/default/display_form/3
(here we assume the latest record has id=3). The form will display an image preview as shown below:
This form, when serialized, generates the following HTML:
<td><label id="person_image__label" for="person_image">Image: </label></td>
<td><div><input type="file" id="person_image" class="upload" name="image"
/>[<a href="/test/default/download/person.image.0246683463831.jpg">file</a>|
<input type="checkbox" name="image__delete" />delete]</div></td><td></td></tr>
<tr id="delete_record__row"><td><label id="delete_record__label" for="delete_record"
>Check to delete:</label></td><td><input type="checkbox" id="delete_record"
class="delete" name="delete_this_record" /></td>
which contains a link to allow downloading of the uploaded file, and a checkbox to remove the file from the database record, thus storing NULL in the "image" field.
Why is this mechanism exposed? Why do you need to write the download function? Because you may want to enforce some authorization mechanism in the download function. See Chapter 9 for an example.
Normally uploaded files are stored into "app/uploads" but you can specify an alternate location:
Field('image', 'upload', uploadfolder='...')In most operating system, accessing the file system can become slow when there are many files in the same folder. If you plan to upload more than 1000 files you can ask web2py to organize the uploads in subfolders:
Field('image', 'upload', uploadseparate=True)Storing the original filename
web2py automatically stores the original filename inside the new UUID filename and retrieves it when the file is downloaded. Upon download, the original filename is stored in the content-disposition header of the HTTP response. This is all done transparently without the need for programming.
Occasionally you may want to store the original filename in a database field. In this case, you need to modify the model and add a field to store it in:
db.define_table('person',
    Field('name', requires=IS_NOT_EMPTY()),
    Field('image_filename'),
    Field('image', 'upload'))
Then you need to modify the controller to handle it:
def display_form():
    record = db.person(request.args(0)) or redirect(URL('index'))
    url = URL('download')
    form = SQLFORM(db.person, record, deletable=True,
                   upload=url, fields=['name', 'image'])
    if request.vars.image != None:
        form.vars.image_filename = request.vars.image.filename
    if form.process().accepted:
        response.flash = 'form accepted'
    elif form.errors:
        response.flash = 'form has errors'
    return dict(form=form)
Notice that the SQLFORM does not display the "image_filename" field. The "display_form" action moves the filename of the request.vars.image into the form.vars.image_filename, so that it gets processed by accepts and stored in the database. The download function, before serving the file, checks in the database for the original filename and uses it in the content-disposition header.
autodelete
The SQLFORM, upon deleting a record, does not delete the physical uploaded file(s) referenced by the record. The reason is that web2py does not know whether the same file is used/linked by other tables or used for other purpose. If you know it is safe to delete the actual file when the corresponding record is deleted, you can do the following:
db.define_table('image',
    Field('name', requires=IS_NOT_EMPTY()),
    Field('source', 'upload', autodelete=True))
The autodelete attribute is False by default. When set to True is makes sure the file is deleted when the record is deleted.
Links to referencing records
Now consider the case of two tables linked by a reference field. For example:
db.define_table('person',
    Field('name', requires=IS_NOT_EMPTY()))
db.define_table('dog',
    Field('owner', 'reference person'),
    Field('name', requires=IS_NOT_EMPTY()))
db.dog.owner.requires = IS_IN_DB(db, 'person.id', '%(name)s')
A person has dogs, and each dog belongs to an owner, which is a person. The dog owner is required to reference a valid db.person.id by '%(name)s'.
Let's use the appadmin interface for this application to add a few persons and their dogs.
When editing an existing person, the appadmin UPDATE form shows a link to a page that lists the dogs that belong to the person. This behavior can be replicated using the linkto argument of the SQLFORM. linkto has to point to the URL of a new action that receives a query string from the SQLFORM and lists the corresponding records. Here is an example:
def display_form():
   record = db.person(request.args(0)) or redirect(URL('index'))
   link = URL('list_records', args='db')
   form = SQLFORM(db.person, record, deletable=True, linkto=link)
   if form.process().accepted:
       response.flash = 'form accepted'
   elif form.errors:
       response.flash = 'form has errors'
   return dict(form=form)
Here is the page:
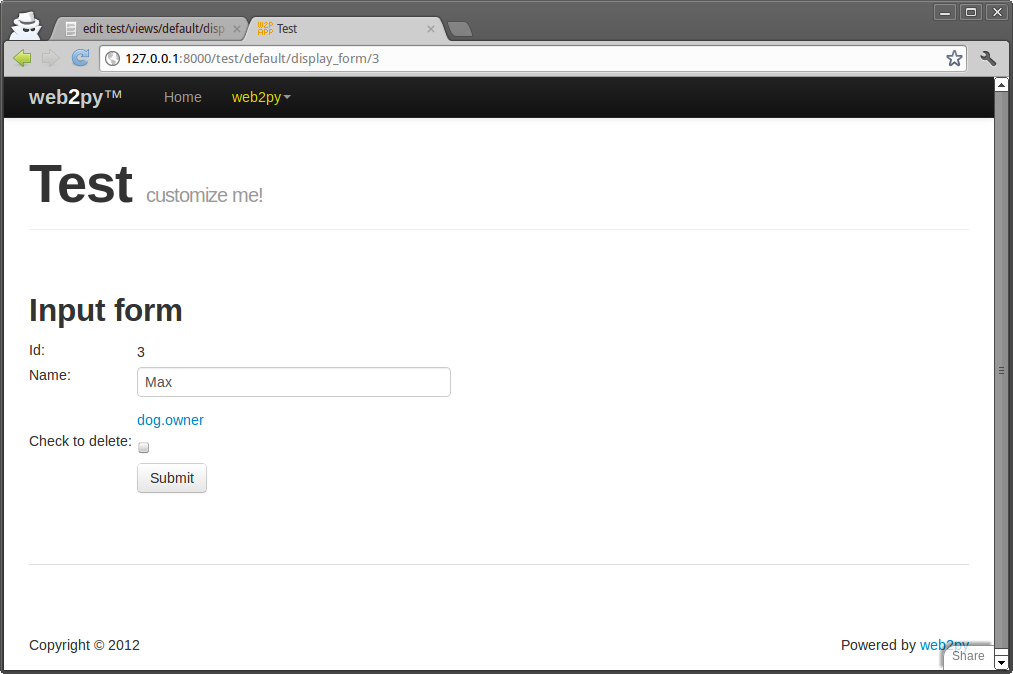
There is a link called "dog.owner". The name of this link can be changed via the labels argument of the SQLFORM, for example:
labels = {'dog.owner':"This person's dogs"}
If you click on the link you get directed to:
/test/default/list_records/db/dog?query=db.dog.owner%3D%3D3
"list_records" is the specified action, with request.args(0) set to the name of the referencing table and request.vars.query set to the SQL query string. The query string in the URL contains the value "dog.owner==3" appropriately url-encoded (web2py decodes this automatically when the URL is parsed).
You can easily implement a very general "list_records" action as follows:
def list_records():
    import re
    REGEX = re.compile(r'^(\w+).(\w+).(\w+)==(\d+)$')
    match = REGEX.match(request.vars.query)
    if not match:
        redirect(URL('error'))
    table, field, id = match.group(2), match.group(3), match.group(4)
    records = db(db[table][field]==id).select()
    return dict(records=records)
with the associated "default/list_records.html" view:
{{extend 'layout.html'}}
{{=records}}
When a set of records is returned by a select and serialized in a view, it is first converted into a SQLTABLE object (not the same as a Table) and then serialized into an HTML table, where each field corresponds to a table column.
Pre-populating the form
It is always possible to pre-populate a form using the syntax:
form.vars.name = 'fieldvalue'
Statements like the one above must be inserted after the form declaration and before the form is accepted, whether or not the field ("name" in the example) is explicitly visualized in the form.
Adding extra form elements to SQLFORM
Sometimes you may wish to add an extra element to your form after it has been created. For example, you may wish to add a checkbox which confirms the user agrees with the terms and conditions of your website:
form = SQLFORM(db.yourtable)
my_extra_element = TR(LABEL('I agree to the terms and conditions'),
                      INPUT(_name='agree', value=True, _type='checkbox'))
form[0].insert(-1, my_extra_element)
The variable my_extra_element should be adapted to the formstyle. In this example, the default formstyle='table3cols' has been assumed.
After submission, form.vars.agree will contain the status of the checkbox, which could then be used in an onvalidation function, for instance.
SQLFORM without database IO
There are times when you want to generate a form from a database table using SQLFORM and you want to validate a submitted form accordingly, but you do not want any automatic INSERT/UPDATE/DELETE in the database. This is the case, for example, when one of the fields needs to be computed from the value of other input fields. This is also the case when you need to perform additional validation on the inserted data that cannot be achieved via standard validators.
This can be done easily by breaking:
form = SQLFORM(db.person)
if form.process().accepted:
    response.flash = 'record inserted'
into:
form = SQLFORM(db.person)
if form.validate():
    ### deal with uploads explicitly
    form.vars.id = db.person.insert(**dict(form.vars))
    response.flash = 'record inserted'
The same can be done for UPDATE/DELETE forms by breaking:
form = SQLFORM(db.person, record)
if form.process().accepted:
    response.flash = 'record updated'
into:
form = SQLFORM(db.person, record)
if form.validate():
    if form.deleted:
        db(db.person.id==record.id).delete()
    else:
        form.record.update_record(**dict(form.vars))
    response.flash = 'record updated'
In the case of a table including an "upload"-type field ("fieldname"), both process(dbio=False) and validate() deal with the storage of the uploaded file as if process(dbio=True), the default behavior.
The name assigned by web2py to the uploaded file can be found in:
form.vars.fieldname
Other types of Forms
SQLFORM.factory
There are cases when you want to generate forms as if you had a database table but you do not want the database table. You simply want to take advantage of the SQLFORM capability to generate a nice looking CSS-friendly form and perhaps perform file upload and renaming.
This can be done via a form_factory. Here is an example where you generate the form, perform validation, upload a file and store everything in the session :
def form_from_factory():
    form = SQLFORM.factory(
        Field('your_name', requires=IS_NOT_EMPTY()),
        Field('your_image', 'upload'))
    if form.process().accepted:
        response.flash = 'form accepted'
        session.your_name = form.vars.your_name
        session.your_image = form.vars.your_image
    elif form.errors:
        response.flash = 'form has errors'
    return dict(form=form)
The Field object in the SQLFORM.factory() constructor is fully documented in Chapter 6. A run-time construction technique for SQLFORM.factory() is
fields = []
fields.append(Field(...))
form=SQLFORM.factory(*fields)
Here is the "default/form_from_factory.html" view:
{{extend 'layout.html'}}
{{=form}}
You cannot use space into field names, set labels explicitly in field constructors (i.e. Field('field_name', ..., label='...')) or pass a dictionary of labels to form_factory, as you would for a SQLFORM. By default SQLFORM.factory generates the form using HTML "id" attributes generated as if the form was generated from a table called "no_table". To change this dummy table name, use the table_name argument:
form = SQLFORM.factory(..., table_name='other_dummy_name')
Changing the table_name is necessary if you need to place two factory generated forms in the same table and want to avoid CSS conflicts.
Uploading files with SQLFORM.factory
One form for multiple tables
It often happens that you have two tables (for example 'client' and 'address' which are linked together by a reference and you want to create a single form that allows to insert info about one client and its default address. Here is how:
model:
db.define_table('client',
     Field('name'))
db.define_table('address',
    Field('client', 'reference client',
          writable=False, readable=False),
    Field('street'), Field('city'))
controller:
def register():
    form = SQLFORM.factory(db.client, db.address)
    if form.process().accepted:
        id = db.client.insert(**db.client._filter_fields(form.vars))
        form.vars.client = id
        id = db.address.insert(**db.address._filter_fields(form.vars))
        response.flash = 'Thanks for filling the form'
    return dict(form=form)
Notice the SQLFORM.factory (it makes ONE form using public fields from both tables and inherits their validators too). On form accepts this does two inserts, some data in one table and some data in the other.
This only works when the tables don't have field names in common.
Confirmation Forms
Often you need a form with a confirmation choice. The form should be accepted if the choice is accepted, that is on submission only. The form may have additional options that link other web pages. web2py provides a simple way to do this:
form = FORM.confirm('Are you sure?')
if form.accepted: do_what_needs_to_be_done()
Notice that the confirm form does not need and must not call .accepts or .process because this is done internally. You can add buttons with links to the confirmation form in the form of a dictionary of {'value':'link'}:
form = FORM.confirm('Are you sure?', {'Back':URL('other_page')})
if form.accepted: do_what_needs_to_be_done()
Form to edit a dictionary
Imagine a system that stores configurations options in a dictionary,
config = dict(color='black', language='English')
and you need a form to allow the visitor to modify this dictionary. This can be done with:
form = SQLFORM.dictform(config)
if form.process().accepted: config.update(form.vars)
The form will display one INPUT field for each item in the dictionary. It will use dictionary keys as INPUT names and labels and current values to infer types (string, int, double, date, datetime, boolean).
This works great but leave to you the logic of making the config dictionary persistent. For example you may want to store the config in a session.
if not session.config:
    session.config = dict(color='black', language='English')
form = SQLFORM.dictform(session.config)
if form.process().accepted:
    session.config.update(form.vars)
CRUD
The Create/Read/Update/Delete (CRUD) API is an experimental interface on top of SQLFORM. It is now deprecated in favor of SQLFORM.grid() and SQLFORM.smartgrid(), but is described here because some applications have been built with it.
CRUD creates an SQLFORM, but it simplifies the coding because it incorporates the creation of the form, the processing of the form, the notification, and the redirection, all in one single function. The first thing to notice is that CRUD differs from the other web2py APIs we have used so far because it is not already exposed. It must be imported. It also must be linked to a specific database. For example:
from gluon.tools import Crud
crud = Crud(db)
The crud object defined above provides the following API:
crud.tables()returns a list of tables defined in the database.crud.create(db.tablename)returns a create form for table tablename.crud.read(db.tablename, id)returns a readonly form for tablename and record id.crud.update(db.tablename, id)returns an update form for tablename and record id.crud.delete(db.tablename, id)deletes the record.crud.select(db.tablename, query)returns a list of records selected from the table.crud.search(db.tablename)returns a tuple (form, records) where form is a search form and records is a list of records based on the submitted search form.crud()returns one of the above based on therequest.args().
For example, the following action:
def data(): return dict(form=crud())
would expose the following URLs:
http://.../[app]/[controller]/data/tables
http://.../[app]/[controller]/data/create/[tablename]
http://.../[app]/[controller]/data/read/[tablename]/[id]
http://.../[app]/[controller]/data/update/[tablename]/[id]
http://.../[app]/[controller]/data/delete/[tablename]/[id]
http://.../[app]/[controller]/data/select/[tablename]
http://.../[app]/[controller]/data/search/[tablename]
However, the following action:
def create_tablename():
    return dict(form=crud.create(db.tablename))
would only expose the create method
http://.../[app]/[controller]/create_tablename
While the following action:
def update_tablename():
    return dict(form=crud.update(db.tablename, request.args(0)))
would only expose the update method
http://.../[app]/[controller]/update_tablename/[id]
and so on.
The behavior of CRUD can be customized in two ways: by setting some attributes of the crud object or by passing extra parameters to each of its methods.
Settings
Here is a complete list of current CRUD attributes, their default values, and meaning:
To enforce authentication on all crud forms:
crud.settings.auth = auth
This is explained in Chapter 9.
To specify the controller that defines the data function which returns the crud object
crud.settings.controller = 'default'
To specify the URL to redirect to after a successful "create" record:
crud.settings.create_next = URL('index')
To specify the URL to redirect to after a successful "update" record:
crud.settings.update_next = URL('index')
To specify the URL to redirect to after a successful "delete" record:
crud.settings.delete_next = URL('index')
To specify the URL to be used for linking uploaded files:
crud.settings.download_url = URL('download')
To specify extra functions to be executed after standard validation procedures for crud.create forms:
crud.settings.create_onvalidation = StorageList()
StorageList is the same as a Storage object, they are both defined in the file "gluon/storage.py", but it defaults to [] as opposed to None. It allows the following syntax:
crud.settings.create_onvalidation.mytablename.append(lambda form: ...)
To specify extra functions to be executed after standard validation procedures for crud.update forms:
crud.settings.update_onvalidation = StorageList()
To specify extra functions to be executed after completion of crud.create forms:
crud.settings.create_onaccept = StorageList()
To specify extra functions to be executed after completion of crud.update forms:
crud.settings.update_onaccept = StorageList()
To specify extra functions to be executed after completion of crud.update if record is deleted:
crud.settings.update_ondelete = StorageList()
To specify extra functions to be executed after completion of crud.delete:
crud.settings.delete_onaccept = StorageList()
To determine whether the "update" forms should have a "delete" button:
crud.settings.update_deletable = True
To determine whether the "update" forms should show the id of the edited record:
crud.settings.showid = False
To determine whether forms should keep the previously inserted values or reset to default after successful submission:
crud.settings.keepvalues = False
Crud always detects whether a record being edited has been modified by a third party in the time between the time when the form is displayed and the time when it is submitted. This behavior is equivalent to
form.process(detect_record_change=True)and it is set in:
crud.settings.detect_record_change = True
and it can be changed/disabled by setting the variable to False.
You can change the form style by
crud.settings.formstyle = 'table3cols' or 'table2cols' or 'divs' or 'ul'
You can set the separator in all crud forms:
crud.settings.label_separator = ':'
captcha
You can add captcha to forms, using the same convention explained for auth.settings (see Chapter 9), with:
crud.settings.create_captcha = None
crud.settings.update_captcha = None
crud.settings.captcha = None
Messages
Here is a list of customizable messages:
crud.messages.submit_button = 'Submit'
sets the text of the "submit" button for both create and update forms.
crud.messages.delete_label = 'Check to delete'
sets the label of the "delete" checkbox in "update" forms.
crud.messages.record_created = 'Record Created'
sets the flash message on successful record creation.
crud.messages.record_updated = 'Record Updated'
sets the flash message on successful record update.
crud.messages.record_deleted = 'Record Deleted'
sets the flash message on successful record deletion.
crud.messages.update_log = 'Record %(id)s updated'
sets the log message on successful record update.
crud.messages.create_log = 'Record %(id)s created'
sets the log message on successful record creation.
crud.messages.read_log = 'Record %(id)s read'
sets the log message on successful record read access.
crud.messages.delete_log = 'Record %(id)s deleted'
sets the log message on successful record deletion.
Notice that
crud.messagesbelongs to the classgluon.storage.Messagewhich is similar togluon.storage.Storagebut it automatically translates its values, without need for theToperator.
Log messages are used if and only if CRUD is connected to Auth (as discussed in Chapter 9) and CRUD logger is attached too:
crud.settings.logger = crud.settings.auth = auth
The events are logged in the Auth table auth_event.
Methods
The behavior of CRUD methods can also be customized on a per call basis. Here are their signatures:
crud.tables()
crud.create(table, next, onvalidation, onaccept, log, message, formname, **attributes)
crud.read(table, record)
crud.update(table, record, next, onvalidation, onaccept, ondelete, log, message, deletable)
crud.delete(table, record_id, next, message)
crud.select(table, query, fields, orderby, limitby, headers, **attr)
crud.search(table, query, queries, query_labels, fields, field_labels, zero, showall, chkall)
tableis a DAL table or a tablename the method should act on.recordandrecord_idare the id of the record the method should act on.nextis the URL to redirect to after success. If the URL contains the substring "[id]" this will be replaced by the id of the record currently created/updated (useURL(..., url_encode=False)to prevent the brackets from being escaped).onvalidationhas the same function as in FORM and SQLFORM (see onvalidation section)onacceptis a function to be called after the form submission is accepted and acted upon, but before redirection. This will be called with the form passed as argument.logis the log message. Log messages in CRUD see variables in theform.varsdictionary such as "%(id)s" (the message actually logged islog % form.vars).messageis the flash message upon form acceptance.formnameis the name to be used for the genarated SQLFORM, this may be needed when you want multiple form on the same page (see Multiple forms per page section for additional details).**attributesadditionalcrud.createandcrud.updatekeyword arguments to be passed to theSQLFORMconstructor.ondeleteis called in place ofonacceptwhen a record is deleted via an "update" form.deletabledetermines whether the "update" form should have a delete option.queryis the query to be used to select records.fieldsis a list of fields to be selected.orderbydetermines the order in which records should be selected (see Chapter 6).limitbydetermines the range of selected records that should be displayed (see Chapter 6).headersis a dictionary mapping field names into header names to be passed to theSQLTABLEconstructor (see Chapter 6).queriesa list like['equals', 'not equal', 'contains']containing the allowed methods in the search form.query_labelsa dictionary likequery_labels=dict(equals='Equals')giving names to search methods.fieldsa list of fields to be listed in the search widget.field_labelsa dictionary mapping field names into labels.zerodefaults to "choose one" is used as default option for the drop-down in the search widget.showallset it to True if you want rows returned as per the query in the first call (added after 1.98.2).chkallset it to True to turn on all the checkboxes in the search form (added after 1.98.2).**attradditionalcrud.selectkeyword arguments to be passed to theSQLTABLEconstructor (see Chapter 6).
Here is an example of usage in a single controller function:
## assuming db.define_table('person', Field('name'))
def people():
    form = crud.create(db.person, next=URL('index'),
                       message=T("record created"))
    persons = crud.select(db.person, fields=['name'],
                          headers={'person.name': 'Name'})
    return dict(form=form, persons=persons)
Here is another very generic controller function that lets you search, create and edit any records from any table where the tablename is passed in request.args(0):
def manage():
    table = db[request.args(0)]
    form = crud.update(table, request.args(1))
    table.id.represent = lambda id, row: \
       A('edit:', id, _href=URL(args=(request.args(0), id)))
    search, rows = crud.search(table)
    return dict(form=form, search=search, rows=rows)
Notice the line table.id.represent=... that tells web2py to change the representation of the id field and display a link instead to the page itself and passes the id as request.args(1) which turns the create page into an update page.
Record versioning
Both SQLFORM and CRUD provides a utility to version database records:
If you have a table (db.mytable) that needs full revision history you can just do:
form = SQLFORM(db.mytable, myrecord).process(onsuccess=auth.archive)
form = crud.update(db.mytable, myrecord, onaccept=auth.archive)
auth.archive defines a new table called db.mytable_archive (the name is derived from the name of the table to which it refers) and on updating, it stores a copy of the record (as it was before the update) in the created archive table, including a reference to the current record.
Because the record is actually updated (only its previous state is archived), references are never broken.
This is all done under the hood. Should you wish to access the archive table you should define it in a model:
db.define_table('mytable_archive',
   Field('current_record', 'reference mytable'),
   db.mytable)
Notice the table extends db.mytable (including all its fields), and adds a reference to the current_record.
auth.archive does not timestamp the stored record unless your original table has timestamp fields, for example:
db.define_table('mytable',
    Field('created_on', 'datetime',
          default=request.now, update=request.now, writable=False),
    Field('created_by', 'reference auth_user',
          default=auth.user_id, update=auth.user_id, writable=False),
There is nothing special about these fields and you may give them any name you like. They are filled before the record is archived and are archived with each copy of the record. The archive table name and/or reference field name can be changed like this:
db.define_table('myhistory',
    Field('parent_record', 'reference mytable'),
    db.mytable)
## ...
form = SQLFORM(db.mytable, myrecord)
form.process(onsuccess = lambda form:auth.archive(form,
             archive_table=db.myhistory,
             current_record='parent_record'))
Custom forms
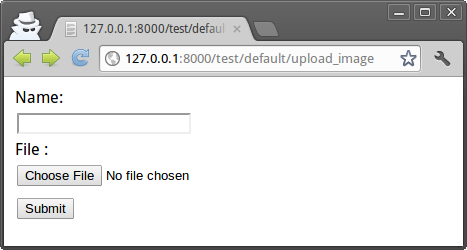
If a form is created with SQLFORM, SQLFORM.factory or CRUD, there are multiple ways it can be embedded in a view allowing multiple degrees of customization. Consider for example the following model:
db.define_table('image',
    Field('name', requires=IS_NOT_EMPTY()),
    Field('source', 'upload'))
and upload action
def upload_image():
    return dict(form=SQLFORM(db.image).process())
The simplest way to embed the form in the view for upload_image is
{{=form}}
This results in a standard table layout. If you wish to use a different layout, you can break the form into components
{{=form.custom.begin}}
Name: <div>{{=form.custom.widget.name}}</div>
File: <div>{{=form.custom.widget.source}}</div>
{{=form.custom.submit}}
{{=form.custom.end}}
where form.custom.widget[fieldname] gets serialized into the proper widget for the field. If the form is submitted and it contains errors, they are appended below the widgets, as usual.
The above sample form is show in the image below.
A similar result could have been obtained without using a custom form:
SQLFORM(..., formstyle='table2cols')
or in case of CRUD forms with the following parameter:
crud.settings.formstyle='table2cols'
See description for formstyle argument of SQLFORM for other possible values.
If you do not wish to use the widgets serialized by web2py, you can replace them with HTML. There are some variables that will be useful for this:
form.custom.label[fieldname]contains the label for the field.form.custom.comment[fieldname]contains the comment for the field.form.custom.dspval[fieldname]form-type and field-type dependent display representation of the field.form.custom.inpval[fieldname]form-type and field-type dependent values to be used in field code.
If your form has deletable=True you should also insert
{{=form.custom.delete}}
to display the delete checkbox.
It is important to follow the conventions described below.
CSS conventions
Tags in forms generated by SQLFORM, SQLFORM.factory and CRUD follow a strict CSS naming convention that can be used to further customize the forms.
Given a table "mytable", and a field "myfield" of type "string", it is rendered by default by a
SQLFORM.widgets.string.widget
that looks like this:
<input type="text" name="myfield" id="mytable_myfield"
       class="string" />
Notice that:
- the class of the INPUT tag is the same as the type of the field. This is very important for the jQuery code in "web2py_ajax.html" to work. It makes sure that you can only have numbers in "integer" and "double" fields, and that "time", "date" and "datetime" fields display the popup calendar/datepicker.
- the id is the name of the class plus the name of the field, joined by one underscore. This allows you to uniquely refer to the field via, for example,
jQuery('#mytable_myfield')and manipulate the stylesheet of the field or bind actions associated to the field events (focus, blur, keyup, etc.). - the name is, as you would expect, the field name.
Hide errors
Occasionally, you may want to disable the automatic error placement and display form error messages in some place other than the default. That can be done easily.
- In the case of FORM or SQLFORM, pass
hideerror=Trueto theacceptsmethod. - In the case of CRUD, set
crud.settings.hideerror=True
You may also want to modify the views to display the error (since they are no longer displayed automatically).
Here is an example where the errors are displayed above the form and not in the form.
{{if form.errors:}}
  Your submitted form contains the following errors:
  <ul>
  {{for fieldname in form.errors:}}
    <li>{{=fieldname}} error: {{=form.errors[fieldname]}}</li>
  {{pass}}
  </ul>
  {{form.errors.clear()}}
{{pass}}
{{=form}}
The errors will displayed as in the image shown below.

This mechanism also works for custom forms.
Validators
Validators are classes used to validate input fields (including forms generated from database tables). With the advanced forms derived from SQLFORM, validators create widgets such as drop-down menus and lookups from other tables.
Here is an example of using a validator with a FORM field:
INPUT(_name='a', requires=IS_INT_IN_RANGE(0, 10))
Here is an example of how to require a validator for a table field:
db.define_table('person', Field('name'))
db.person.name.requires = IS_NOT_EMPTY()
Validators are always assigned using the requires attribute of a field. A field can have a single validator or multiple validators. Multiple validators are made part of a list:
db.person.name.requires = [IS_NOT_EMPTY(),
                           IS_NOT_IN_DB(db, 'person.name')]
Normally validators are called automatically by the function accepts and process of a FORM or other HTML helper object that contains a form. They are called in the order in which they are listed.
One can also call validators explicitly for a field:
db.person.name.validate(value)which returns a tuple (value, error) and error is None if the value validates.
Built-in validators have constructors that take an optional argument:
IS_NOT_EMPTY(error_message='cannot be empty')
error_message allows you to override the default error message for any validator.
Here is an example of a validator on a database table:
db.person.name.requires = IS_NOT_EMPTY(error_message='fill this!')
where we have used the translation operator T to allow for internationalization. Notice that default error messages are not translated.
Mind that the only validators that can be used with list: type fields are:
IS_IN_DB(..., multiple=True)IS_IN_SET(..., multiple=True)IS_NOT_EMPTY()IS_LIST_OF_EMAILS()IS_LIST_OF(...)
The latter can be used to apply any validator to the individual items in the list. multiple=(1, 1000) requires a selection of between 1 and 1000 items. This enforces selection of at least one choice.
Text format validators
IS_ALPHANUMERIC
This validator checks that a field value contains only characters in the ranges a-z, A-Z, or 0-9.
requires = IS_ALPHANUMERIC(error_message='must be alphanumeric!')
IS_LOWER
This validator never returns an error. It just converts the value to lower case.
requires = IS_LOWER()
IS_UPPER
This validator never returns an error. It converts the value to upper case.
requires = IS_UPPER()
IS_EMAIL
It checks that the field value looks like an email address. It does not try to send email to confirm.
requires = IS_EMAIL(error_message='invalid email!')
IS_MATCH
This validator matches the value against a regular expression and returns an error if it does not match. Here is an example of usage to validate a US zip code:
requires = IS_MATCH('^\d{5}(-\d{4})?$',
         error_message='not a zip code')
Here is an example of usage to validate an IPv4 address (note: the IS_IPV4 validator is more appropriate for this purpose):
requires = IS_MATCH('^\d{1,3}(.\d{1,3}){3}$',
         error_message='not an IP address')
Here is an example of usage to validate a US phone number:
requires = IS_MATCH('^1?((-)\d{3}-?|\(\d{3}\))\d{3}-?\d{4}$',
         error_message='not a phone number')
For more information on Python regular expressions, refer to the official Python documentation.
IS_MATCH takes an optional argument strict which defaults to False. When set to True it only matches the whole string (from the beginning to the end):
>>> IS_MATCH('ab', strict=False)('abc')
('abc', None)
>>> IS_MATCH('ab', strict=True)('abc')
('abc', 'Invalid expression')
IS_MATCH takes an other optional argument search which defaults to False. When set to True, it uses regex method search instead of method match to validate the string.
IS_MATCH('...', extract=True) filters and extract only the first matching substring rather than the original value.
IS_LENGTH
Checks if length of field's value fits between given boundaries. Works for both text and file inputs.
Its arguments are:
- maxsize: the maximum allowed length / size (has default = 255)
- minsize: the minimum allowed length / size
Examples: Check if text string is shorter than 33 characters:
INPUT(_type='text', _name='name', requires=IS_LENGTH(32))
Check if password string is longer than 5 characters:
INPUT(_type='password', _name='name', requires=IS_LENGTH(minsize=6))
Check if uploaded file has size between 1KB and 1MB:
INPUT(_type='file', _name='name', requires=IS_LENGTH(1048576, 1024))
For all field types except for files, it checks the length of the value. In the case of files, the value is a cgi.FieldStorage, so it validates the length of the data in the file, which is the behavior one might intuitively expect.
IS_URL
Rejects a URL string if any of the following is true:
- The string is empty or None
- The string uses characters that are not allowed in a URL
- The string breaks any of the HTTP syntactic rules
- The URL scheme specified (if one is specified) is not 'http' or 'https'
- The top-level domain (if a host name is specified) does not exist
(These rules are based on RFC 2616[RFC2616] )
This function only checks the URL's syntax. It does not check that the URL points to a real document, for example, or that it otherwise makes semantic sense. This function does automatically prepend 'http://' in front of a URL in the case of an abbreviated URL (e.g. 'google.ca').
If the parameter mode='generic' is used, then this function's behavior changes. It then rejects a URL string if any of the following is true:
- The string is empty or None
- The string uses characters that are not allowed in a URL
- The URL scheme specified (if one is specified) is not valid
(These rules are based on RFC 2396[RFC2396] )
The list of allowed schemes is customizable with the allowed_schemes parameter. If you exclude None from the list, then abbreviated URLs (lacking a scheme such as 'http') will be rejected.
The default prepended scheme is customizable with the prepend_scheme parameter. If you set prepend_scheme to None, then prepending will be disabled. URLs that require prepending to parse will still be accepted, but the return value will not be modified.
IS_URL is compatible with the Internationalized Domain Name (IDN) standard specified in RFC 3490[RFC3490] ). As a result, URLs can be regular strings or unicode strings. If the URL's domain component (e.g. google.ca) contains non-US-ASCII letters, then the domain will be converted into Punycode (defined in RFC 3492[RFC3492] ). IS_URL goes a bit beyond the standards, and allows non-US-ASCII characters to be present in the path and query components of the URL as well. These non-US-ASCII characters will be encoded. For example, space will be encoded as'%20'. The unicode character with hex code 0x4e86 will become '%4e%86'.
Examples:
requires = IS_URL())
requires = IS_URL(mode='generic')
requires = IS_URL(allowed_schemes=['https'])
requires = IS_URL(prepend_scheme='https')
requires = IS_URL(mode='generic',
                  allowed_schemes=['ftps', 'https'],
                  prepend_scheme='https')
IS_SLUG
requires = IS_SLUG(maxlen=80, check=False, error_message='must be slug')
If check is set to True it check whether the validated value is a slug (allowing only alphanumeric characters and non-repeated dashes).
If check is set to False (default) it converts the input value to a slug.
IS_JSON
requires = IS_JSON(error_message='Invalid json', native_json=False)
This validator checks that a field value is in JSON format.
If native_json is set to False (default) it converts the input value to the serialized value otherwise the input value is left unchanged.
Date and time validators
IS_TIME
This validator checks that a field value contains a valid time in the specified format.
requires = IS_TIME(error_message='must be HH:MM:SS!')
IS_DATE
This validator checks that a field value contains a valid date in the specified format. It is good practice to specify the format using the translation operator, in order to support different formats in different locales.
requires = IS_DATE(format=T('%Y-%m-%d'),
                   error_message='must be YYYY-MM-DD!')
For the full description on % directives look under the IS_DATETIME validator.
IS_DATETIME
This validator checks that a field value contains a valid datetime in the specified format. It is good practice to specify the format using the translation operator, in order to support different formats in different locales.
requires = IS_DATETIME(format=T('%Y-%m-%d %H:%M:%S'),
                       error_message='must be YYYY-MM-DD HH:MM:SS!')
The following symbols can be used for the format string (this shows the symbol, their meaning, and an example string):
%Y  year with century (e.g. '1963')
%y  year without century (e.g. '63')
%d  day of the month (e.g. '28')
%m  month (e.g '08')
%b  abbreviated month name (e.g.'Aug')
%B  full month name (e.g. 'August')
%H  hour (24-hour clock, e.g. '14')
%I  hour (12-hour clock, e.g. '02')
%p  either 'AM' or 'PM'
%M  minute (e.g. '30')
%S  second (e.g. '59')
IS_DATE_IN_RANGE
Works very much like the previous validator but allows to specify a range:
requires = IS_DATE_IN_RANGE(format=T('%Y-%m-%d'),
                   minimum=datetime.date(2008, 1, 1),
                   maximum=datetime.date(2009, 12, 31),
                   error_message='must be YYYY-MM-DD!')
For the full description on % directives look under the IS_DATETIME validator.
IS_DATETIME_IN_RANGE
Works very much like the previous validator but allows to specify a range:
requires = IS_DATETIME_IN_RANGE(format=T('%Y-%m-%d %H:%M:%S'),
                       minimum=datetime.datetime(2008, 1, 1, 10, 30),
                       maximum=datetime.datetime(2009, 12, 31, 11, 45),
                       error_message='must be YYYY-MM-DD HH:MM::SS!')
For the full description on % directives look under the IS_DATETIME validator.
Range, set and equality validators
IS_EQUAL_TO
Checks whether the validated value is equal to a given value (which can be a variable):
requires = IS_EQUAL_TO(request.vars.password,
                       error_message='passwords do not match')
IS_NOT_EMPTY
This validator checks that the content of the field value is neither None nor an empty string nor an empty list. A string value is checked for after a .strip().
requires = IS_NOT_EMPTY(error_message='cannot be empty!')
You can provide a regular expression for the matching of the empty string.
requires = IS_NOT_EMPTY(error_message='Enter a value', empty_regex='NULL(?i)')
IS_NULL_OR
Deprecated, an alias for IS_EMPTY_OR described below.
IS_EMPTY_OR
Sometimes you need to allow empty values on a field along with other requirements. For example a field may be a date but it can also be empty. The IS_EMPTY_OR validator allows this:
requires = IS_EMPTY_OR(IS_DATE())
An empty value is either None or an empty string or an empty list. A string value is checked for after a .strip().
You can provide a regular expression for the matching of the empty string with the empty_regex argument (like for IS_NOT_EMPTY validator).
You may also specify a value to be used for the empty case.
requires = IS_EMPTY_OR(IS_ALPHANUMERIC(), null='anonymous')
IS_EXPR
This validator let you express a general condition by means of a callable which takes a value to validate and returns the error message or None to accept the input value.
requires = IS_EXPR(lambda v: T('not divisible by 3') if int(v) % 3 else None)
Notice that returned message will not be translated if you do not arrange otherwise.
For backward compatibility the condition may be expressed as a string containing a logical expression in terms of a variable value. It validates a field value if the expression evaluates to True.
requires = IS_EXPR('int(value) % 3 == 0',
                   error_message='not divisible by 3')
One should first check that the value is an integer so that an exception will not occur.
requires = [IS_INT_IN_RANGE(0, None),
            IS_EXPR(lambda v: T('not divisible by 3') if v % 3 else None)]
IS_DECIMAL_IN_RANGE
INPUT(_type='text', _name='name', requires=IS_DECIMAL_IN_RANGE(0, 10, dot="."))
It converts the input into a Python Decimal or generates an error if the decimal does not fall within the specified inclusive range. The comparison is made with Python Decimal arithmetic.
The minimum and maximum limits can be None, meaning no lower or upper limit, respectively.
The dot argument is optional and allows you to internationalize the symbol used to separate the decimals.
IS_FLOAT_IN_RANGE
Checks that the field value is a floating point number within a definite range, 0 <= value <= 100 in the following example:
requires = IS_FLOAT_IN_RANGE(0, 100, dot=".",
                             error_message='negative or too large!')
The dot argument is optional and allows you to internationalize the symbol used to separate the decimals.
IS_INT_IN_RANGE
Checks that the field value is an integer number within a definite range, 0 <= value < 100 in the following example:
requires = IS_INT_IN_RANGE(0, 100,
                           error_message='negative or too large!')
IS_IN_SET
In SQLFORM (and the grids) this validator will automatically set the form field to an option field (ie, with a drop-down menu).
IS_IN_SET checks that the field values are in a set:
requires = IS_IN_SET(['a', 'b', 'c'], zero=T('choose one'),
                     error_message='must be a or b or c')
The zero argument is optional and it determines the text of the option selected by default, an option which is not accepted by the IS_IN_SET validator itself. If you do not want a "choose one" option, set zero=None.
The elements of the set can be combined with a numerical validator, as long as IS_IN_SET is first in the list. Doing so wil force conversion by the last validator to the numerical type. So, IS_IN_SET can be followed by IS_INT_IN_RANGE (which converts the value to int) or IS_FLOAT_IN_RANGE (which converts the value to float). For example:
requires = [ IS_IN_SET([2, 3, 5, 7], error_message='must be prime and less than 10'),
             IS_INT_IN_RANGE(0, None) ]
Checkbox validation
To force a filled-in form checkbox (such as an acceptance of terms and conditions), use this:
requires=IS_IN_SET(['on'])
Dictionaries and tuples with IS_IN_SET
You may also use a dictionary or a list of tuples to make the drop down list more descriptive:
Dictionary example:
requires = IS_IN_SET({'A':'Apple', 'B':'Banana', 'C':'Cherry'}, zero=None)

List of tuples example:
requires = IS_IN_SET([('A', 'Apple'), ('B', 'Banana'), ('C', 'Cherry')])
Sorted options
To keep the options alphabetically sorted by their labels into the drop down list, use the sort argument with IS_IN_SET.
IS_IN_SET([('H', 'Hulk'), ('S', 'Superman'), ('B', 'Batman')], sort=True)
IS_IN_SET and Tagging
The IS_IN_SET validator has an optional attribute multiple=False. If set to True, multiple values can be stored in one field. The field should be of type list:integer or list:string as discussed in Chapter 6. An explicit example of tagging is discussed there. We strongly suggest using the jQuery multiselect plugin to render multiple fields.
Note that when
multiple=True,IS_IN_SETwill accept zero or more values, i.e. it will accept the field when nothing has been selected.multiplecan also be a tuple of the form(a, b)whereaandbare the minimum and (exclusive) maximum number of items that can be selected respectively.
Complexity and security validators
IS_STRONG
Enforces complexity requirements on a field (usually a password field).
Example:
requires = IS_STRONG(min=10, special=2, upper=2)
where:
minis minimum length of the valuespecialis the minimum number of required special characters, by default special characters are any of the following~!!@#$%^&*()_+-=?<>,.:;{}[]|(you can customize these usingspecials = '...')upperis the minimum number of upper case characters
other accepected arguments are:
invalidfor the list of forbidden characters, by defaultinvalid=' "'maxfor the maximum length of the valuelowerfor the minimum number of lower case charactersnumberfor the minimum number of digit characters
Obviously you can provide an error_message as for any other validator, although IS_STRONG is clever enough to provide a clear message to describe the validation failure.
A special argument you can use is entropy, that is a minimum value for the complexity of the value to accept (a number), experiment this with:
>>> IS_STRONG(entropy=100.0)('hello')
('hello', Entropy (24.53) less than required (100.0))
Notice that if the argument
entropyis not given then IS_STRONG implicitly sets the following defaults:min = 8, upper = 1, lower = 1, number = 1, special = 1which otherwise are all sets toNone.
CRYPT
This is also a filter. It performs a secure hash on the input and it is used to prevent passwords from being passed in the clear to the database.
requires = CRYPT()
By default, CRYPT uses 1000 iterations of the pbkdf2 algorithm combined with SHA512 to produce a 20-byte-long hash. Older versions of web2py used md5 or HMAC+SHA512 depending on whether a key was specified or not.
If a key is specified, CRYPT uses the HMAC algorithm. The key may contain a prefix that determines the algorithm to use with HMAC, for example SHA512:
requires = CRYPT(key='sha512:thisisthekey')
This is the recommended syntax. The key must be a unique string associated with the database used. The key can never be changed. If you lose the key, the previously hashed values become useless.
By default, CRYPT uses random salt, such that each result is different. To use a constant salt value, specify its value:
requires = CRYPT(salt='mysaltvalue')
Or, to use no salt:
requires = CRYPT(salt=False)
The CRYPT validator hashes its input, and this makes it somewhat special. If you need to validate a password field before it is hashed, you can use CRYPT in a list of validators, but must make sure it is the last of the list, so that it is called last. For example:
requires = [IS_STRONG(), CRYPT(key='sha512:thisisthekey')]
CRYPT also takes a min_length argument, which defaults to zero.
The resulting hash takes the form alg$salt$hash, where alg is the hash algorithm used, salt is the salt string (which can be empty), and hash is the algorithm's output. Consequently, the hash is self-identifying, allowing, for example, the algorithm to be changed without invalidating previous hashes. The key, however, must remain the same.
Special type validators
IS_LIST_OF
This validator helps you to ensure length limits on values of type list, for this purpose use its minimum, maximum, and error_message arguments, for example:
requires = IS_LIST_OF(minimum=2)
A list value may comes from a form containing multiple fields with the same name or a multiple selection box. Note that this validator automatically converts a non-list value into a single valued list:
>>> IS_LIST_OF()('hello')
(['hello'], None)
If the first argument of IS_LIST_OF is another validator, then it applies the other validator to each element of the list. A typical usage is validation of a list: type field, for example:
Field('emails', 'list:string', requires=IS_LIST_OF(IS_EMAIL()), ...)
IS_LIST_OF_EMAILS
This validator is specifically designed to work with the following field:
Field('emails', 'list:string',
      widget=SQLFORM.widgets.text.widget,
      requires=IS_LIST_OF_EMAILS(),
      filter_in=lambda l: \
          IS_LIST_OF_EMAILS.split_emails.findall(l[0]) if l else l,
      represent=lambda v, r: \
          XML(', '.join([A(x, _href='mailto:'+x).xml() for x in (v or [])]))
     )
Notice that due to the widget customization this field will be rendered by a textarea in SQLFORMs (see next Widgets section). This let you insert and edit multiple emails in a single input field (very much like normal mail client programs do), separating each email address with ,, ;, and blanks (space, newline, and tab characters). As a conseguence now we need a validator which is able to operate on a single value input and a way to split the validated value into a list to be next processed by DAL, these are what the requires and filter_in arguments stand for. As alternative to filter_in, you can pass the following function to the onvalidation argument of form accepts, process, or validate method (see onvalidation section):
def emails_onvalidation(form):
    form.vars.emails = IS_LIST_OF_EMAILS.split_emails.findall(form.vars.emails)
The effect of the represent argument (at lines 6 and 7) is to add a "mailto:..." link to each email address when the record is rendered in HTML pages.
ANY_OF
This validator takes a list of validators and accepts a value if any of the validators in the list does (i.e. it acts like a logical OR with respect to given validators).
requires = ANY_OF([IS_ALPHANUMERIC(), IS_EMAIL()])
When none of the validators accepts the value you get the error message form the last attempted one (the last in the list), you can customize the error message as usual:
>>> ANY_OF([IS_ALPHANUMERIC(), IS_EMAIL()])('@ab.co')
('@ab.co', 'Enter a valid email address')
>>> ANY_OF([IS_ALPHANUMERIC(), IS_EMAIL()],
...        error_message='Enter login or email')('@ab.co')
('@ab.co', 'Enter login or email')
IS_IMAGE
This validator checks if a file uploaded through the file input was saved in one of the selected image formats and has dimensions (width and height) within given limits.
It does not check for maximum file size (use IS_LENGTH for that). It returns a validation failure if no data was uploaded. It supports the file formats BMP, GIF, JPEG, PNG, and it does not require the Python Imaging Library.
Code parts taken from ref.[source1]
It takes the following arguments:
- extensions: iterable containing allowed image file extensions in lowercase
- maxsize: iterable containing maximum width and height of the image
- minsize: iterable containing minimum width and height of the image
Use (-1, -1) as minsize to bypass the image-size check.
Here are some Examples:
- Check if uploaded file is in any of supported image formats:
requires = IS_IMAGE()
- Check if uploaded file is either JPEG or PNG:
requires = IS_IMAGE(extensions=('jpeg', 'png'))
- Check if uploaded file is PNG with maximum size of 200x200 pixels:
requires = IS_IMAGE(extensions=('png'), maxsize=(200, 200))
- Note: on displaying an edit form for a table including
requires = IS_IMAGE(), adeletecheckbox will NOT appear because to delete the file would cause the validation to fail. To display thedeletecheckbox use this validation:
requires = IS_EMPTY_OR(IS_IMAGE())
IS_FILE
Checks if name and extension of file uploaded through file input matches given criteria.
Does *not* ensure the file type in any way. Returns validation failure if no data was uploaded.
Its arguments are:
- filename: string/compiled regex or a list of strings/regex of valid filenames
- extension: string/compiled regex or a list of strings/regex of valid extensions
- lastdot: which dot should be used as a filename / extension separator:
Trueindicates last dot (e.g., "file.tar.gz" will be broken in "file.tar" + "gz") whileFalsemeans first dot (e.g., "file.tar.gz" will be broken into "file" + "tar.gz"). - case: 0 means keep the case; 1 means transform the string into lowercase (default); 2 means transform the string into uppercase.
If there is no dot present, extension checks will be done against empty string and filename checks against whole value.
Examples: Check if file has a pdf extension (case insensitive):
INPUT(_type='file', _name='name',
        requires=IS_FILE(extension='pdf'))
Check if file is called 'thumbnail' and has a jpg or png extension (case insensitive):
INPUT(_type='file', _name='name',
        requires=IS_FILE(filename='thumbnail',
        extension=['jpg', 'png']))
Check if file has a tar.gz extension and name starting with backup:
INPUT(_type='file', _name='name',
        requires=IS_FILE(filename=re.compile('backup.*'),
        extension='tar.gz', lastdot=False))
Check if file has no extension and name matching README (case sensitive):
    INPUT(_type='file', _name='name',
        requires=IS_FILE(filename='README',
        extension='', case=0)
IS_UPLOAD_FILENAME
This is the older implementation for checking files, included for backwards compatibility. For new applications, use IS_FILE().
This validator checks if the name and extension of a file uploaded through the file input matches the given criteria.
It does not ensure the file type in any way. Returns validation failure if no data was uploaded.
Its arguments are:
- filename: filename (before dot) regex.
- extension: extension (after dot) regex.
- lastdot: which dot should be used as a filename / extension separator:
Trueindicates last dot (e.g., "file.tar.gz" will be broken in "file.tar" + "gz") whileFalsemeans first dot (e.g., "file.tar.gz" will be broken into "file" + "tar.gz"). - case: 0 means keep the case; 1 means transform the string into lowercase (default); 2 means transform the string into uppercase.
If there is no dot present, extension checks will be done against an empty string and filename checks will be done against the whole value.
Examples:
Check if file has a pdf extension (case insensitive):
requires = IS_UPLOAD_FILENAME(extension='pdf')
Check if file has a tar.gz extension and name starting with backup:
requires = IS_UPLOAD_FILENAME(filename='backup.*', extension='tar.gz', lastdot=False)
Check if file has no extension and name matching README (case sensitive):
requires = IS_UPLOAD_FILENAME(filename='^README$', extension='^$', case=0)
IS_IPV4
This validator checks if a field's value is an IP version 4 address in decimal form. Can be set to force addresses from a certain range.
IPv4 regex taken from ref.[regexlib]
The signature for the IS_IPV4 constructor is the following:
IS_IPV4(minip='0.0.0.0', maxip='255.255.255.255', invert=False,
        is_localhost=None, is_private=None, is_automatic=None,
        error_message='Enter valid IPv4 address')
Where:
minipis the lowest allowed addressmaxipis the highest allowed addressinvertis a flag to invert allowed address range, i.e. if set to True allows addresses only from outside of given range; note that range boundaries are not matched this way
You can pass an IP address either as a string (e.g. '192.168.0.1') or as a list or tuple of 4 integers (e.g. [192, 168, 0, 1]).
To check for multiple address ranges pass to minip and maxip a list or tuple of boundary addresses, for example to allow only addresses between '192.168.20.10' and '192.168.20.19' or between '192.168.30.100' and '192.168.30.199' use:
requires = IS_IPV4(minip=('192.168.20.10', '192.168.30.100'),
                   maxip=('192.168.20.19', '192.168.30.199'))
Notice that only a range for which both lower and upper limits are set is configured, that is the number of configured ranges is determined by the shorter of the iterables passed to
minipandmaxip.
The arguments is_localhost, is_private, and is_automatic accept the following values:
Noneto ignore the optionTrueto force the optionFalseto forbid the option
The option meanings are:
is_localhost: match localhost address (127.0.0.1)is_private: match address in 172.16.0.0 - 172.31.255.255 and 192.168.0.0 - 192.168.255.255 rangesis_automatic: match address in 169.254.0.0 - 169.254.255.255 range
Examples:
Check for valid IPv4 address:
requires = IS_IPV4()
Check for valid private network IPv4 address:
requires = IS_IPV4(minip='192.168.0.1', maxip='192.168.255.255')
IS_IPV6
This validator checks if a field's value is an IP version 6 address.
The signature for the IS_IPV6 constructor is the following:
IS_IPV6(is_private=None,
        is_link_local=None,
        is_reserved=None,
        is_multicast=None,
        is_routeable=None,
        is_6to4=None,
        is_teredo=None,
        subnets=None,
        error_message='Enter valid IPv6 address')
The arguments is_private, is_link_local, is_reserved, is_multicast, is_routeable, is_6to4, and is_teredo accept the following values:
Noneto ignore the optionTrueto force the optionFalseto forbid the option, this does not work foris_routeable
The option meanings are:
is_private: match an address allocated for private networksis_link_local: match an address reserved for link-local (i.e. in fe80::/10 range), this is a private network too (also matched byis_privateabove)is_reserved: match an address otherwise IETF reservedis_multicast: match an address reserved for multicast use (i.e. in ff00::/8 range)is_6to4: match an address that appear to contain a 6to4 embedded address (i.e. in 2002::/16 range)is_teredo: match a teredo address (i.e. in 2001::/32 range)
Forcing is_routeable (setting to True) is a shortcut to forbid (setting to False) is_private, is_reserved, and is_multicast all.
Use the subnets argument to pass a subnet or list of subnets to check for address membership, this way an address must be a subnet member to validate.
Examples:
Check for valid IPv6 address:
requires = IS_IPV6()
Check for valid private network IPv6 address:
requires = IS_IPV6(is_link_local=True)
Check for valid IPv6 address in subnet:
requires = IS_IPV6(subnets='fb00::/8')
IS_IPADDRESS
This validator checks if a field's value is an IP address (either version 4 or version 6). Can be set to force addresses from within a specific range. Checks are done using the appropriate IS_IPV4 or IS_IPV6 validator.
The signature for the IS_IPADDRESS constructor is the following:
IS_IPADDRESS(minip='0.0.0.0', maxip='255.255.255.255', invert=False,
             is_localhost=None, is_private=None, is_automatic=None,
             is_ipv4=None,
             is_link_local=None, is_reserved=None, is_multicast=None,
             is_routeable=None, is_6to4=None, is_teredo=None,
             subnets=None, is_ipv6=None,
             error_message='Enter valid IP address')
With respect to IS_IPV4 and IS_IPV6 validators the only added arguments are:
is_ipv4, set to True to force version 4 or set to False to forbid version 4is_ipv6, set to True to force version 6 or set to False to forbid version 6
Refer to IS_IPV4 and IS_IPV6 validators for the meaning of other arguments.
Examples:
Check for valid IP address (both IPv4 and IPv6):
requires = IS_IPADDRESS()
Check for valid IP address (IPv6 only):
requires = IS_IPADDRESS(is_ipv6=True)
Other validators
CLEANUP
This is a filter. It never fails. By default it just removes all characters whose decimal ASCII codes are not in the list [10, 13, 32-127]. It always perform an initial strip (i.e. heading and trailing blank characters removal) on the value.
requires = CLEANUP()
You can pass a regular expression to decide what has to be removed, for example to clear all non-digit characters use:
>>> CLEANUP('[^\d]')('Hello 123 world 456')
('123456', None)
Database validators
IS_NOT_IN_DB
Synopsis:
IS_NOT_IN_DB(db|set, 'table.field')Consider the following example:
db.define_table('person', Field('name'))
db.person.name.requires = IS_NOT_IN_DB(db, 'person.name')
It requires that when you insert a new person, his/her name is not already in the database, db, in the field person.name.
A set can be used instead of db.
As with all other validators this requirement is enforced at the form processing level, not at the database level. This means that there is a small probability that, if two visitors try to concurrently insert records with the same person.name, this results in a race condition and both records are accepted. It is therefore safer to also inform the database that this field should have a unique value:
db.define_table('person', Field('name', unique=True))
db.person.name.requires = IS_NOT_IN_DB(db, 'person.name')
Now if a race condition occurs, the database raises an OperationalError and one of the two inserts is rejected.
The first argument of IS_NOT_IN_DB can be a database connection or a Set. In the latter case, you would be checking only the set defined by the Set.
A complete argument list for IS_NOT_IN_DB() is as follows:
IS_NOT_IN_DB(dbset, field, error_message='value already in database or empty',
             allowed_override=[], ignore_common_filters=True)
The following code, for example, does not allow registration of two persons with the same name within 10 days of each other:
import datetime
now = datetime.datetime.today()
db.define_table('person',
    Field('name'),
    Field('registration_stamp', 'datetime', default=now))
recent = db(db.person.registration_stamp > now-datetime.timedelta(10))
db.person.name.requires = IS_NOT_IN_DB(recent, 'person.name')
IS_IN_DB
Synopsis:
IS_IN_DB(db|set, 'table.value_field', '%(representing_field)s', zero='choose one')where the third and fourth arguments are optional.
multiple= is also possible if the field type is a list. The default is False. It can be set to True or to a tuple (min, max) to restrict the number of values selected. So multiple=(1, 10) enforces at least one and at most ten selections.
Other optional arguments are discussed below.
Example
Consider the following tables and requirement:
db.define_table('person', Field('name', unique=True))
db.define_table('dog', Field('name'), Field('owner', db.person))
db.dog.owner.requires = IS_IN_DB(db, 'person.id', '%(name)s',
                                 zero=T('choose one'))
the IS_IN_DB requirement could also be written to use a Set instead of db
db.dog.owner.requires = IS_IN_DB(db(db.person.id > 10), 'person.id', '%(name)s',
                                 zero=T('choose one'))
It is enforced at the level of dog INSERT/UPDATE/DELETE forms. This example requires that a dog.owner be a valid id in the field person.id in the database db. Because of this validator, the dog.owner field is represented as a drop-down list. The third argument of the validator is a string that describes the elements in the drop-down list, this is passed to the label argument of the validator. In the example you want to see the person %(name)s instead of the person %(id)s. %(...)s is replaced by the value of the field in brackets for each record. Other accepted values for the label are a Field instance (e.g. you could use db.person.name instead of '%(name)s') or even a callable that takes a row and returns the description for the option.
The zero option works very much like for the IS_IN_SET validator.
Other optional arguments accepted by IS_IN_DB are: orderby, groupby, distinct, cache, and left, these are passed to the db select (see on Chapter 6 for their meanings).
Notice that
groupby,distinct, andleftdo not apply to Google App Engine.
To alphabetically sort the options listed in the drop-down list you can set the sort argument to True (sorting is case-insensitive), this may be usefull when no orderby is feasible or practical.
The first argument of the validator can be a database connection or a DAL Set, as in IS_NOT_IN_DB. This can be useful for example when wishing to limit the records in the drop-down list. In this example, we use IS_IN_DB in a controller to limit the records dynamically each time the controller is called:
def index():
    (...)
    query = (db.table.field == 'xyz') # in practice 'xyz' would be a variable
    db.table.field.requires = IS_IN_DB(db(query), ...)
    form = SQLFORM(...)
    if form.process().accepted: ...
    (...)
If you want the field validated, but you do not want a drop-down, you must put the validator in a list.
db.dog.owner.requires = [IS_IN_DB(db, 'person.id', '%(name)s')]
Occasionally you want the drop-down (so you do not want to use the list syntax above) yet you want to use additional validators. For this purpose the IS_IN_DB validator takes an extra argument _and that can point to a list of other validators applied if the validated value passes the IS_IN_DB validation. For example to validate all dog owners in db that are not in a subset:
subset = db(db.person.id > 100)
db.dog.owner.requires = IS_IN_DB(db, 'person.id', '%(name)s',
                                 _and=IS_NOT_IN_DB(subset, 'person.id'))
IS_IN_DB and Tagging
The IS_IN_DB validator has an optional attribute multiple=False. If set to True multiple values can be stored in one field. This field should be of type list:reference as discussed in Chapter 6. An explicit example of tagging is discussed there. Multiple references are handled automatically in create and update forms, but they are transparent to the DAL. We strongly suggest using the jQuery multiselect plugin to render multiple fields.
Custom validators
All validators follow the prototype below:
class sample_validator:
    def __init__(self, *a, error_message='error'):
        self.a = a
        self.e = error_message
    def __call__(self, value):
        if validate(value):
            return (parsed(value), None)
        return (value, self.e)
    def formatter(self, value):
        return format(value)
i.e., when called to validate a value, a validator returns a tuple (x, y). If y is None, then the value passed validation and x contains a parsed value. For example, if the validator requires the value to be an integer, x is converted to int(value). If the value did not pass validation, then x contains the input value and y contains an error message that explains the failed validation. This error message is used to report the error in forms that do not validate.
Notice that as alternative to custom validators, you can also use the
onvalidationargument of formaccepts,process, andvalidatemethods (see onvalidation section).
The validator may also contain a formatter method. It must perform the opposite conversion to the one the __call__ does. For example, consider the source code for IS_DATE:
class IS_DATE(object):
    def __init__(self, format='%Y-%m-%d', error_message='must be YYYY-MM-DD!'):
        self.format = format
        self.error_message = error_message
    def __call__(self, value):
        try:
            y, m, d, hh, mm, ss, t0, t1, t2 = time.strptime(value, str(self.format))
            value = datetime.date(y, m, d)
            return (value, None)
        except:
            return (value, self.error_message)
    def formatter(self, value):
        return value.strftime(str(self.format))
On success, the __call__ method reads a date string from the form and converts it into a datetime.date object using the format string specified in the constructor. The formatter method takes a datetime.date object and converts it to a string representation using the same format. The formatter is called automatically in forms, but you can also call it explicitly to convert objects into their proper representation. For example:
>>> db = DAL()
>>> db.define_table('atable',
       Field('birth', 'date', requires=IS_DATE('%m/%d/%Y')))
>>> id = db.atable.insert(birth=datetime.date(2008, 1, 1))
>>> row = db.atable[id]
>>> print db.atable.birth.formatter(row.birth)
01/01/2008
Multiple Validators
Normally, when multiple validators are required (and stored in a list), they are executed in order and the output of one is passed as input to the next. The chain breaks when one of the validators fails.
Conversely, when we call the formatter method of a field, the formatters of the associated validators are also chained, but in reverse order.
As an alternative to the chained behavior described above, the ANY_OF validator can be used to combine a list of validators, and to pass if any of the validators pass (see the ANY_OF section for details).
Validators with dependencies
Usually validators are set once for all in models.
Occasionally, you need to validate a field and the validator depends on the value of another field. This can be done in various ways. It can be done in the model or in the controller.
For example, here is a page that generates a registration form that asks for username and password twice. None of the fields can be empty, and both passwords must match:
def index():
    form = SQLFORM.factory(
        Field('username', requires=IS_NOT_EMPTY()),
        Field('password', requires=IS_NOT_EMPTY()),
        Field('password_again',
              requires=IS_EQUAL_TO(request.vars.password)))
    if form.process().accepted:
        pass # or take some action
    return dict(form=form)
Widgets
Here is a list of available web2py widgets:
SQLFORM.widgets.string.widget
SQLFORM.widgets.text.widget
SQLFORM.widgets.password.widget
SQLFORM.widgets.integer.widget
SQLFORM.widgets.double.widget
SQLFORM.widgets.time.widget
SQLFORM.widgets.date.widget
SQLFORM.widgets.datetime.widget
SQLFORM.widgets.upload.widget
SQLFORM.widgets.boolean.widget
SQLFORM.widgets.options.widget
SQLFORM.widgets.multiple.widget
SQLFORM.widgets.radio.widget
SQLFORM.widgets.checkboxes.widget
SQLFORM.widgets.autocomplete
SQLFORM.widgets.list
The first ten of them plus "list" are the defaults for the corresponding field types. The "options" widget is used when a field's requires is IS_IN_SET or IS_IN_DB with multiple=False (default behavior). The "multiple" widget is used when a field's requires is IS_IN_SET or IS_IN_DB with multiple=True. The "radio" and "checkboxes" widgets are never used by default, but can be set manually. The "autocomplete" widget is special and discussed in its own section.
For example, to have a "string" field represented by a textarea:
Field('comment', 'string', widget=SQLFORM.widgets.text.widget)
Widgets can also be assigned to fields a posteriori:
db.mytable.myfield.widget = SQLFORM.widgets.string.widget
Sometimes widgets take additional arguments and one needs to specify their values. In this case one can use lambda
db.mytable.myfield.widget = lambda field, value: \
    SQLFORM.widgets.string.widget(field, value, _style='color:blue')
Widgets are helper factories and their first two arguments are always field and value. The other arguments can include normal helper attributes such as _style, _class, etc. Some widgets also take special arguments. In particular SQLFORM.widgets.radio and SQLFORM.widgets.checkboxes take a style argument (not to be confused with _style) which can be set to "table", "ul", "divs" or whatever matches the formstyle of the containing form.
You can create new widgets or extend existing widgets.
SQLFORM.widgets[type] is a class and SQLFORM.widgets[type].widget is a static member function of the corresponding class. Each widget function takes two arguments: the field object, and the current value of that field. It returns a representation of the widget. As an example, the string widget could be re-coded as follows:
def my_string_widget(field, value):
    return INPUT(_name=field.name,
                 _id="%s_%s" % (field.tablename, field.name),
                 _class=field.type,
                 _value=value,
                 requires=field.requires)

Field('comment', 'string', widget=my_string_widget)
The id and class values must follow the convention described later in this chapter. A widget may contain its own validators, but it is good practice to associate the validators to the "requires" attribute of the field and have the widget get them from there.
Autocomplete widget
There are two possible uses for the autocomplete widget: to autocomplete a field that takes a value from a list or to autocomplete a reference field (where the string to be autocompleted is a representation of the reference which is implemented as an id).
The first case is easy:
db.define_table('category', Field('name'))
db.define_table('product', Field('name'), Field('category'))
db.product.category.widget = SQLFORM.widgets.autocomplete(
     request, db.category.name, limitby=(0, 10), min_length=2)
Where limitby instructs the widget to display no more than 10 suggestions at the time, and min_length instructs the widget to perform an Ajax callback to fetch suggestions only after the user has typed at least 2 characters in the search box. When used this way you can avoid duplicate suggestions setting optional argument distinct=True.
Notice that both arguments
limitby=(0, 10)andmin_length=2could be omitted in the example above because of their default values.Notice that
distinctdoes not work when autocompleting a virtual field (see Chapter 6 for virtual fields).
The second case is more complex:
db.define_table('category', Field('name'))
db.define_table('product', Field('name'), Field('category', 'reference category'))
db.product.category.widget = SQLFORM.widgets.autocomplete(
     request, db.category.name, id_field=db.category.id)
In this case the value of id_field tells the widget that even if the value to be autocompleted is a db.category.name, the value to be stored is the corresponding db.category.id. An optional parameter is orderby that instructs the widget on how to sort the suggestions, for example to have them alphabetically sorted use:
db.product.category.widget = SQLFORM.widgets.autocomplete(
     request, db.category.name, id_field=db.category.id,
     orderby=db.category.name)
You cannot use distinct=True to avoid duplicate suggestions in this case, because when autocompleting a reference field the id_field is selected too (see Chapter 6 for further details).
When looking for suggestion the widget normally matches at beginning of the field value, to let the widget matching everywhere (i.e. performing a search) set optional argument at_beginning=False.
Note that on Google App Engine both
distinct=Trueandat_beginning=Falsedo not work.
This widget works via Ajax. Where is the Ajax callback? Some magic is going on in this widget. The callback is a method of the widget object itself. How is it exposed? In web2py any piece of code can generate a response by raising an HTTP exception. This widget exploits this possibility in the following way: the widget sends the Ajax call to the same URL that generated the widget in the first place and puts a special token in the request.vars. Should the widget get instantiated again, it finds the token and raises an HTTP exception that responds to the request. All of this is done under the hood and hidden to the developer.
To enahnce security, the autocomplete widget can digitally sign Ajax callbacks, this is done through the user_signature and hash_vars arguments, see on Chapter 4 for an explanation of that.
SQLFORM.grid and SQLFORM.smartgrid
Attention: grid and smartgrid were experimental prior web2py version 2.0 and were vulnerable to information leakage. The grid and smartgrid are no longer experimental, but we are still not promising backward compatibility of the presentation layer of the grid, only of its APIs.
These are two high level objects that create complex CRUD controls. They provide pagination, the ability to browse, search, sort, create, update and delete records from a single object.
Because web2py's HTML objects build on the underlying, simpler objects, the grids create SQLFORMs for viewing, editing and creating its rows. Many of the arguments to the grids are passed through to this SQLFORM. This means the documentation for SQLFORM (and FORM) is relevant. For example, the grid takes an onvalidation callback. The processing logic of the grid ultimately passes this through to the underlying process() method of FORM, which means you should consult the documentation of onvalidation for FORMs.
As the grid passes through different states, such as editing a row, a new request is generated. request.args has information about which state the grid is in.
SQLFORM.grid
The simplest of the two is SQLFORM.grid. Here is an example of usage:
@auth.requires_login()
def manage_users():
    grid = SQLFORM.grid(db.auth_user)
    return locals()
which produces the following page:
The first argument of SQLFORM.grid can be a table or a query. The grid object will provide access to records matching the query.
Before we dive into the long list of arguments of the grid object we need to understand how it works. The object looks at request.args in order to decide what to do (browse, search, create, update, delete, etc.). Each button created by the object links the same function (manage_users in the above case) but passes different request.args.
login required by default for data updates
By default all the URLs generated by the grid are digitally signed and verified. This means one cannot perform certain actions (create, update, delete) without being logged-in. These restrictions can be relaxed:
def manage_users():
    grid = SQLFORM.grid(db.auth_user, user_signature=False)
    return locals()
but we do not recommend it.
Multiple grids per controller function
Because of the way grid works one can only have one grid per controller function, unless they are embedded as components via
LOAD. To make the default search grid work in more than one LOADed grid, please use a differentformnamefor each one.
Using requests.args safely
Because the controller function that contains the grid may itself manipulate the URL arguments (known in web2py as response.args and response.vars), the grid needs to know which args should be handled by the grid and which not. Here is an example of code that allows one to manage any table:
@auth.requires_login()
def manage():
    table = request.args(0)
    if not table in db.tables(): redirect(URL('error'))
    grid = SQLFORM.grid(db[table], args=request.args[:1])
    return locals()
the args argument of the grid specifies which request.args should be passed along and ignored by the grid. In our case request.args[:1] is the name of the table we want to manage and it is handled by the manage function itself, not by the grid. So, args=request.args[:1] tells the grid to preserve the first URL argument in any links that it generates, appending any grid-specific arguments after that first argument.
SQLFORM.grid signature
The complete signature for the grid is the following:
SQLFORM.grid(
query,
fields=None,
field_id=None,
left=None,
headers={},
orderby=None,
groupby=None,
searchable=True,
sortable=True,
paginate=20,
deletable=True,
editable=True,
details=True,
selectable=None,
create=True,
csv=True,
links=None,
links_in_grid=True,
upload='<default>',
args=[],
user_signature=True,
maxtextlengths={},
maxtextlength=20,
onvalidation=None,
onfailure=None,
oncreate=None,
onupdate=None,
ondelete=None,
sorter_icons=(XML('▲'), XML('▼')),
ui = 'web2py',
showbuttontext=True,
_class="web2py_grid",
formname='web2py_grid',
search_widget='default',
advanced_search=True,
ignore_rw = False,
formstyle = None,
exportclasses = None,
formargs={},
createargs={},
editargs={},
viewargs={},
selectable_submit_button='Submit',
buttons_placement = 'right',
links_placement = 'right',
noconfirm=False,
cache_count=None,
client_side_delete=False,
ignore_common_filters=None,
auto_pagination=True,
use_cursor=False,
represent_none=None,
showblobs=False
)
fieldsis a list of fields to be fetched from the database. It is also used to determine which fields to be shown in the grid view. However, it doesn't control what is displayed in the separate form used to edit rows. For that, use the readable and writable attribute of the database fields. For example, in a editable grid, suppress updating of a field like this: before creating the SQLFORM.grid, setdb.my_table.a_field.writable = False db.my_table.a_field.readable = False
field_idmust be the field of the table to be used as ID, for exampledb.mytable.id. This is useful when the grid query is a join of several tables. Any action button on the grid (add record, view, edit, delete) will work over db.mytable.leftis an optional left join expressions used to build...select(left=...).headersis a dictionary that maps 'tablename.fieldname' into the corresponding header label, e.g.{'auth_user.email' : 'Email Address'}orderbyis used as default ordering for the rows. See Chapter 6 (multiple fields are possible).groupbyis used to group the set. Use the same syntax as you were passing in a simpleselect(groupby=...).searchable,sortable,deletable,editable,details,createdetermine whether one can search, sort, delete, edit, view details, and create new records respectively.deletable,editableanddetailsare usually boolean values but they can be functions which take the row object and decide whether to display the corresponding button or not.selectablecan be used to call a custom function on multiple records (a checkbox will be inserted for every row) e.g.a submit button will be added in the checkboxes column with the label passed inselectable = lambda ids : redirect(URL('default', 'mapping_multiple', vars=dict(id=ids)))
selectable_submit_button; or for multiple action buttons, use a list of tuples:selectable = [('button label1', lambda...), ('button label2', lambda ...)]
paginatesets the max number of rows per page.csvif set to True allows to download the grid in various format (see alsoexportclassesbelow).linksis used to display new columns which can be links to other pages. Thelinksargument must be a list ofdict(header='name', body=lambda row: A(...))whereheaderis the header of the new column andbodyis a function that takes a row and returns a value. In the example, the value is aA(...)helper.links_in_gridif set to False, links will only be displayed in the "details" and "edit" page (so, not on the main grid)uploadsame as SQLFORM's one. web2py uses the action at that URL to download the filemaxtextlengthsets the maximum length of text to be displayed for each field value, in the grid view. This value can be overwritten for each field usingmaxtextlengths, a dictionary of 'tablename.fieldname':length e.g.{'auth_user.email' : 50}onvalidation,onfailure,oncreate,onupdateandondeleteare callback functions. All butondeletetake a form object as input, ondelete takes the table and the record id. Because the edit/create form is an SQLFORM which extends FORM, these callbacks are essentially used in the same way as documented in the sections for FORM and SQLFORM. Here is skeleton code:def myonvalidation(form): print "In onvalidation callback" print form.vars form.errors= True #this prevents the submission from completing #...or to add messages to specific elements on the form form.errors.first_name = "Do not name your child after prominent deities" form.errors.last_name = "Last names must start with a letter" response.flash = "I don't like your submission" def myonfailure(form): print 'edit/create validation problem' print form.errors def myoncreate(form): print 'create!' print form.vars def myonupdate(form): print 'update!' print form.vars def myondelete(table, id): print 'delete!' print table, id
onupdateandoncreatecallbacks are passed toSQLFORM.process(onsuccess=...).sorter_iconsis a list of two strings (or helpers) that will be used to represent the up and down sorting options for each field.uican be set equal to'web2py'(default) and will generate web2py friendly class names, can be set equal to'jquery-ui'and will generate jquery UI friendly class names, but it can also be its own set of class names for the various grid components:ui = dict( widget='', header='', content='', default='', cornerall='', cornertop='', cornerbottom='', button='button', buttontext='buttontext button', buttonadd='icon plus', buttonback='icon leftarrow', buttonexport='icon downarrow', buttondelete='icon trash', buttonedit='icon pen', buttontable='icon rightarrow', buttonview='icon magnifier')
search_widgetallows to override the default search widget and we refer the reader the source code in gluon/sqlhtml.py for details.advanced_searchif set to False, advanced search capabilities are disabled on search widgetshowbuttontextallows buttons without text (there will effectively be only icons)_classis the class for the grid container.exportclassestakes a dictionary of tuples: by default it's defined asExporterCSV_hidden, ExporterCSV, ExporterXML, ExporterHTML, ExporterJSON and ExporterTSV are all defined in gluon/sqlhtml.py. Take a look at those for creating your own exporter. If you pass a dict likedict( csv_with_hidden_cols=(ExporterCSV_hidden, 'CSV (hidden cols)', T(...)), csv=(ExporterCSV, 'CSV', T(...)), xml=(ExporterXML, 'XML', T('XML export of columns shown')), html=(ExporterHTML, 'HTML', T('HTML export of visible columns')), json=(ExporterJSON, 'JSON', T('JSON export of visible columns')), tsv_with_hidden_cols= (ExporterTSV, 'TSV (Spreadsheets, hidden cols)', T(...)), tsv=(ExporterTSV, 'TSV (Spreadsheets)', T(...)))
dict(xml=False, html=False)you will disable the xml and html export formats.formargsis passed to all SQLFORM objects used by the grid, whilecreateargs,editargsandviewargsare passed only to the specific create, edit and details SQLFORMsformname,ignore_rwandformstyleare passed to the SQLFORM objects used by the grid for create/update forms.buttons_placementandlinks_placementboth take a parameter ('right', 'left', 'both') that will affect where on the row the buttons (or the links) will be placednoconfirmif set to True do not requires user confirmation upon record delete.cache_countis used to speed up the grid rows counting, it works either caching the selecting query (in this case you pass a tuple as for thecacheargument ofselect, see Chapter 6), or directly providing the number of rows (i.e. an integer or a callable returning the integer count).client_side_deleteif set to True requires that the grid gets reloaded on delete on Ajax (i.e. the value ofclient_side_deleteis passed toclient_sideargument ofredirect, see also Chapter 4).ignore_common_filterscan be set to True for common filters suppression upon grid db set definition (i.e. while evaluating query). Common filters are described in Chapter 6.auto_paginationif set to True enforce always an ordering over records to avoid pagination issues.use_cursoris specific to Google NoSQL (Datastore) only, if set to True allows use of cursor for pagination.represent_noneis an optional value to be used instead of None when showing records in grid/details view.showblobsif set to True tell the grid to show fields ofblobtype, which by default are not shown.
Virtual fields in SQLFORM.grid and smartgrid
In versions of web2py after 2.6, virtual fields are shown in grids like normal fields: either shown alongside all other fields by default, or by including them in the fields argument. However, virtual fields are not sortable.
In older web2py versions, showing virtual fields in a grid requires use of the links argument. This is still supported for more recent versions. If table db.t1 has a field called t1.vfield which is based on the values of t1.field1 and t1.field2, do this:
grid = SQLFORM.grid(db.t1, ..., fields = [t1.field1, t1.field2, ...],
   links = [dict(header='Virtual Field 1', body=lambda row:row.vfield), ...] )
In all cases, because t1.vfield depends on t1.field1 and t1.field2, these fields must be present in the row. In the example above, this is guaranteed by including t1.field1 and t1.field2 in the fields argument. Alternatively, showing all fields will also work. You can suppress a field from displaying by setting the readable attribute to False.
Note that when defining the virtual field, the lambda function must qualify fields with the table name, but in the links argument, this is not necessary. So for the example above, the virtual field may be defined like:
db.define_table('t1', Field('field1', 'string'),
   Field('field2', 'string'),
   Field.Virtual('vfield', lambda row: row.t1.field1 + row.t1.field2),
   ...)
SQLFORM.smartgrid
A SQLFORM.smartgrid looks a lot like a grid, in fact it contains a grid but it is designed to take as input not a query but only one table and to browse said table and selected referencing tables.
For example consider the following table structure:
db.define_table('parent', Field('name'))
db.define_table('child', Field('name'), Field('parent', 'reference parent'))
With SQLFORM.grid you can list all parents:
SQLFORM.grid(db.parent)
all children:
SQLFORM.grid(db.child)
and all parents and children in one table:
SQLFORM.grid(db.parent, left=db.child.on(db.child.parent==db.parent.id))
With SQLFORM.smartgrid you can put all the data in one object that spawns both tables:
@auth.requires_login()
def manage():
    grid = SQLFORM.smartgrid(db.parent, linked_tables=['child'])
    return locals()
which looks like this:
Notice the extra "children" links. One could create the extra links using a regular grid but they would point to a different action. With a smartgrid they are created automatically and handled by the same object.
Also notice that when clicking on the "children" link for a given parent one only gets the list of children for that parent (and that is obvious) but also notice that if one now tried to add a new child, the parent value for the new child is automatically set to the selected parent (displayed in the breadcrumbs associated to the object). The value of this field can be overwritten. We can prevent this by making it readonly:
@auth.requires_login()
def manage():
    db.child.parent.writable = False
    grid = SQLFORM.smartgrid(db.parent, linked_tables=['child'])
    return locals()
If the linked_tables argument is not specified all referencing tables are automatically linked. Anyway, to avoid accidentally exposing data we recommend explicitly listing tables that should be linked.
The following code creates a very powerful management interface for all tables in the system:
@auth.requires_membership('managers')
def manage():
    table = request.args(0) or 'auth_user'
    if not table in db.tables(): redirect(URL('error'))
    grid = SQLFORM.smartgrid(db[table], args=request.args[:1])
    return locals()
smartgrid signature
The smartgrid takes the same arguments as a grid and some more with some caveats:
- The first argument is a table, not a query
- There is an extra argument
constraintswhich is a dictionary of 'tablename':query which can be used to further restrict access to the records displayed in the 'tablename' grid. - There is an extra argument
linked_tableswhich is a list of tablenames of tables that should be accessible via the smartgrid. dividerallows to specify a character to use in the breadcrumb navigator,breadcrumbs_classwill apply the class to the breadcrumb element- All the arguments but the table,
args,linked_tables,links_in_grid, anduser_signaturecan be dictionaries as explained below.
Consider the previous grid:
grid = SQLFORM.smartgrid(db.parent, linked_tables=['child'])
It allows one to access both a db.parent and a db.child. Apart for navigation controls, for each one table, a smartgrid is nothing but a grid. This means that, in this case, one smartgrid can create a grid for parent and one grid for child. We may want to pass different sets of parameters to these grids. For example different sets of searchable parameters.
While for a grid we would pass a boolean:
grid = SQLFORM.grid(db.parent, searchable=True)
For a smartgrid we would pass a dictionary of booleans:
grid = SQLFORM.smartgrid(db.parent, linked_tables=['child'],
     searchable= dict(parent=True, child=False))
In this way we made parents searchable but children for each parent not searchable (there should not be that many to need the search widget).
grid and smartgrid access control
grid and smartgrid do not automatically enforce access control like crud does but you can integrate it with auth using explicit permission checking:
grid = SQLFORM.grid(db.auth_user,
     editable = auth.has_membership('managers'),
     deletable = auth.has_membership('managers'))
or
grid = SQLFORM.grid(db.auth_user,
     editable = auth.has_permission('edit', 'auth_user'),
     deletable = auth.has_permission('delete', 'auth_user'))
smartgrid plurals
The smartgrid is the only object in web2py that displays the table name and it needs both the singular and the plural. For example one parent can have one "Child" or many "Children". Therefore a table object needs to know its own singular and plural names. web2py normally guesses them but you can set them explicitly:
db.define_table('child', ..., singular="Child", plural="Children")
or with:
db.define_table('child', ...)
db.child._singular = "Child"
db.child._plural = "Children"
They should also be internationalized using the T operator.
The plural and singular values are then used by smartgrid to provide correct names for headers and links.